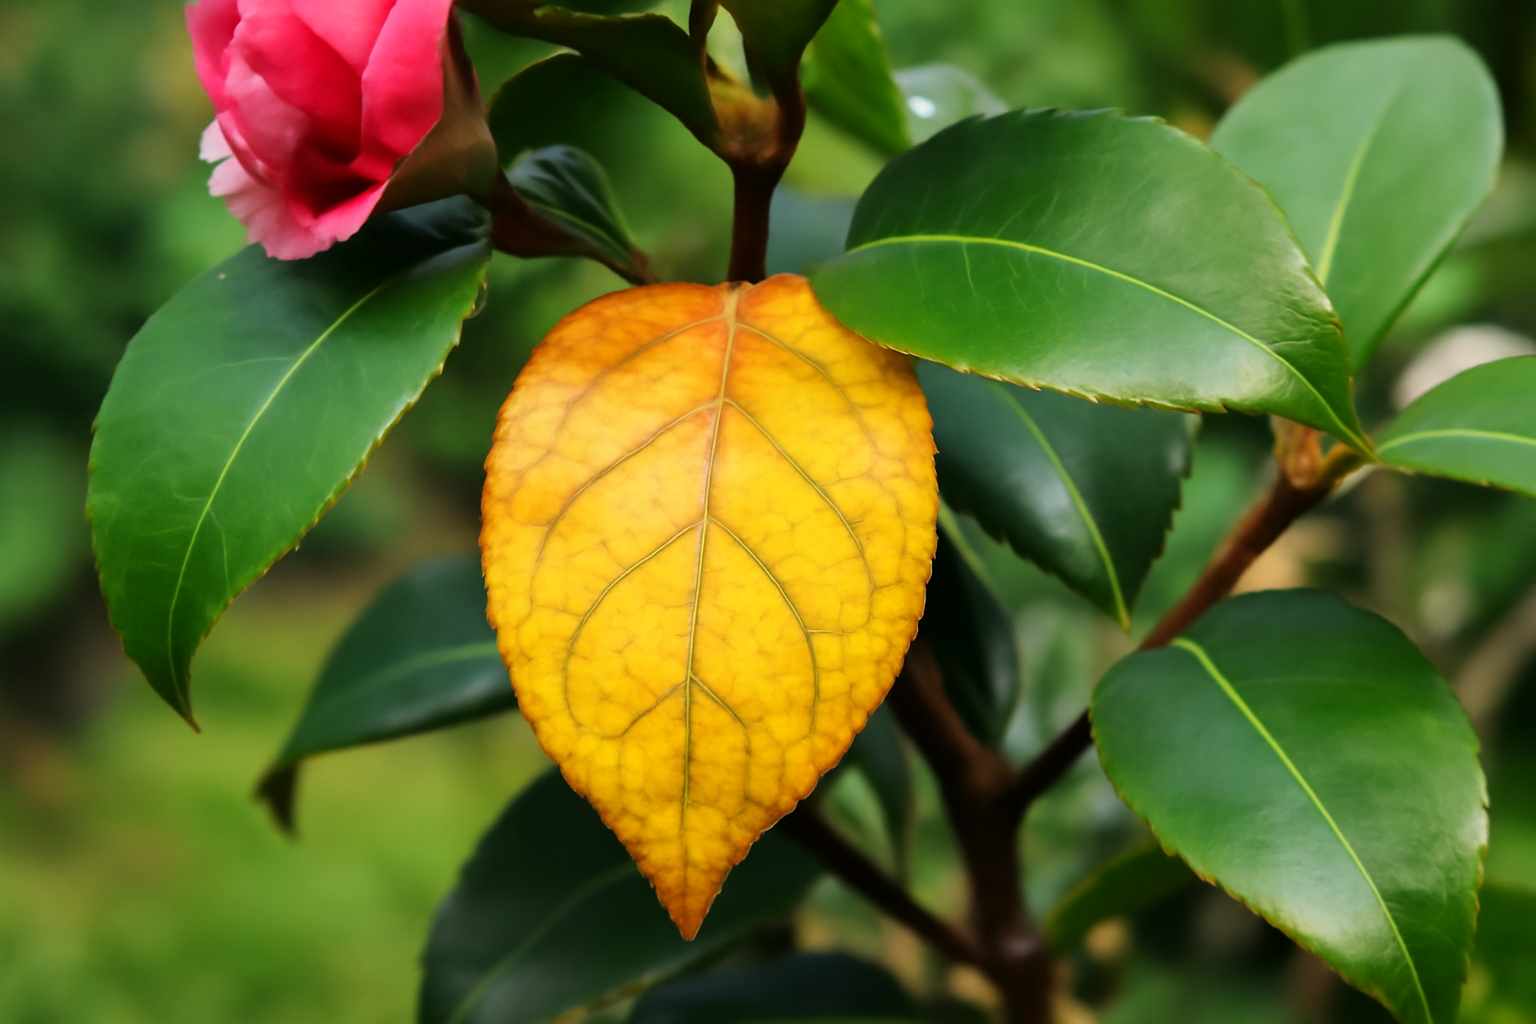
Behind my potting shed sits a narrow bed I’ve never gotten around to naming — just six camellias tucked against a weathered fence, and the anchor of the group is a ‘Donation’ Williamsii hybrid I’ve nursed through six full growing seasons here in my Zone 8a garden. One afternoon I wandered back there with my coffee and nearly dropped the mug. Overnight, it seemed, half its foliage had gone a dull, washed-out yellow. My chest tightened. Yellowing camellia leaves weren’t new to me, but this pace, and this particular plant, rattled me. Within a week I’d tracked down the cause. And here’s the reassuring part: whatever’s turning your camellia’s leaves yellow, there’s almost always a workable fix once you’ve correctly named the problem.
Across two decades of raising camellias — japonicas, sasanquas, reticulatas, and plenty of crosses in between — I’ve run into at least seven separate reasons leaves go yellow. A few demand quick action; others are nothing to lose sleep over. What follows is my rundown of each one, along with what actually worked when I dealt with it myself, plus a concrete next step so you can nurse your plant back to its proper green.
Does Yellowing Always Mean Something’s Wrong?
Not necessarily — and that catches a lot of people off guard. Camellias hold onto their leaves year-round, technically, but they still shed the oldest ones, usually as spring turns into early summer. During this cycle, it’s the innermost, aging leaves that fade to yellow and fall away, while fresh growth emerges at the branch tips.
I watch this play out annually on both my ‘Kramer’s Supreme’ japonica and my ‘Setsugekka’ sasanqua. A scattering of yellow leaves buried inside the plant come May doesn’t worry me one bit. But if the yellowing shows up on tender new shoots, on the outermost leaves, or spreads across the entire shrub, that’s my cue to dig deeper.
7 Reasons Camellia Leaves Go Yellow (And How to Fix Every One)
1. Off-Target Soil pH — The Number One Cause
This is far and away the usual suspect. Camellias belong to the acid-loving crowd, doing best when soil pH sits between 5.5 and 6.5. Once pH climbs past that window, iron and manganese lock up chemically — the plant can’t absorb them, even though they’re sitting right there in the ground. What you end up seeing is interveinal chlorosis: yellow leaf tissue with the veins still tracing green.
I discovered this the painful way with a ‘Nuccio’s Gem’ japonica I’d set too close to a concrete foundation in my Zone 7b garden. Lime seeping out of that concrete nudged the surrounding soil past pH 7.0. The plant limped along looking miserable for two whole growing seasons before I connected the dots.
How to fix it: Test before you treat — skip the guessing game. I send mine off through a basic mail-in kit from my local cooperative extension office. If your results come back high, mix elemental sulfur into the soil out to the drip line. Need results sooner? A chelated iron application, either as a foliar spray or a soil drench, works faster. Going forward, switch to pine bark or pine needle mulch, since both acidify the soil naturally as they decompose.
2. Too Much Water and Root Rot
If yellow leaves show up alongside soft, squishy stems, or the plant looks wilted even though the soil is soaked, root rot is likely the culprit. Phytophthora cinnamomi is the fungus most often responsible, and it flourishes anywhere water sits too long. Camellias like consistent moisture, sure, but drainage matters just as much.
Container plants take the biggest hit in my experience. Years back I lost a ‘Doctor Clifford Parks’ reticulata to root rot simply because its pot had inadequate drainage holes and I stuck to a fixed watering schedule instead of actually checking the soil first.
How to fix it: Allow the soil to dry out a bit between waterings. Press a finger two inches down — if it’s still moist, hold off. In-ground plants benefit from mixing in coarse perlite or pine bark to open up drainage. Once rot has taken hold, pull the plant, cut away any blackened or mushy roots, and get it into fresh, fast-draining mix. A phosphonate drench can also help keep Phytophthora in check.
3. Not Enough Water and Drought Stress
Go the other direction and drought does the same thing — typically starting at the leaf margins and tips, then working its way in. My Zone 8b beds bake under summer sun, and it’s rough on the plants. Sasanquas tolerate it better than japonicas, though even a hardy variety like ‘Yuletide’ will show its displeasure through a long dry stretch.
How to fix it: Favor deep, occasional watering over quick, shallow sips. I shoot for roughly an inch of water weekly during dry weather, delivered slowly right at the root zone. Laying down a 3-inch mulch layer around the base — kept clear of the trunk itself — goes a long way toward holding onto that moisture through the hottest months.
4. Iron Deficiency and Chlorosis
This overlaps with pH trouble but can also show up on its own — say, when a camellia is stuck in dense clay that hampers root activity. The giveaway is vivid yellow leaves crossed by clearly green veins, most noticeable on the newest growth near the branch tips.
I ran into this on a young ‘Midnight Magic’ japonica planted in a clay-dominant corner of my Zone 8a garden. Its spring flush came in nearly lime-colored. That striking green-veins-on-yellow look is the classic signature of iron chlorosis.
How to fix it: Reach for chelated iron — unlike iron sulfate, it stays usable by the roots across a broader pH range. Spraying the foliage gives you a quick visible response, and following that with a soil drench extends the effect. For the long game, build up organic matter to improve soil texture and double-check that your pH lands within that 5.5–6.5 range.
5. Excessive Direct Sunlight
By nature, camellias belong under a forest canopy. Most japonicas and reticulatas want filtered light or morning sun paired with afternoon shade, particularly in hotter regions. Heavy afternoon sun scorches leaves and turns them yellow, frequently paired with a bleached, papery texture.
Sasanquas, on the other hand, shrug off sun much better. My ‘Sparkling Burgundy’ takes full sun in Zone 8b without complaint most of the year. Even she, though, starts looking a little tired once July’s heat peaks if I let her water run low.
How to fix it: A piece of shade cloth offers instant relief during the worst of summer. Looking further ahead, planting a small deciduous tree to the south or west can filter that afternoon glare naturally. You could also just move the plant — more labor, admittedly, but camellias transplant better than most people expect when you’re careful. I’ve relocated mature specimens successfully in late fall.
6. Nitrogen Shortage
When yellowing spreads broadly, starting at the older leaves and creeping toward newer growth, nitrogen deficiency is usually behind it. Unlike iron chlorosis, the whole leaf — veins included — fades to yellow evenly. This tends to follow heavy rainfall washing nutrients out of sandy soil, or simply a few seasons of skipped feeding.
How to fix it: Switch to an acid-based fertilizer formulated for camellias, azaleas, and rhododendrons. I apply a slow-release granular version early in spring, right after my japonicas finish blooming — usually March, in my Zone 8a garden. If you want faster movement, liquid fertilizer will show improvement within a couple of weeks. Just stop feeding once July arrives; fertilizing later than that encourages soft new growth that cold weather will punish.
I go into more depth on scheduling and product picks in my complete camellia fertilizing guide, in case you’d like the fuller breakdown.
7. Insect Damage — Scale Tops the List
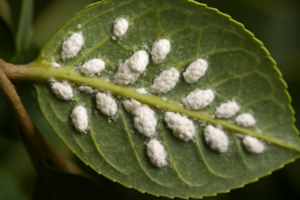
Scale insects operate quietly. They latch onto stems and leaf undersides, draining sap unnoticed until the plant finally shows the strain — typically overall yellowing, a sticky honeydew coating, or sooty mold taking root in that residue. On my japonicas specifically, tea scale is the one I run into most.
Spider mites produce a similar look — mottled, faded yellow — especially when the weather turns hot and dry. Flip a leaf over and check for fine webbing or specks that move; that confirms it.
How to fix it: For scale, I rely on horticultural oil applied in late winter, before new growth breaks — it smothers the insects still overwintering on the plant. Active infestations respond to a summer oil application too, but keep it off the plant above 90°F, or you’ll risk burning the foliage. Spider mites can be knocked back fast with a firm spray of water, repeated every few days. If things are severe, insecticidal soap or a miticide will finish the job.
My Go-To Quick Diagnosis Routine
Before I reach for any product, I run through a short mental checklist. Here’s what it looks like:
- Where’s the yellow showing up? Old leaves near the interior usually just mean natural shedding. Fresh growth at the tips is a bigger flag.
- What shape does the discoloration take? Green veins surrounded by yellow points to an iron or pH problem. Solid, even yellow suggests nitrogen deficiency or too much water.
- What’s happening at soil level? Waterlogged means overwatering or poor drainage. Dry as dust means drought stress.
- What’s hiding on the leaf undersides? Look for scale, mites, or sticky film before jumping to a nutrient diagnosis.
- How long has it been since I last tested my soil? “Never” or “ages ago” means that’s where I start.
Five minutes, tops. It’s saved me hours of guesswork and plenty of wasted money on the wrong remedy.
Knowing When Yellowing Is Urgent — and When It Isn’t
Plenty of yellowing can simply run its course. Spring’s natural leaf drop? Leave it be. A stray yellow leaf or two on an otherwise thriving ‘April Kiss’ or ‘Winter’s Star’ sasanqua? Keep an eye on it for a week before you assume the worst.
That said, yellowing that spreads fast and wide — particularly paired with wilting, brown patches, or visible bugs — calls for immediate action. Root rot especially can take a camellia down quickly if you sit on it. This is not the one to wait out.
In my Zone 7b plantings, I also stay alert for cold injury during late winter, which shows up as yellowing on exposed tips. That’s a completely different situation from a nutrient or pest problem, and the remedy is simply waiting it out — the plant will push new growth once temperatures rebound. I break down cold-weather strategies more fully in my post on protecting camellias in winter.
Wrapping Up: Camellia Leaves Turning Yellow
Of all the questions fellow growers bring to me, yellowing leaves come up constantly — and thankfully, they’re also among the easiest problems to solve. In nearly every case, the plant is pointing you toward a specific cause. Your task is simply to read those signals carefully before reaching for a fix.
Soil pH should be your starting point. In my own garden, it’s caused more grief than any other single factor. A basic soil test runs under ten dollars and gives you actual numbers to act on. From there, review your watering routine, check closely for pests, and consider how much sun the plant is really getting. Move through the list one item at a time.
As for my ‘Donation’ — the one behind the potting shed — the answer turned out to be a one-two punch: creeping pH plus a scale population I hadn’t caught building up all winter. A couple of horticultural oil treatments and a round of soil acidification later, she’s back to her full glossy self. If she could turn it around, there’s a good chance yours will too.
Your action step for today: Step outside, pull a single yellowed leaf off your camellia, and study it up close. Note exactly where the yellowing sits, whether the veins stayed green or faded too, and flip it over to check for pests. That one small inspection will get you closer to the right answer faster than anything else in this post.
About This Article

Written by Helen Pritchard. Helen Pritchard is a lifelong gardener in the Pacific Northwest who has grown more than 200 named camellia cultivars over two decades. She writes practical, experience-based guides to camellia care, from variety selection and pruning to troubleshooting yellowing leaves and bud drop. More about this site.
Verify this against a primary source
Specifics change, and your situation may differ from the one described here. These are the authorities worth checking directly:
- American Camellia Society — cultivar registration and culture guides
- USDA Plant Hardiness Zone Map — zone verification for your location
- Royal Horticultural Society — camellia cultivation and pest guidance