
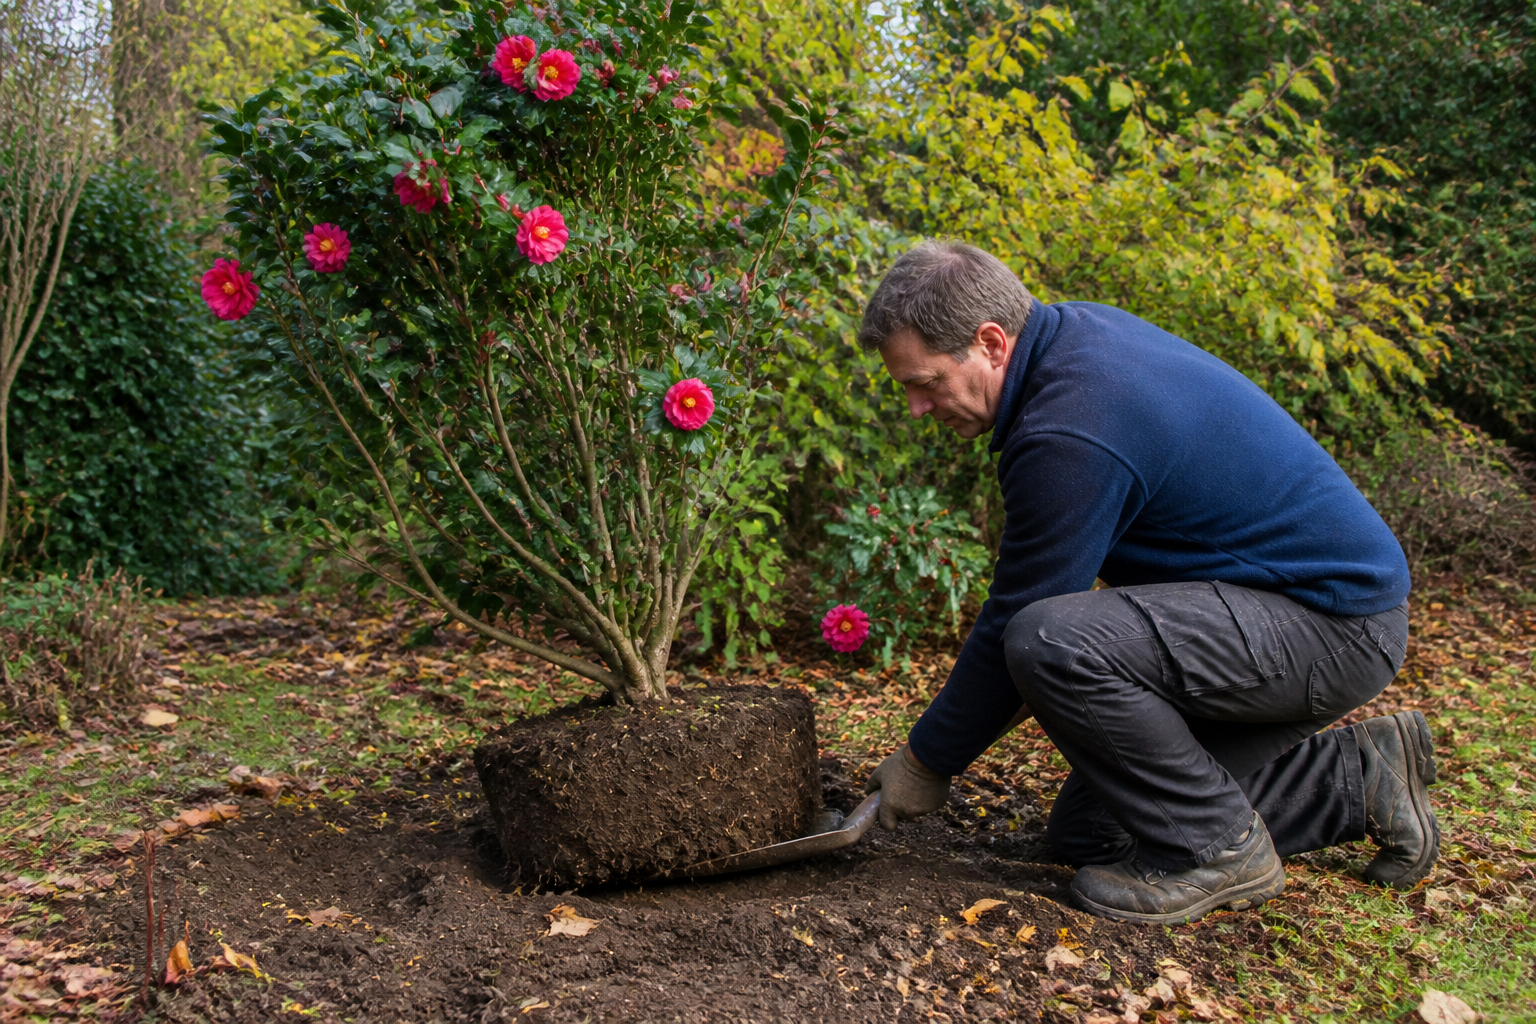
Fifteen years — that’s how long my ‘Donation’ camellia had occupied the same patch of ground before I decided to dig her up and march her clear across the garden. She’d grown into a sprawling four-foot beauty, smothered in crimson blooms, and by the time I made my decision, she was throwing so much shade over my fledgling tea garden that something had to give. I stood there with pruning shears in hand, half-convinced I was about to end a fifteen-year friendship. She didn’t die. Not even close — today she’s flowering more prolifically than she ever did in her old spot. That whole experience taught me something I wish someone had told me back when I was starting out: moving a camellia isn’t just possible — it’s often remarkably forgiving, so long as you understand the mechanics behind it. What follows is everything I’ve picked up about relocating camellias successfully: the timing that matters most, the digging and planting technique that protects the roots, and how to sidestep the shock that trips up so many well-meaning gardeners.
Is Moving a Mature Camellia Actually Realistic?
Without question, yes.
I say this constantly to worried gardeners who assume they’re about to kill their plant. Camellias, unlike many woody ornamentals, grow a dense fibrous root system rather than one deep, brittle taproot that snaps the moment you push a spade near it. That fibrous mat is what saves the day — it holds the rootball together as you dig, giving the plant a genuine shot at settling back in once it’s moved.
I’ve relocated everything from small potted specimens to genuine giants like my ‘Donation’. A friend of mine, Sarah, gardens in zone 8b, and she once moved a hulking 20-year-old ‘Yuletide’ with the help of a mini-digger. It dropped leaves, sure. It sulked through an entire spring. But it’s now thriving and pushing out more blooms than it ever managed in its previous location.
The word that matters here is technique. Relocating a camellia demands patience and a handful of rules you really shouldn’t bend. Skip the proper timing or rush the digging, and you’re asking for trouble. Follow the process, though, and the plant will surprise you with how tough it actually is.
When to Move a Camellia for the Best Odds of Success
Timing decides more of the outcome than almost anything else. Nail this part, and you’ve already won most of the fight.
Autumn: The Prime Window
From what I’ve seen over the years, autumn beats every other season for relocating a camellia. That means October into November, or just after the first frosts if your climate runs mild.
The reasoning is straightforward: the plant is easing into semi-dormancy. Growth has slowed to a crawl, so it isn’t pulling hard on water or stored energy. Meanwhile, the soil is still warm enough for fresh roots to take hold. That gives your camellia the entire winter and early spring stretch to build new roots before summer heat rolls in.
When I relocated ‘Donation’ in late October, she had close to five months to get comfortable before summer arrived. That head start mattered more than I expected. Her roots pushed into the fresh soil during the cool, damp months of autumn and winter, and by April she’d built enough new root mass to handle the warming season without missing a beat.
Early Spring: A Decent Backup Option
Miss the autumn window, and early spring can still work — it’s just a step down. The target here is the short stretch right after flowering wraps up, before new growth starts pushing out.
What’s in its favor? You can actually see the plant’s full shape while it’s dormant-ish, and the fact that it’s waking up can spur root growth along. But the clock is ticking — you’ve got only a handful of weeks before fresh leaves start pulling water and energy that developing roots haven’t yet earned. In my own zone 8a garden, this window is tight — roughly late February through mid-March, at the outside.
Seasons and Situations to Skip
Summer transplanting is off the table entirely. Combine heat stress with active growth, and you’ve got a near-guaranteed failure. Leaves are transpiring hard, roots are scrambling to re-establish, and you’re essentially fighting the season itself. This is the scenario where camellia transplant shock does its worst damage — and where it’s most likely to finish the plant off.
I’d also steer clear of moving a camellia while it’s covered in open flowers. You want all that stored energy going toward root recovery, not toward keeping blooms going. Let the flowers finish, then get to work.
A note for UK readers: gardening across the pond, late autumn and early winter give you an excellent window — your gentler winters actually work in your favor here. Some UK growers have even had luck transplanting during mild January or February spells, provided the ground hasn’t frozen solid.
Getting a Camellia Ready for the Move
This is the stage where most gardeners trip up. I’ve watched people dig into bone-dry soil, only to have the rootball disintegrate before they’ve carried the plant ten feet. Don’t let that be your story.
Step 1: Soak the Ground Two Days Ahead
Two days before your planned move, give the plant a long, deep drink. Really saturate the surrounding soil — you want moisture reaching down a solid 12 inches.
Why the two-day gap? It gives the soil time to firm back up while staying moist throughout. The water has time to spread evenly through the root zone, so when you dig, the soil clings to the roots instead of sifting away. Think of it as the difference between soil that packs together and soil that just crumbles apart in your hands.
Step 2: Cut Back the Top Growth
On mature specimens, I like to trim the canopy back by roughly a third, either just before the move or right after. It’s one of my go-to moves because it directly cuts down on transplant shock.
Here’s the reasoning: while the roots are busy re-establishing in unfamiliar soil, the foliage above is still losing moisture through transpiration. Trim back the leaf mass, and you lower the plant’s overall water demand, easing pressure on roots that are already working overtime. When I pruned ‘Donation’ ahead of her move, she shed noticeably fewer leaves than she would have otherwise.
Make every cut just above a leaf node or branch junction, and use secateurs that are sharp and clean. This isn’t the moment for a dramatic structural overhaul — you’re simply thinning the overall bulk.
How to Dig and Move a Camellia Without Damaging the Roots
Here’s where the physical labor kicks in. Don’t rush it — hurrying is exactly how rootballs fall apart and plants get lost in the process.
The Digging Approach
Begin working a circle around the drip line — roughly where the outermost branches end. That’s where the bulk of the fibrous roots live. Avoid digging right against the trunk; give yourself generous room to maneuver.
Reach for a sharp spade rather than a dull one — a clean cut beats a ragged tear every time. Move steadily around the plant, angling the spade down and under the rootball. You’ll be severing outer roots as you go, which is unavoidable, but do it with a light touch.
Once you’ve circled the whole plant, rock it gently — side to side, then front to back — to feel where it’s still anchored. Keep working underneath until the whole mass feels loose and free. Aim to keep that rootball as large and undisturbed as you can manage.
A young, three-foot camellia is manageable solo. Anything bigger, though, call in help. Moving ‘Donation’ took two of us, and honestly, we were glad for a third pair of hands once it came time to actually shift her.
Cradling the Rootball
Before lifting anything, work a sheet of burlap or tarpaulin underneath the rootball. This keeps everything from crumbling apart and gives you something solid to grip. With ‘Donation’, this step turned out to be non-negotiable — her rootball was far too large and heavy to lift by the trunk, which would’ve snapped the plant in half anyway.
Never, under any circumstance, lift a camellia by its trunk. Doing so risks snapped branches, torn bark, and stress concentrated exactly where the plant can least afford it. Instead, carry the load through the rootball and the base of the plant.
Settling the Camellia Into Its New Spot
You’ve dug it up, carried it across, and now comes the part that matters just as much as everything before it: planting.
Getting the New Hole Ready
Dig a hole that spreads wider than it goes deep. Camellias resist sitting in a narrow, deep pocket — they’d much rather spread out in a shallow, broad space. The hole itself should be just a touch wider than the rootball and roughly matched to its depth.
Here’s the crucial bit: work generous amounts of organic matter into your backfill. My own mix combines native soil with ericaceous, acid-loving-plant compost. Camellias crave acidity and do best in soil sitting between pH 5.0 and 6.5. Skip anything that raises pH, like lime. Gardening on naturally alkaline ground can make things tricky, but leaning on ericaceous compost helps counter that.
My usual ratio runs about 40% ericaceous compost to 60% native soil for backfill. That combination delivers the acidity camellias want while still keeping the soil structurally sound.
Getting the Depth Right
Set the plant at the exact depth it grew before — look for the soil line on the trunk as your reference point. Planting a touch higher is fine, especially in soil that tends to stay wet, but never plant it deeper. Sinking the plant too low is a mistake I’ve watched countless gardeners make, and it’s a fast track to root rot.
Firming the Soil and Mulching
Give the soil a thorough soaking to settle it around the roots — don’t be shy here, since the goal is closing up any air pockets. Follow that with a generous layer of pine bark or another ericaceous mulch, spread 8–10cm deep around the plant. One key detail: keep that mulch clear of the trunk itself. Leaving a 5–10cm gap between mulch and bark wards off rot and unwanted pests.
If the new spot catches wind or sits exposed, stake the plant so it can’t rock. A rootball that keeps shifting won’t manage to grow anchoring roots. One or two soft ties fastened to a sturdy stake usually does the trick.
Transplant Shock: What It Looks Like, How to Dodge It, and How Recovery Unfolds
Let’s address the topic nobody likes bringing up: transplant shock. It’s real, it happens, and your camellia may well go through some version of it. The good news is that it’s entirely manageable once you know the signs.
Recognizing Transplant Shock
The telltale signs surface anywhere from a few weeks to several months after the move. Leaf drop shows up often — try not to panic when it does. Wilting, even in moist soil, means the roots are lagging behind the plant’s water needs. You might also spot yellowing foliage or notice spring arrive without any fresh growth at all.
‘Donation’ shed a substantial number of leaves the spring after her move. She looked genuinely rough for about six weeks straight. But she never fully wilted, and eventually new growth pushed through. That’s a plant working through shock — not a plant on its way out.
Heading Off Transplant Shock Before It Starts
Prevention beats treatment every time. Timing is your first line of defense — planting in autumn slashes the risk considerably. Preserving as much of the rootball as possible matters too; the more root system you keep intact, the more the plant can support itself once it’s in its new home.
Speed matters just as much. Never let a dug-up camellia sit around waiting for days on end. Getting it from old soil to new soil should happen the same day — ideally within a few hours.
Once it’s planted, hold off feeding it for at least six months. Fertilizing a plant that’s still recovering only adds strain to roots that are trying to settle in. What you actually want is steady moisture — never soggy, never bone-dry. This is exactly where autumn-to-winter timing pays off, since natural rainfall usually handles the moisture balance for you without any extra effort.
Here’s the toughest part: waiting it out. A relocated camellia can need a full growing season, sometimes longer, before it looks genuinely content again. Don’t be surprised if it skips flowering entirely that first year — that’s completely normal. It’s channeling energy into rebuilding roots rather than producing blooms, which is exactly the right priority.
Give it until year two, and you should notice a real turnaround. ‘Donation’ was blooming again by her second winter in her new spot, and now she flowers more heavily than she ever did before the move. That’s the payoff for sticking it out.
If your camellia still looks unhappy a few months in, resist the temptation to dig it up again. Give it a full year at minimum. All the real activity is happening underground, out of sight — trust that the process is working even when you can’t see it.
A Real Example: Relocating My Own ‘Donation’
I want to tie everything together with the full story of ‘Donation’, because it shows exactly what’s achievable when you handle a camellia transplant the right way.
She stood fifteen years old, five feet tall, and four feet across when I decided she had to move. My new tea garden needed sunlight, and she was blocking it. I could have simply removed her, but that felt unthinkable — so I committed to relocating her instead.
I held out for late October, just after our first frost. Two days ahead, I gave her a deep soak. I trimmed roughly a third off the canopy to cut down leaf area. Then the digging began — and kept going. The rootball turned out enormous, easily three feet across and two feet deep. I ended up renting a small mini-digger, which made an otherwise brutal job manageable. Without it, I’d have burned through a full day with just a spade.
I slid burlap underneath her and had three of us carefully carry her over. The new hole was ready, loaded with plenty of ericaceous compost. I set her at her original depth, watered her in thoroughly, and mulched around the base. Then all that was left was to wait.
Come spring, she dropped leaves. For roughly six weeks she looked thin and dejected. I kept her watered consistently, skipped fertilizer entirely, and otherwise left her be. By June, fresh growth was showing up. By the following winter, she was flowering again. Now, five years down the line, she’s thriving and blooming more heavily than she ever did before.
Time to Give Your Camellia a New Home
Relocating a camellia is well within reach for any gardener willing to respect the right timing and technique. Whether you’re shifting a young plant or a long-established favorite, you’re now equipped to handle it properly.
My advice: choose your autumn window, prepare with care, and trust in just how resilient camellias really are. Shock may show up. A recovery period is likely. But on the far side of that stretch, you’ll have a plant flourishing in precisely the spot you wanted it all along.
Curious about the root system that makes all of this transplanting possible in the first place? I’ve written a more detailed piece on camellia roots and how they interact with soil health that you might find worth reading.
Go ahead and start planning your move. Your camellia has more resilience in it than you’d guess — I can promise you that.
About This Article

Written by Helen Pritchard. Helen Pritchard is a lifelong gardener in the Pacific Northwest who has grown more than 200 named camellia cultivars over two decades. She writes practical, experience-based guides to camellia care, from variety selection and pruning to troubleshooting yellowing leaves and bud drop. More about this site.
Verify this against a primary source
Specifics change, and your situation may differ from the one described here. These are the authorities worth checking directly:
- American Camellia Society — cultivar registration and culture guides
- USDA Plant Hardiness Zone Map — zone verification for your location
- Royal Horticultural Society — camellia cultivation and pest guidance



