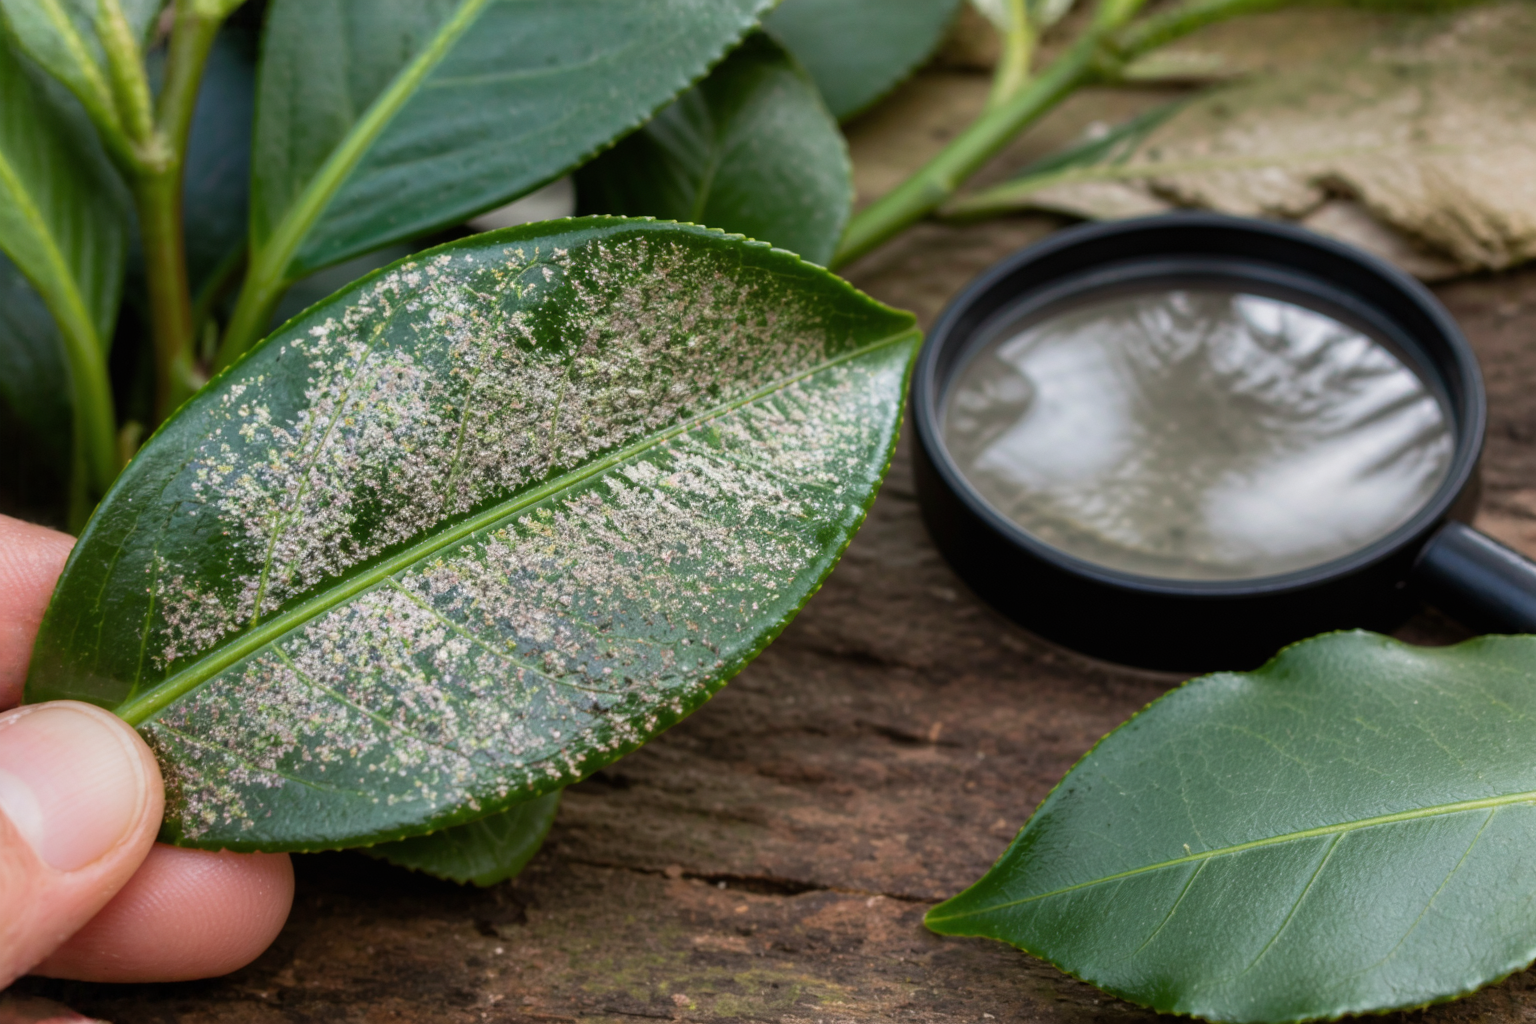

I remember the moment I first spotted something wrong with my Camellia sasanqua ‘Yuletide.’ Tiny silvery patches had appeared on the upper surfaces of several leaves, almost like sunscald. The plant sat in a bright corner of my garden, so I assumed—wrongly—that it was sun damage. I left it alone for three weeks while the stippling spread across half the canopy. When I finally flipped a leaf over and saw the telltale black specks underneath, I realised my mistake: camellia thrips had moved in, and I’d given them a head start.
That experience taught me something valuable. Thrips are easy to overlook and even easier to misdiagnose. But once you know what to look for, they’re manageable. In this guide, I’ll walk you through camellia thrips identification, the specific damage they cause, and the treatment methods that have worked best across my collection of 200+ cultivars.
What Are Camellia Thrips?
Camellia thrips are tiny, slender insects measuring just 1–2 millimetres long. You won’t spot them easily with your naked eye. Most thrips that damage camellias in cultivation belong to one of two species: Heliothrips haemorrhoidalis (greenhouse thrips) or Cuban laurel thrips. Both are sap-feeders that puncture plant tissue and extract fluids.
Here’s the frustrating part: the thrips themselves are far harder to see than the damage they leave behind. Adults range from yellow-brown to nearly black, depending on the species and light. They favour warm, sheltered growing conditions—which is exactly why they thrive in mild climates and greenhouse settings.
If you suspect thrips but can’t see them, try this simple trick. Place a white sheet of paper or white card directly under a suspect leaf, then tap the leaf sharply. Any thrips feeding on the underside will drop onto the paper, where they’re suddenly visible. It’s a bit like a shake-and-reveal game, but it works. I’ve used this method dozens of times to confirm an infestation before committing to a treatment plan.
How to Identify Thrips Damage on Leaves
Leaf damage is where thrips make themselves known. The classic signature is a silvery or bronze stippling across the upper leaf surface. This damage often begins along the midrib and spreads outward as the infestation grows.
But here’s the diagnostic giveaway: flip the leaf over. On the undersides of infested leaves, you’ll see tiny black specks that look like varnish or flecks of tar. These specks are thrips droppings (faeces), and their presence combined with the silvering above is the gold standard for camellia thrips identification.
This combination—silvery upper surface plus black specks underneath—is what sets thrips damage apart from other issues. Scale insects, for example, leave visible bumps or shells on leaves. Spider mites cause finer stippling and often web. Petal blight spreads as soft, mushy brown patches, not streaks. Knowing this distinction has saved me countless hours of misdiagnosis.
In my experience, damage appears first on younger, more tender foliage. Mature, hardened leaves resist thrips feeding. That’s why you’ll often notice the earliest signs on new spring growth or on the softer emerging leaves at the branch tips.
How to Identify Thrips Damage on Flowers
Flower damage from thrips looks distinctly different from leaf stippling. You’ll see brown streaking or discoloured blotches across the petals. On white and pale cultivars—like my beloved Camellia japonica ‘Nuccio’s Gem’—this damage is particularly obvious and frustrating.
The streaks are often irregular and patchy rather than uniform. Petal edges may turn brown or become distorted. At first glance, this can look like petal blight. However, thrips damage is streaky and confined to the areas where thrips have fed, whereas true blight spreads as a soft, spreading brown rot. That distinction matters for treatment decisions.
Newly opened buds are particularly vulnerable. If thrips are active during bud development, you may see distorted, curled, or stunted new leaves when those buds finally break. The damage happens hidden inside the bud scales, where thrips like to hide and feed undisturbed.
Why Thrips Are Easy to Miss (and Why They Spread Fast)
Thrips are master hiders. They shelter on leaf undersides, nestle between bud scales, and burrow into soil and fallen leaf litter. This hiding habit means light infestations can go unnoticed until damage is already widespread.
Population explosions happen quickly in warm, dry conditions. Thrips reproduce rapidly, with multiple generations per year in mild climates. In my Zone 8a garden, thrips populations peak in late spring and early autumn when temperatures are warm but humidity is relatively low.
That’s why early detection matters. The longer you wait before spotting them, the harder they are to control. A handful of thrips in March can become hundreds by June if left unchecked. I’ve learned this lesson repeatedly, and it’s why I now check my young camellia growth weekly during the warm months.
How to Treat Camellia Thrips
Treatment for camellia thrips works best as a staged approach. Start with the gentlest options and escalate only if early interventions aren’t slowing the infestation. I’ve found this method reduces unnecessary chemical use while still protecting my plants.
Monitoring and Cultural Control
Before you reach for any spray, set up a monitoring system. Hang blue or yellow sticky traps in the camellia canopy. These traps catch adult thrips as they move between plants and give you an early warning before damage spirals.
Once you’ve confirmed thrips are present, start with cultural control. Remove and destroy heavily infested leaves and flowers. Don’t compost them—put them in the trash. Clear fallen leaf litter and debris around the base of affected plants, as thrips overwinter in this material. In my garden, a thorough autumn cleanup reduces spring thrips pressure significantly.
Fertilisation habits matter too. Excess nitrogen promotes soft, tender new growth that thrips adore. I’m careful to use a balanced camellia fertiliser and avoid high-nitrogen products during the warm months when thrips are active.
Organic and Biological Options
For mild infestations, insecticidal soap or horticultural oil work well. Spray these directly onto the leaf undersides and along branch tips where thrips hide. Repeat applications every 7–10 days for two to three weeks. Early intervention with soap often stops the problem before it requires stronger measures.
Biological control is another path. Predatory mites and minute pirate bugs eat thrips at all life stages. If you use these natural enemies, avoid broad-spectrum sprays that kill them too. That’s a trap I fell into years ago—I sprayed my ‘Yuletide’ with an insecticide and wiped out the natural predators along with the thrips, leading to a rebound infestation weeks later.
Let natural predators do the work when possible. It takes longer than a chemical spray, but the results are more stable long-term. I’ve had good success introducing predatory mites into my greenhouse where thrips historically recur.
Spinosad and Chemical Options for Heavier Infestations
When organic sprays aren’t cutting it, spinosad is my go-to option. This naturally derived insecticide comes from soil bacteria and is effective against thrips at all life stages. It’s less toxic than broad-spectrum synthetics, but it’s still potent.
Always spray in the evening when pollinators are inactive. Apply spinosad to both leaf surfaces and branch tips, targeting the areas where thrips hide. Two to three applications spaced 7–10 days apart usually resolve moderate infestations in my experience.
For severe, repeated infestations, systemic or stronger chemical options exist. However, I reserve these for last-resort situations. Timing matters: spray after bloom when possible to minimise pollinator exposure. If you do go this route, follow label directions carefully and consider consulting your local cooperative extension office for guidance specific to your region.
How Thrips Compare to Other Camellia Pests
Camellias face other pests and diseases beyond thrips. Scale insects, aphids, and petal blight are common issues I manage alongside thrip pressure. Each requires a different approach.
Scale leaves visible, waxy bumps or shells on stems and leaves. Thrips damage looks like stippling or streaking. Aphids cluster visibly and often produce honeydew (sticky residue). If you see all three names but aren’t sure which pest you’re facing, the leaf-flipping trick and a white paper tap will confirm thrips. For more on these other issues, check out our guides to camellia pests and camellia petal blight on the site.
That said, thrips are almost never life-threatening to a camellia on their own. The damage is primarily cosmetic. However, repeated heavy infestations do weaken the plant over time by reducing its ability to photosynthesize. Prevention and early action keep this from becoming a chronic problem.
Your Prevention-First Approach
The best thrips management is prevention. Monitor regularly during warm months. Keep fallen leaves cleared. Avoid excessive nitrogen fertiliser. Remove and isolate any new plants before introducing them to your garden—thrips hitch rides on nursery stock all the time.
My sunscald misdiagnosis was humbling, but it taught me something lasting: if a camellia shows unusual leaf damage, check the undersides first. Look for those telltale black specks. Camellia thrips are manageable when caught early. And once you know what to look for, you’ll catch them far sooner than I did with my ‘Yuletide.’
Visit your camellias weekly during spring and autumn. Use a white paper tap if you’re unsure. Treat early with soap or oil if you find thrips. This simple, proactive routine has kept my collection of 200+ cultivars thriving for over two decades, and it can work for your garden too.
—