
Hi there! I’m Helen Pritchard, and I’ve spent over two decades nurturing camellias in my garden here in the beautiful Pacific Northwest. With more than 200 named cultivars under my belt, including favorites like ‘Donation’, ‘Brushfield’s Yellow’, and ‘Nicky Crisp’, I’ve learned a thing or two about what makes these stunning plants tick. Growing camellias has been an adventure filled with both triumphs and failures. I remember when I first tried to propagate my beloved ‘Donation’ — it was a nerve-wracking experience that taught me so much. My goal is to share practical, experience-based guides that help fellow camellia enthusiasts navigate their gardening journeys with confidence.
When it comes to propagating camellias, the debate over methods can get quite lively. You’ll hear conflicting advice: some say to snip a stem and root it in a jar of water, while others swear by more established techniques. I learned early on that the water-jar trick is a gamble that rarely pays off. Roots that form underwater develop differently from those in soil, making it tough for your plant to adapt later on. My journey took a significant turn when I finally gained the courage to air layer my ‘Donation’ camellia, which had been a cherished part of my garden for nearly fifteen years. Its stunning pink semi-double blooms brought joy each spring, and many visitors would ask if they could take a piece home. I hesitated out of fear of damaging such a beloved plant, but air layering changed everything for me.
Within just three months, I had a fully rooted plant ready for potting, and I was genuinely taken aback by the success. Since then, I’ve air-layered many of my named cultivars — including ‘Nicky Crisp’ and ‘Brushfield’s Yellow’ — making it my go-to propagation method. If you want to preserve your prized varieties true-to-type, air layering is the way to go. It’s reliable, forgiving to beginners, and honestly, watching it work feels like a bit of magic.
Why Air Layering Beats Every Other Propagation Method
Let’s dive into why air layering stands out among propagation methods. Camellias are notoriously tricky when it comes to cuttings. I’ve experienced this firsthand; semi-hardwood cuttings only root about 40–60% of the time, even with the best conditions like bottom heat and misting. Many wilt away, while others form a callus but never produce roots. It can be a frustrating way to spend a season.
In contrast, air layering flips the odds in our favor. Over my years of gardening across three different climate zones, I’ve seen success rates soar to 80–90%. The reason is simple: the branch remains attached to its parent during the rooting process. It continues to draw nutrients and moisture, avoiding the physiological shock that often dooms standalone cuttings.
Another critical advantage is genetic accuracy. Anything propagated from a vegetative piece is a genetic duplicate of the parent plant. This is particularly important for named cultivars. If you were to grow ‘Donation’ from seed, you might end up with unpredictable results like pink, white, or streaked blooms. However, an air-layered ‘Donation’ guarantees you’ll get the same glorious flowers as the original. While seed propagation might be cheaper and less labor-intensive, it doesn’t help preserve the cultivar’s identity. Air layering, on the other hand, allows you to replicate everything you love about that plant.
The Right Season for Air Layering Camellias
Timing is everything when it comes to air layering. I typically do mine between late spring and early summer — around late May to June here in the Pacific Northwest. This is when the growth is in full swing, and the sap is flowing freely through the plant.
During this period, the cambium — that thin layer responsible for new growth — is most responsive and primed to produce roots quickly. Attempting air layering in autumn or winter is mostly a waste of time, as the plant has slowed down or gone dormant, which can lead to longer rooting times or outright failure.
For those in warmer zones (8 and up), you might push the envelope a bit, even into July or August. But if you’re in a cooler zone like mine, stick to late May or June. This timing gives your newly rooted plant enough opportunity to establish before winter sets in.
Gathering Your Tools and Supplies
You don’t need much to get started with air layering, but the quality of your tools matters. A dull blade can bruise bark instead of slicing it cleanly, inviting disease. Here’s the kit I rely on:
- A clean, properly sharpened knife — I usually use a small pruning knife or a craft blade. Make sure to sanitize it with rubbing alcohol or briefly pass it through a flame before use.
- Rooting hormone powder that contains IBA (indole-3-butyric acid). My favorites are Dip’N’Grow or Rootone, but a liquid IBA formulation works well too.
- Sphagnum moss, either dried or living. I soak it thoroughly and then squeeze it firmly until it’s damp, not dripping.
- Clear plastic wrap or transparent bags — clarity is key here, as you need to monitor root growth without unwrapping.
- Grafting tape or electrical tape to seal everything securely.
That’s really all there is to it! I keep everything organized in a small box beside my potting bench — simple but effective.
Air Layering a Camellia: The Full Process
Now let’s get into the nitty-gritty of the air layering process. I’ll walk you through it stage by stage, and if you follow along closely, there’s minimal room for error. This method has worked reliably for me with ‘Donation’, ‘Brushfield’s Yellow’, ‘Nicky Crisp’, and many more.
Getting the Branch Ready (Steps 1–4)
Step 1: Choose your branch. Look for a branch that’s roughly pencil-thick, either from this year’s growth or last year’s stems. Avoid anything too young and tender or old and woody. Mid-age growth works best — it should have a bit of flexibility without snapping. My ‘Donation’ branches typically measure around 30–50 cm in length.
Step 2: Strip the leaves. Remove every leaf along the lower 10–15 cm of the branch, but leave the foliage above intact. Those upper leaves will be the future plant’s powerhouse, photosynthesizing and feeding the area where roots will form. It’s the bare stem below that will do all the hard work.
Step 3: Cut the girdle. With your sharpened knife, make two clean rings through the bark down to the wood, leaving a 3–4 cm gap between them. Everything within that gap — the “girdle” — needs to be completely removed. Don’t rush this part. If you leave any bark behind, it will heal over and prevent root formation.
I learned this the hard way during my first attempt with ‘Brushfield’s Yellow’. I was too gentle, leaving thin strips of bark intact, which led to no roots at all. The cambium never triggered root development, and I had to wait another year to try again.
Step 4: Scrape away the cambium. This is where precision is key. The freshly exposed wood will have a slick greenish film — that’s the cambium layer. Gently scrape it away with the flat edge of your knife, going all the way around the stem. Avoid gouging into the wood; you only want to remove the cambium. Skipping this step can lead to just a callus forming instead of roots, and in my experience, this detail makes the biggest difference in overall success.
Building the Moss Pack and Sealing It (Steps 5–8)
Step 5: Dust on the rooting hormone. Generously coat the exposed wood with IBA rooting powder, or paint it on if you’re using a liquid. This signals the plant to start producing roots right at the wound. Don’t be shy with the amount — a heavy coating won’t harm the plant.
Step 6: Build the moss ball. This step requires precision: the moss should be damp but not soggy. I soak a handful of sphagnum moss, then wring it out until it’s barely dripping. Mold this around the wound and girdle to form a ball roughly the size of a cricket ball, or a bit larger if you prefer. Think of the moss as a reservoir — it keeps the wound evenly moist while allowing air to circulate.
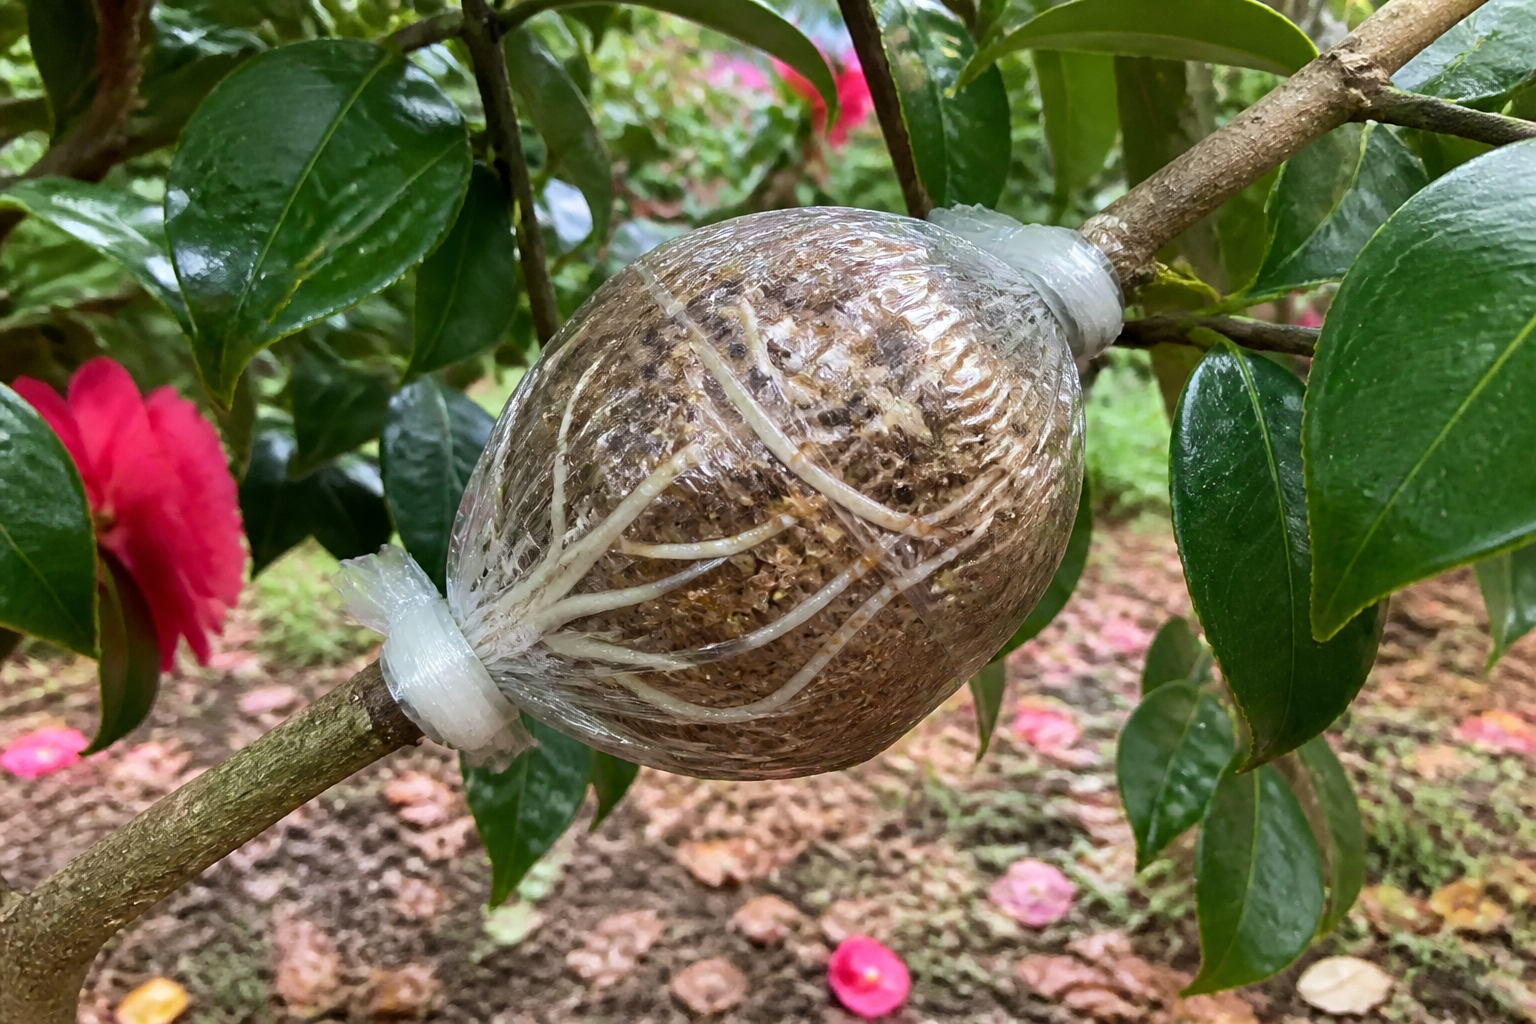
Step 7: Seal it in clear plastic. Wrap the moss ball in a sheet of clear plastic or a transparent bag, pulling it tight to eliminate any air pockets. Fold the excess plastic over both the top and bottom, sealing each end firmly with grafting or electrical tape. You’ve created a humidity chamber, and any roots that form will be visible through the clear plastic.
Using clear plastic is essential; it allows you to check progress without unwrapping the layer. An opaque covering would leave you guessing — you might miss roots forming and either let it rot or cut it too soon.
Step 8: Sit tight. Patience is key now. Roots generally show up anywhere between 8–12 weeks into the growing season. I check on mine every couple of weeks, gently squeezing the plastic to feel for firmness — a good sign that roots are forming — and looking for white roots through the wrap.
Cutting Free and Potting On (Steps 9–10)
Step 9: Recognize when it’s ready to cut. Once you see real white roots measuring 2–3 cm — not just callus tissue, but actual roots with visible tips — it’s time to sever the branch. Resist the temptation to jump the gun. Cutting too early leaves your new plant relying on roots that are too fragile to support it. Wait for roots that are substantial and well-formed.
Using your clean, sharpened knife, make a confident cut just below the moss ball. That motion officially separates your new plant from its parent.
Step 10: Pot it up thoughtfully. Remove the plastic wrap, but keep the sphagnum moss intact around the roots — don’t rinse it off or disturb it. That moss is now the plant’s growing medium, and the roots have adapted to it. Place the whole bundle — roots, moss, everything — directly into a pot filled with lime-free, ericaceous compost, ideally about 4–5 inches (10–13 cm) across.
Water it gently and set the pot in a bright spot, away from direct sunlight. Keep the compost damp but not soggy for the next 4–6 weeks. This is a critical establishment phase where the plant learns to function on its own. Shield it from harsh sun and drying winds while it settles in.
Once you notice fresh growth appearing after that 4–6 week period, you’re in the clear. Start easing it into more light gradually and treat it like any other established young plant.
Where Air Layers Go Wrong — and How to Fix It
Even with my years of experience, I still occasionally lose a layer. I’ve traced nearly every failure back to one of three common mistakes.
Slip-up One: Leaving bark or cambium behind. If the bark ring isn’t stripped completely or the cambium scrape is insufficient, the wound heals back up without ever rooting. The plant effectively closes itself off and refuses to cooperate. The fix is straightforward: be thorough. Strip every scrap of bark and scrape the cambium layer properly. If you’re unsure, scrape it again.
Slip-up Two: Getting the moss moisture wrong. Too much moisture invites rot, while dry moss can’t support root formation. Aim for the texture of a well-wrung sponge — damp throughout with no pooling water. Check on it occasionally; if heavy rain has soaked the plastic, gently squeeze out the excess, and if the moss feels parched, open a small corner and mist it lightly.
Slip-up Three: Severing the branch too early. I’ve done this myself before. A few pale tips appear (often just callus, not real roots), and it’s tempting to cut right away. But two weeks later, the fledgling plant collapses because the roots weren’t developed enough. Wait for roots measuring at least 2–3 cm — that extra week or two of patience pays off.
Propagating Camellias by Cuttings — A Backup Option
Sometimes air layering isn’t an option — perhaps the branch you want is too high to reach, or you’re dealing with a dwarf variety whose stems are too thin. In these cases, semi-hardwood cuttings can serve as a backup method, though success rates are lower than with air layering.
Best timing for cuttings: Late summer to early autumn — think August to September — is the ideal window. By then, new growth has matured somewhat but hasn’t turned fully woody yet.
Taking the cutting: Select a vigorous, healthy shoot tip and slice cleanly just below a leaf node, taking roughly 10–15 cm of the stem. Remove the lower leaves, leaving the top two or three intact. Dip the cut end into standard-strength IBA rooting powder (0.3–0.8%) — not the concentrated version meant for hardwood.
Choosing a rooting medium: Insert the cuttings into a mix of 50% perlite and grit, or use bark chips if you prefer. This combo drains quickly to prevent rot while retaining moisture. Water thoroughly, then cover with clear polythene or place them in a propagator. Setting bottom heat to 18–21°C (64–70°F) noticeably improves your odds.
Expect rooting to take about 10–14 weeks. Once you see roots poking through the drainage holes, pot the cutting into ericaceous compost and follow the same aftercare outlined earlier. Success rates for cuttings hover around 40–60%, compared to 80–90% with air layering — still a valid method, just less efficient.
On the subject of water rooting: I’ve come across various suggestions to root camellia cuttings in water. Honestly, don’t bother. Roots developed underwater differ from those grown in soil, and when you eventually pot them, they often struggle to adapt. The success rate is genuinely poor. Stick with a proper solid medium — like perlite, grit, or bark — and your success will improve significantly.
Closing Thoughts: Multiplying Your Camellias for Free
Learning to air layer camellias transformed how I expand my collection. Instead of continually purchasing new varieties — which can get expensive — I now create more of what I adore. That ‘Donation’ I first layered all those years ago has produced five offspring scattered across friends’ gardens, and my ‘Brushfield’s Yellow’ now thrives in three different gardens beyond my own.
What makes air layering so appealing is its low-stakes nature. You’re not gambling with a severed cutting that might die on you; instead, you’re nurturing a branch to root while it’s still connected to its food supply. With success rates between 80–90%, disappointment is quite rare.
If there’s a camellia cultivar you can’t get enough of — whether it’s ‘Nicky Crisp’, ‘Donation’, ‘Brushfield’s Yellow’, or any other cherished plant — air layering is how you multiply your favorites. Select a healthy branch in late May or June, follow the steps closely, and by early autumn, you’ll have a rooted plant ready for its own pot.
Start small. One branch. One layer. Witness it take root, and you’ll understand why I’ve remained loyal to this method for so long. Happy propagating!
About This Article

Written by Helen Pritchard. Helen Pritchard is a lifelong gardener in the Pacific Northwest who has grown more than 200 named camellia cultivars over two decades. She writes practical, experience-based guides to camellia care, from variety selection and pruning to troubleshooting yellowing leaves and bud drop. More about this site.
Verify this against a primary source
Specifics change, and your situation may differ from the one described here. These are the authorities worth checking directly:
- American Camellia Society — cultivar registration and culture guides
- USDA Plant Hardiness Zone Map — zone verification for your location
- Royal Horticultural Society — camellia cultivation and pest guidance



