
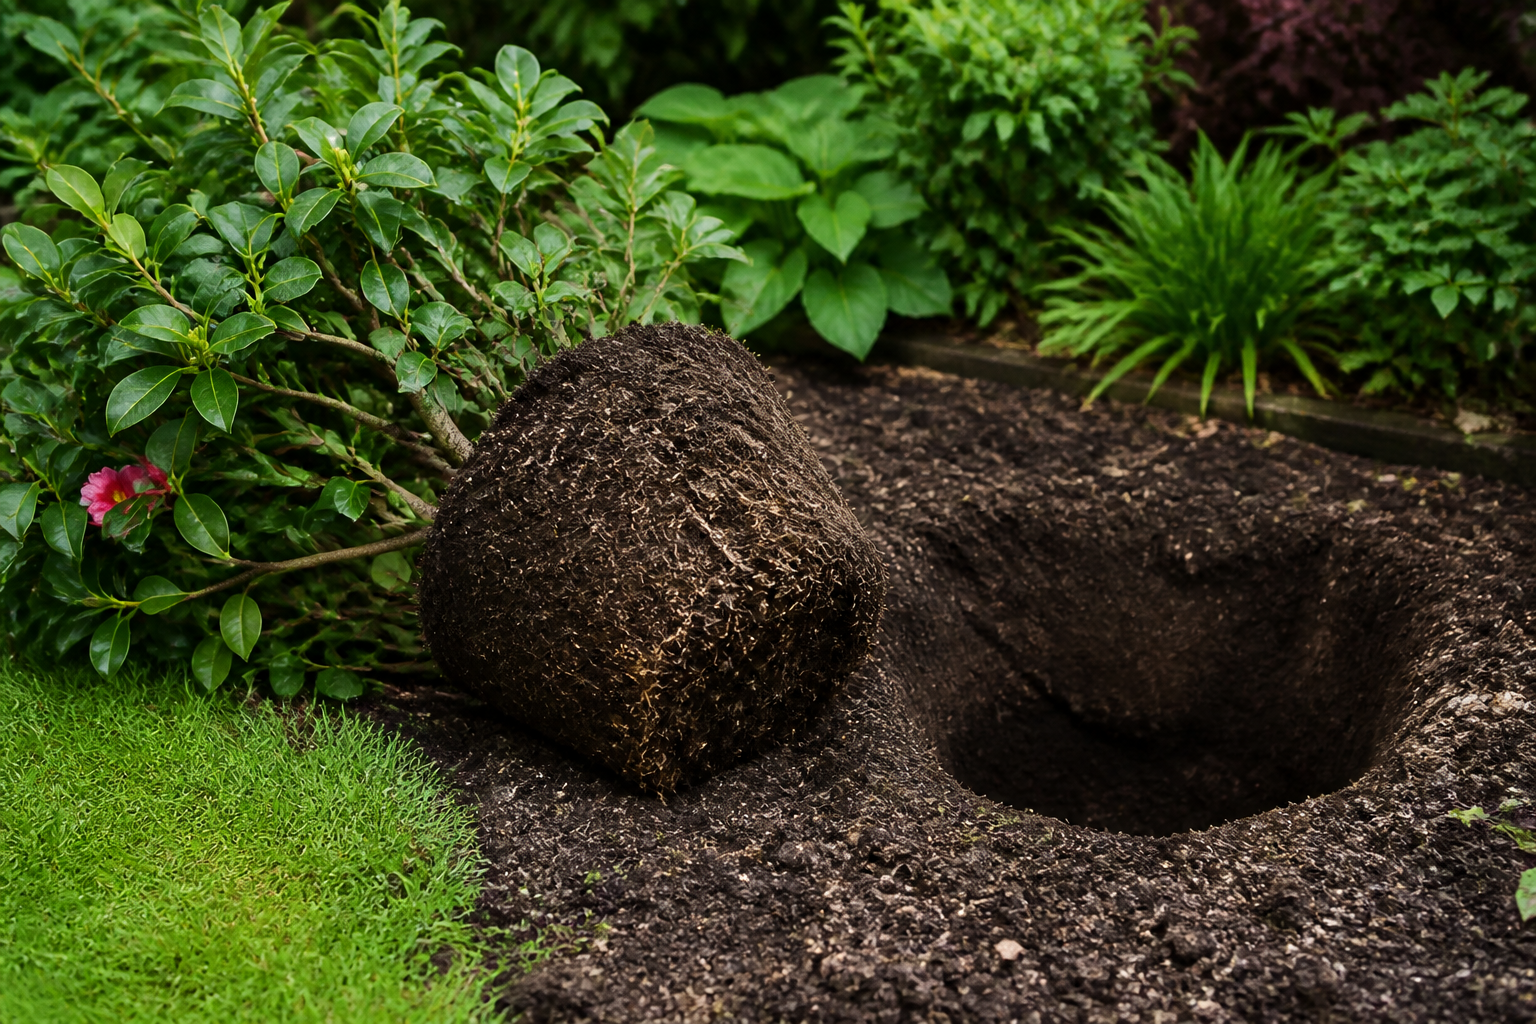
A late-February hard freeze dipped into the low twenties here in my zone 8a garden a few years back, and it pushed me to dig up and relocate a ten-year-old Camellia japonica ‘Elegans’ that had been sitting in a spot suddenly too exposed to the wind. Sliding the root ball free of its planting hole, I found what I’ve encountered more times than I can count, yet it still catches my attention every single time. There was no deep-plunging root like you’d find on an oak or dogwood—just a dense, shallow mat of fine, thread-like roots packed into roughly the top twelve inches of soil. Teasing them apart with my fingers, they fanned out like delicate lacework, wide rather than deep. That moment reminded me that the camellia root system isn’t some dry botanical footnote—it dictates how you plant, where you’re allowed to dig, what kind of mulch you lay down, and ultimately whether a hedge thrives or limps along. Two decades of growing camellias across three different USDA zones has taught me that this root architecture is really the master key to fewer disasters and stronger plants.
The Root Architecture of a Camellia, Explained
Camellias grow on a fibrous root network rather than a taproot—and that fact carries both a blessing and a catch.
So what does “fibrous” actually mean here? Rather than sending down one dominant root like a carrot, camellias branch out into a dense web of fine, hair-thin roots that fork over and over. Picture a mop head instead of a taproot vegetable. These slender roots excel at pulling in moisture and nutrients across a broad but shallow band of soil.
This kind of root structure pays off in real ways. Camellias transplant with remarkable ease because that root ball stays intact—there’s no snapping or tearing the way you’d get with a taproot species. I’ve relocated camellias at fifteen, twenty, even twenty-five years of age and had every one of them pull through. This same fibrous habit also means camellias won’t wreak havoc on nearby foundations, patios, or drainage lines. No cracked concrete, no punctured water pipes waiting to surprise you.
But there’s a trade-off. Because these roots stay near the surface, they’re fragile. They dehydrate fast. Turn a shovel deep near an established camellia and you’ll slice right through them. And soggy, waterlogged ground? That’s about the worst thing you can hand them.
Camellia japonica and C. sasanqua both follow this same fibrous blueprint. Call your plant a “camellia bush” or a “camellia tree”—it makes no difference; the root system underneath is identical. The mixed terminology just comes from the fact that pruning style and age push some camellias toward a shrub form and others toward a small tree shape. The roots themselves never notice the label. What matters to them is what’s happening in the soil.
Just How Deep Do These Roots Reach?
Here’s the straightforward version: most camellia roots cluster within the top 8 to 18 inches of soil. Under near-perfect conditions—loose, quick-draining ground—they might push down to 24 inches. That’s the outlier, though, not the norm.
Where’s the real feeding activity concentrated? Between eight and twelve inches down. That narrow band is where the plant pulls its water and nutrients from—it’s the true operational zone of the camellia root system.
I picked up this lesson the painful way roughly fifteen years back. I was getting a bed ready for a new C. japonica ‘Professor C. S. Sargent’—a stunning red double I’d been chasing for a while. Full of enthusiasm, I dug the whole bed nearly two feet deep with a spade, convinced I was building the perfect root environment.
The plant went in without a hitch, and the first year passed uneventfully. Come year two, though, I started noticing wilting during hot stretches despite plenty of rain. By year three, leaves were dropping. What had gone wrong? I’d made the deep soil too loose and airy, and that had lured the roots downward, pulling them away from the moisture-rich upper layers where camellias naturally prefer to live. Essentially, I’d cut them off from steady rainfall and left them more exposed to drought.
These days, I only work the top 8 to 12 inches thoroughly and leave everything below that mostly undisturbed. The difference is noticeable. Camellias want their roots shallow and concentrated—so the smart move is to cooperate with that instinct, not fight it.
How Wide Does the Root Zone Extend?
Here’s the part that surprises people: camellia roots travel a long way sideways. On a mature plant, expect the roots to stretch out to somewhere between 1.5 and 2 times the width of the canopy above.
Take a camellia whose branches reach 6 feet out from the trunk in every direction—its roots are probably extending 9 to 12 feet. That number matters enormously when you’re figuring out where to place companion plants, how much room a screen needs, or whether it’s safe to dig near a mature specimen.
I’ve got a ‘Nuccio’s Gem’ in my garden that’s probably hit the thirty-year mark by now, with a canopy roughly 10 feet across. Last year, while trenching in an irrigation line about 8 feet out from the trunk, I sliced through what felt like an endless tangle of fine roots—every push of the digging fork caught another hair-thin strand, almost like cutting through mesh fabric. The following summer, that camellia showed some yellowing leaves, stress-related, even though watering had been consistent. Those severed roots weren’t its sole support system, but losing them clearly took a toll.
This wide-reaching root habit is exactly why spacing matters so much for hedges and privacy screens. It’s also why tucking shade-loving plants beneath a mature camellia rarely works out—that root mat competes hard for every drop of water and every nutrient.
The Consequences of Shallow Roots: Mulch, Digging, and Soil Chemistry
Once you grasp how the camellia root system behaves, three practices become essential: proper mulching, careful digging habits, and managing soil pH.
Steer Clear of Deep Digging Around Mature Plants
I really can’t stress this enough. Since active roots sit anywhere from 8 to 18 inches below the surface, deep cultivation is essentially a death sentence for them. Push a spade or fork 12 inches into the ground near an established camellia’s base and you’re cutting straight through roots that are actively feeding the plant.
That’s exactly why I’ve stopped cultivating the soil around any of my camellias—not even a light pass. I hand-pull weeds right at the surface and let mulch do the heavy lifting. Mulch essentially does double duty: it protects the root system and it keeps me (and anyone else) from being tempted to dig nearby.
Mulch Isn’t Optional
A layer of aged pine bark or shredded hardwood, three to four inches deep, shields those vulnerable shallow roots. It moderates soil temperature, holds onto moisture, and discourages anyone from poking around near the base. In my own zone 8a garden, a solid mulch layer smooths out the harsh winter temperature swings that otherwise stress shallow-rooted plants like these.
Leave a gap of 2 to 3 inches between the mulch and the trunk itself. Piling mulch right up against the stem invites rot and pest trouble. Outside that buffer zone, though, mulch generously.
Soil pH Directly Shapes Root Performance
Those fine fibrous camellia roots are calibrated for mildly acidic soil, somewhere in the 5.5 to 6.5 pH range. This isn’t a nice-to-have—it’s essential for the roots to actually access nutrients.
Once soil pH climbs above 7.0 into alkaline territory, iron and manganese essentially become chemically locked in place. It doesn’t matter how much of either nutrient is present in the soil—the roots simply can’t reach it. The telltale sign is interveinal chlorosis: leaves turning yellow while the veins stay stubbornly green. I run into this constantly with camellias planted in lime-heavy or dense clay soils that were never amended.
If your soil leans alkaline, work in sulfur or aluminum sulfate to bring the pH down, and test the soil before you ever plant. Camellias planted in naturally acidic ground practically take care of themselves. Camellias battling alkaline soil, on the other hand, struggle no matter how carefully you time your watering.
Nailing the Right Planting Depth
Planting depth is the difference between a camellia that settles in with confidence and one that quietly fades. Get it wrong from the start, and the whole root system is fighting an uphill battle before it even gets established.
The rule I follow religiously: match the depth of the nursery pot—never go deeper. Don’t ever bury the root crown, that spot where the main stems meet the roots. It’s a vulnerable point, and burying it too deep leads to suffocation or rot.
When I’m unsure, I always err toward planting a touch high—leaving the top of the root ball sitting about 0.5 to 1 inch above the surrounding soil line. You can always mound soil around the edges later as the plant settles in naturally. Correcting a camellia that’s gone in too deep, on the other hand, is a far messier fix.
When planting in the ground, dig a hole that’s wide and shallow—about twice the width of the root ball but no deeper than the ball itself. Loosen the surrounding soil down to about 10 or 12 inches, but resist going any deeper than the root ball. This setup encourages the roots to spread sideways at the exact depth they prefer.
Work 25 to 30 percent pine bark or peat moss into the backfill. Camellias respond well to organic matter in the root zone—it boosts drainage and naturally nudges soil pH downward. Backfill the hole, tamp gently, and give it a thorough watering.
Drainage and the Waterlogging Danger Zone
If shallow roots are one camellia weak point, standing water is the other, arguably worse one. Camellias have almost zero tolerance for wet feet. Water pooling around the root zone opens the door to Phytophthora root rot—a fungal disease that destroys roots and is brutally hard to reverse once it takes hold.
Never site a camellia in a low spot where water gathers, or in dense clay that hasn’t been significantly improved. I’ve personally lost two camellias to root rot, both planted in low areas that stayed soggy all winter. I won’t make that mistake a third time.
Instead, plant on a slight mound. If your soil is heavy clay or slow to drain, raise the planting area 4 to 6 inches above the surrounding grade. This keeps oxygen reaching that shallow root band. Even when moisture levels are fine, roots sitting in saturated soil essentially suffocate.
Drainage matters just as much in containers. I repot my potted camellias every 2 to 3 years because the roots eventually circle the container and pack in too tightly. Once that happens, water stops soaking through evenly and root rot becomes a real threat. Fibrous roots need fresh, well-draining potting mix to keep performing in a pot.
Spacing Camellias for Hedges and Privacy Screens
If a camellia hedge or privacy screen is your goal, the root system itself tells you exactly how much room to leave between plants.
Camellia japonica varieties do best spaced 4 to 6 feet apart, center to center. C. sasanqua types, which tend to grow a bit more upright and tidy, can be spaced closer—3 to 5 feet apart works fine. Both spacing ranges factor in how far the roots spread and how wide the canopy eventually gets.
Follow this spacing and you’ll get a fairly solid, effective screen within 5 to 8 years. The canopies won’t be touching right away, but underground, the root systems are already busy claiming the space between plants. Crowding them tighter than recommended invites fierce competition for water and nutrients, plus more fungal disease pressure from poor airflow.
Over the years I’ve put in several hedges, and my best result is a mixed row of C. japonica ‘Debutante’, ‘Elegans’, and ‘Lady in Red’ set 5 feet apart. By the sixth year, it had grown into a nearly unbroken 8-foot-tall wall of foliage. That spacing turned out to be exactly right.
Foundation Plantings and Whether Roots Pose a Risk
One question I hear constantly: is it safe to plant camellias near a house foundation, driveway, or buried plumbing?
Yes, and the main reason is that camellias never develop an aggressive taproot. Their fibrous roots spread outward, but they never thicken into the kind of structural roots capable of heaving concrete or crushing pipes underground. I’ve got camellias growing just 3 to 4 feet from my house’s foundation in two separate gardens, and neither foundation nor plumbing has ever given me trouble.
Even so, I’d still leave a minimum of 3 feet of breathing room from any foundation. That gap allows for airflow, cuts down on heat reflecting off the wall, and keeps the plant from getting overly shaded by the structure as it grows. Camellias crammed too close to walls tend to grow lopsided, stretching toward available light and building up a tangle of dead interior branches.
Root Limitations in Container-Grown Camellias
Camellias grown in containers deal with an entirely different root reality. Confined to a pot, those fibrous roots have nowhere to travel—they simply circle the inside of the container, forming a tightly wound mass.
Plan on repotting a container camellia every 2 to 3 years, moving it into a slightly larger pot with fresh, acidic potting mix. Skip this step and the roots keep circling indefinitely, water stops soaking through evenly, and the plant’s growth stalls or reverses. A root-bound camellia is a stressed camellia, regardless of how diligently you water it.
Choose containers with functioning drainage holes, and mix your own potting blend from 40 percent pine bark, 40 percent peat moss, and 20 percent perlite. That combination recreates the acidic, fast-draining conditions camellias depend on. Water potted camellias consistently—their shallow roots dry out fast in containers—but never let them sit for long in a saucer full of standing water.
Wrapping Up: What the Camellia Root System Really Teaches Us
Getting familiar with how camellia roots grow isn’t just theoretical plant science. It’s literally the foundation for raising a healthy, thriving plant.
Camellias run on shallow, fibrous roots concentrated within the top 8 to 18 inches of soil, spreading laterally 1.5 to 2 times the width of the canopy above. They’re vulnerable to deep digging, standing water, and alkaline conditions—but they reward you generously for mulching well, planting at the correct depth, and ensuring solid drainage.
After twenty years of growing these plants, my guiding rule boils down to this: plant it a little high, mulch it generously, keep your shovel away from the root zone, and always respect how shallow those roots actually live. Stick to that, and your camellias won’t just limp along—they’ll thrive for decades to come.
About This Article

Written by Helen Pritchard. Helen Pritchard is a lifelong gardener in the Pacific Northwest who has grown more than 200 named camellia cultivars over two decades. She writes practical, experience-based guides to camellia care, from variety selection and pruning to troubleshooting yellowing leaves and bud drop. More about this site.
Verify this against a primary source
Specifics change, and your situation may differ from the one described here. These are the authorities worth checking directly:
- American Camellia Society — cultivar registration and culture guides
- USDA Plant Hardiness Zone Map — zone verification for your location
- Royal Horticultural Society — camellia cultivation and pest guidance



