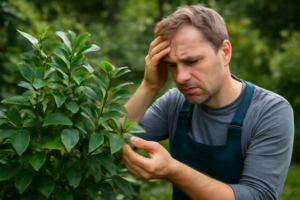
Last spring, my neighbour knocked on the garden gate looking worried. Her prized Camellia japonica ‘Adolphe Audusson’—a deep red treasure she’d planted two years earlier—was turning yellow. Not dramatically, but in that telltale way between the veins while the veins themselves stayed green. I walked over, looked at the plant, and asked one question: “What’s your soil pH?” She looked at me blankly. That yellowing camellia was screaming a silent alarm, and the culprit was almost certainly her tap water and neutral garden soil. This is the moment camellia soil pH becomes real to gardeners—when a healthy-looking plant starts to fail for no obvious reason.
After 20 years growing over 200 named camellia cultivars across three USDA zones, I’ve learned that soil pH is not a nice-to-have detail. It’s foundational. Get it wrong, and your camellias will never thrive, no matter how much sunlight or water you give them. Get it right, and these stunning plants reward you with vigorous growth and abundant flowers. Let me share what I’ve learned—and the mistakes I’ve made—about keeping camellias in their happy pH zone.
What Is the Ideal Soil pH for Camellias?
Camellias are acid-loving plants. Their ideal soil pH range is 5.5 to 6.5, with an optimal sweet spot around 6.0 to 6.2 for most cultivars. This isn’t arbitrary. Nature designed camellias to thrive in the acidic woodland soils where they originated—the forests of Japan, China, and Southeast Asia.
In my garden, I aim for pH 6.0 to 6.2 for my main bed. I’ve found that most popular varieties—’C.M. Hovey’, ‘Elegans’, ‘Blood of China’—perform beautifully in this narrow window. Some cultivars, particularly certain sasanqua types, tolerate slightly higher pH (up to 6.5), but I don’t test that boundary. Consistency is safer than experimentation.
If your soil sits at pH 7.0 or above, you’re in trouble. Not because camellias will die immediately, but because they’ll decline slowly. That’s when you notice the problems that keep gardeners awake at night.
Why pH Matters—What Goes Wrong at the Wrong pH
Here’s the chemistry that changed my understanding of camellia care. Soil can contain plenty of iron and manganese, yet your camellia starves anyway. Why? Because soil pH controls whether those minerals are chemically available to plant roots.
At pH 7 and above, iron and manganese become locked up in forms roots cannot absorb. As a result, your camellia develops interveinal chlorosis—that distinctive yellowing between the leaf veins while the veins themselves stay green. The plant looks anaemic. New growth comes in pale and weak. Flowering drops off. The plant stalls.
I once watched a neighbour add iron supplement after iron supplement to a camellia planted in neutral soil. Nothing improved. She was pouring expensive solutions onto the real problem: pH. Until she lowered the soil pH, the iron would never help. That taught me a hard lesson about diagnosing before treating.
On the flip side, if your pH drops below 5.0, manganese becomes too available. Your camellia darkens unnaturally, growth stunts, and you see signs of manganese toxicity. This is rarer in home gardens, but it happens in heavily amended acidic soils. I’ve seen it in container camellias watered exclusively with rainwater collected from a metal roof treated with sulphur.
How to Test Your Soil pH
Before you amend anything, test. You need to know where you’re starting from. I use three methods depending on the situation, and each has strengths and limits.
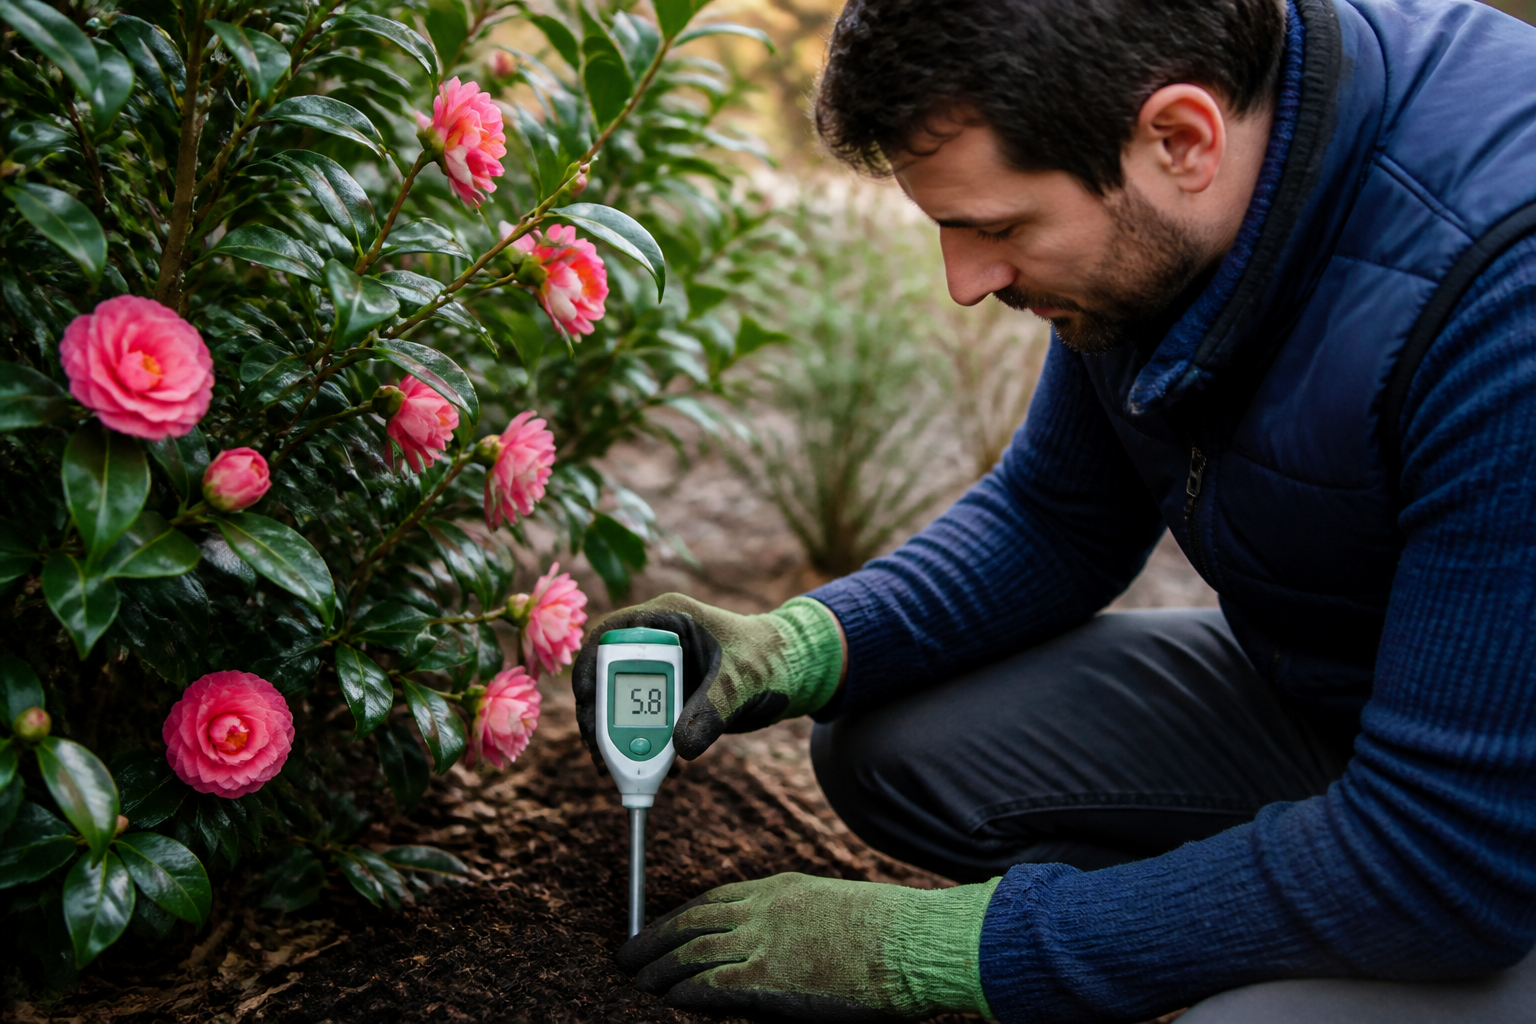
The Sonkir MS02 Soil pH Meter
This affordable digital meter costs around £20–25 and is my go-to for quick checks. Insert it into moist soil, wait 30 seconds, and you get a reading. I own two and use them regularly in my main beds and containers.
The honest truth? The Sonkir MS02 is not laboratory-accurate. Soil variability, moisture content, and electrode wear all affect readings. But it’s excellent for trend-checking. If I measure 6.8 in one corner and 6.2 in another, I know where I need to focus amendments. For £20, it’s practical problem-solving, not scientific perfection.
Take multiple readings across your camellia bed. Soil pH varies. Amendments settle unevenly. One reading tells you almost nothing.
Proprietary Soil Test Kits
Rapitest and similar kits cost £10–15 and offer better accuracy than the Sonkir. Mix soil with distilled water, add a reagent, and compare the colour to a chart. Takes 10 minutes and gives you pH plus nutrient levels. I use these when establishing new beds or troubleshooting persistent problems.
They’re more reliable than a digital meter, though still not laboratory-grade.
County Extension or RHS Soil Analysis
For definitive results, send samples to your local county extension office or the RHS. They’ll measure pH, nutrient levels, and texture professionally. Cost is usually £15–40 per sample. I do this once when establishing a new camellia bed. After that, I use the Sonkir for maintenance checks.
This is the gold standard. If you’re serious about camellias, it’s worth the investment at least once.
How to Lower Soil pH for Camellias
Most gardeners in neutral or slightly alkaline regions need to lower their soil pH for camellias. There’s no one-size-fits-all answer. Your method depends on how much you need to drop, how quickly, and your philosophy on amendments.
Let me walk through the main options I’ve used and what I recommend.
Sulphur—the Safest Long-Term Option
Elemental sulphur is my preferred method for established camellia beds. It’s organic-approved, gentle on soil life, and effective over time. The bacteria in your soil convert elemental sulphur to sulphuric acid, which lowers pH naturally.
Apply sulphur at 100–200 grams per square metre, depending on how much pH drop you need. Work it into the top 15 centimetres of soil. Then wait. Sulphur takes 2–3 months to take effect, depending on temperature and soil microbes. This is why patience matters.
In my experience, it’s worth the wait. Retest after three months with your Sonkir or a soil kit. If you need to drop another 0.5 pH points, apply another dose. Slow adjustments are safer than dramatic ones.
The downside? You can’t see immediate results, which tests the patience of eager gardeners. But once applied, sulphur works steadily and doesn’t accumulate to toxic levels like some alternatives.
Aluminium Sulphate—for Faster Results
Aluminium sulphate works faster than sulphur, lowering pH within 4–6 weeks. Apply at rates recommended on the package, usually 50–100 grams per square metre. Water thoroughly after application.
Here’s my caution: aluminium accumulates in soil over repeated applications. Use it sparingly and only when you need quick results. I’ve seen gardeners apply it year after year, then years later discover excessive aluminium levels in their soil. Not ideal.
My strategy? Use aluminium sulphate once if I’m in a hurry, then switch to sulphur or acidic mulches for maintenance. It’s a tool, not a routine amendment.
Acidic Mulches and Holly-Tone—Maintaining the Right pH
Once your soil pH is in the target zone, maintaining it is easier than fixing it. This is where acidic mulches shine. I use pine bark mulch and pine needle mulch around my camellia beds. Both are naturally acidic and break down slowly, gently maintaining acidity over years.
Leaf mould from acid-loving trees—oak, beech, pine—works beautifully too. I collect fallen oak leaves in autumn and let them compost in a bin. By spring, I have a gorgeous, slightly acidic amendment that mulches and enriches simultaneously.
Now, let me address Holly-Tone specifically, since many camellia growers ask about it. Holly-Tone is an organic granular fertiliser formulated for acid-loving plants. It contains feather meal, bone meal, and sulphur. That sulphur component slowly lowers pH while feeding your camellia.
Is Holly-Tone a rapid pH fixer? No. But is it excellent for maintaining acidity and providing slow-release nutrients? Absolutely. I use it as part of my spring feeding routine. Apply 1 cup per foot of plant spread, scratch it into the top few centimetres, and water well. It does not replace proper pH adjustment, but it’s a wonderful maintenance tool once you’ve established the right pH.
Combining Holly-Tone, sulphur amendments, and acidic mulches creates a self-reinforcing cycle. Your camellia stays happy, and your pH stays stable.
What If Your Soil pH Is Too Low?
This is rare, but it happens. If your pH drops below 5.0–5.5, your camellia may show stunted growth and unnaturally dark foliage. Raise the pH carefully using garden lime (calcium carbonate) or dolomitic lime.
Apply small doses and retest regularly. It’s much easier to raise pH gradually than to lower it. Use about 50–100 grams per square metre initially, wait a month, test, and repeat if needed. Never dump large quantities of lime into camellia soil.
Potting Mix for Camellias in Containers
Growing camellias in pots is popular, especially in cooler climates where moving them offers frost protection. But containers require different pH thinking than in-ground beds.
Never, ever use multi-purpose compost for camellias. Most multi-purpose mixes are buffered to pH 6.5–7.0, designed for general plants. Your camellia in that mix will slowly yellow and disappoint you. I learned this the hard way with a containerized ‘Nuccio’s Gem’ that spent two seasons looking miserable before I realized the compost was the problem.
Instead, use dedicated ericaceous (acid) compost. Most garden centres stock it under names like “azalea compost,” “camellia potting mix,” or “azalea-camellia potting mix.” Brands vary by region, but any ericaceous compost will work. It’s already pH-adjusted to around 5.5–6.0.
For my container camellias, I make my own mix: 60% ericaceous compost, 30% perlite, and 10% composted pine bark. This combination gives excellent drainage (which containers need) while maintaining acidity and structure. The perlite prevents waterlogging, which container soil is prone to. The pine bark adds slow-release acidity.
Repot every 2–3 years using fresh ericaceous compost. Over time, container soil degrades and pH can drift. Fresh compost keeps your camellia thriving.
The Watering pH Problem
Here’s a subtle issue that catches many gardeners: tap water. In many regions, municipal water is slightly alkaline (pH 7–8). Over years, watering your camellias with tap water gradually raises soil pH, undoing your acidifying efforts.
I discovered this the hard way with my container camellias. I’d adjusted their pH perfectly, but three years later, they were yellowing. My Sonkir revealed pH 6.8. I’d been watering them with tap water from the house. The accumulated alkalinity had crept pH upward slowly but steadily.
Now I collect rainwater for my container camellias. Rainwater is naturally slightly acidic (pH 5.5–6.0) and ideal. In-ground camellias are less vulnerable because soil buffering is stronger, but containers are more sensitive.
If you live in an area with very hard, alkaline tap water, consider collecting rainwater, even for in-ground camellias. A rain barrel is a one-time investment that protects your plants for life.
My Biggest Camellia pH Mistake
Five years ago, I planted a prized ‘Adolphe Audusson Red’ in a new border. I amended the soil heavily with mushroom compost, thinking I was being generous. Mushroom compost is wonderful for many plants, but it’s highly alkaline—pH 8–8.5. Disaster waiting to happen.
For two seasons, that camellia slowly yellowed. I added iron. Nothing. I fussed and worried. Finally, I tested the soil pH and found 7.6. The culprit was obvious in hindsight. I should have tested before amending, not after.
That taught me a lesson that shaped everything I do now: always test soil pH before planting camellias. Know your starting point. Then amend with intention. Never assume compost is camellia-safe without checking the label or knowing its origin.
My pH Management Routine
Now, my camellia soil pH stays stable with minimal effort. Here’s what I do:
- Spring: Apply Holly-Tone at 1 cup per foot of plant spread. Scratch in gently and water well.
- Summer: Refresh pine bark and pine needle mulch around the base. Maintain 5–7 centimetres of acidic mulch.
- Autumn: Test soil pH with Sonkir in 2–3 locations. If drifting above 6.5, note areas for sulphur application.
- Every 2–3 years: Send a soil sample to the local extension office for professional analysis. This catches problems before they’re visible.
This routine takes minutes but prevents the yellowing, stunted growth, and missed flowers that break camellia lovers’ hearts.
Your Action Plan
If you’re growing camellias now or planning to, here’s what to do:
- Test first. Use a Sonkir MS02 or soil test kit for a quick read. If establishing a new bed, invest in county extension analysis.
- Target 6.0–6.2 pH. This is the window where most camellias thrive.
- Use sulphur for permanent beds. It’s safe, organic, and slow but effective.
- Maintain with acidic mulches and Holly-Tone. Once you’re in the zone, keep it there with simple maintenance.
- Use ericaceous compost for containers. Never compromise on this.
- Consider rainwater for containers. A rain barrel eliminates the slow pH creep from alkaline tap water.