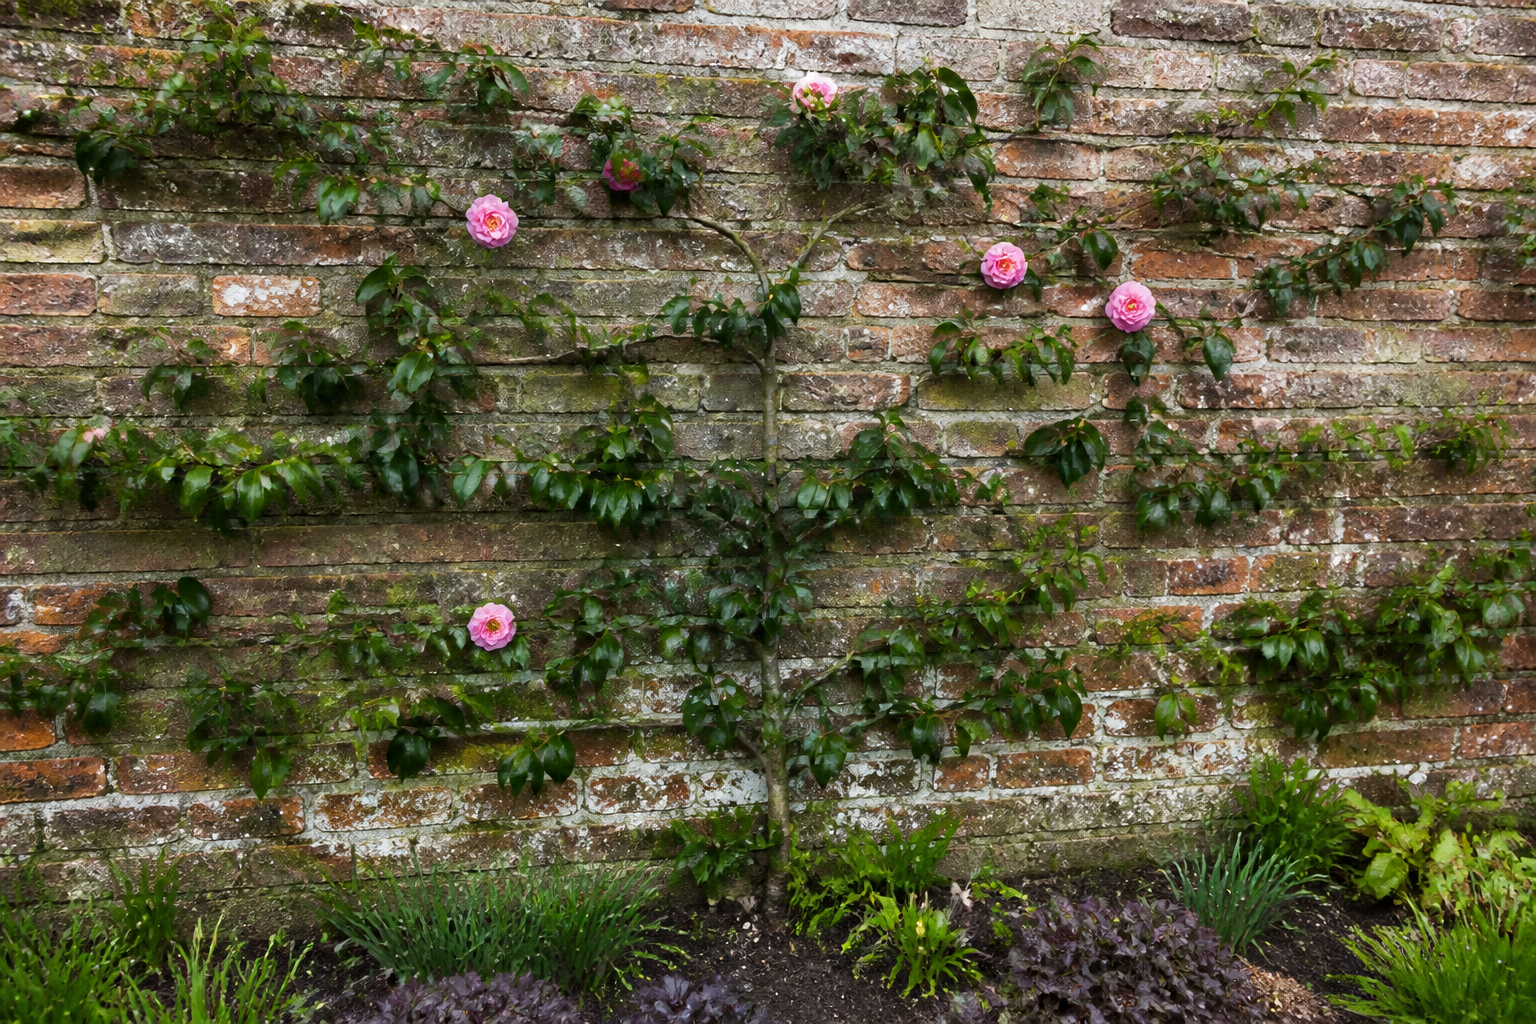
People who type narrow camellia varieties into a search box usually want the same thing. They want glossy leaves and winter flowers on a wall, or beside a path where only a foot or two is free. I wanted that too, and I got it by training the plants rather than hunting for a magic cultivar. Here is how the methods work, what they cost in time, and where I have gone wrong.
Let me clear up the search first. There is no such thing as a climbing camellia. Camellias do not twine, cling, or send out tendrils the way a clematis or climbing rose does. What you want is espalier, a shrub trained flat against a support, or a fan, a variation where the main branches radiate out from a single point. Both are still shrubs. We simply persuade them into a new shape.
Why camellias take well to espalier and fans
Camellias suit this kind of work for two practical reasons. First, they tolerate hard pruning into old wood, and most will push new growth from that cut, though not always quickly. Second, many japonicas and sasanquas throw long, flexible shoots in their early seasons. Those shoots bend to a wire without snapping, which makes tying in far less stressful for the plant.
Not every cultivar behaves the same way. Some have stiff, upright stems that resist being pulled flat. Others arch and sprawl, and they fill a wall beautifully but need constant tying. Before you commit, look at the plant itself. Note how the new growth bends and whether the stems feel springy or brittle.
Setting up the framework
Hold your wires or battens a few centimetres off the wall. Air needs to move behind the plant. Damp, stagnant air trapped against foliage invites leaf spot and mildew, and it keeps the leaves wet long after rain has stopped. I use galvanised wire run through spacers on wall pins. Any sturdy, weather-proof system will do, provided it stands clear of the masonry or timber.
Plant well out from the footing. I set the root ball roughly 45 to 60 centimetres from the wall and angle the stem toward the support. Soil right against a wall sits in its rain shadow, where the overhang and the masonry keep it dry. That dry zone is the usual reason espaliers fail. The plant grows well for a season, then sulks and dies back from the base.
Water deliberately during the first two summers. Don’t assume the wall will supply rain. A soaker hose laid a little out from the root zone works well, and a layer of mulch helps hold moisture in the bed.
Ties, pruning, and aspect
Use soft ties, such as strips of old stocking or purpose-made plant tape. Check every tie once a year, ideally in late winter when you are already out with secateurs. Stems thicken quickly in spring. A tie that was comfortable in February can start to bite into the bark by autumn, and a girdled branch above that point will die.
Prune straight after flowering. Next year’s flower buds form on the growth that follows the bloom, so cutting later in the season removes the wood you were counting on. For japonicas in my part of the Pacific Northwest, that means April or May. Sasanquas flower earlier, so their window falls in late winter, after the last blooms drop.
Aspect matters more than most people expect. A north-facing wall is the safest choice. A south or west wall gets hot afternoon sun that can push the plant into early growth, and morning sun on frosted buds is what browns them. An east wall can work if a tree, fence, or building blocks the first hard morning light. Gardeners disagree about east walls, and I have had both good and poor results on them.
Standards: the lollipop form
A standard, often called a lollipop or tree form, is a single clear trunk topped with a rounded head. It is the most formal of the four approaches, and it looks wonderful beside a door or on either side of a bench. The method is simple to describe and slow to achieve.
Choose one strong leader and stake it upright. Remove every side shoot below the height where you want the head to begin. Rub the shoots out while they are soft, not after they have hardened into wood. Then let the leader grow. Pinch its tip once it reaches the height you want, which encourages branching at the top.
From a young plant, expect five years or more before the head looks like a head. The timeline depends on the cultivar, the growing conditions, and how patient you are with the stake. If you want a sense of how quickly different types put on height, see how fast camellias grow, by cultivar before you choose.
This is also why nursery standards cost what they do. The grower has already spent those years, along with the staking, the rubbing out, and the pinching. Buying a finished standard saves time but costs real money. Growing your own is cheaper, provided you can wait.
Sasanquas are the easier starting point. Their stems are more flexible, and they tend to branch readily once the leader is pinched. Japonicas can be trained the same way, but in my experience their leaders are stiffer and slower to thicken. Sources also disagree on how readily some japonicas branch at the top, so treat any timeline as a rough guide.
Narrow clipped columns and hedges
Here is the honest point about this form. Narrowness in camellias comes mostly from training, not from genetics. There is no true columnar camellia in the way some conifers grow tall and skinny by nature. If you want a slim camellia, you choose an upright habit and then keep the sides cut back.
Look for plants that grow up more than out, with dense, compact branching. Sasanquas take clipping better than japonicas, and they respond well to tighter, more frequent work. The sasanqua ‘Yuletide’ is widely described as upright and dense, and in my garden it has responded well to annual trimming. Check local nursery descriptions too, since habit descriptions vary between sources and between growing conditions.
Clip the sides once a year, straight after flowering, when you can see exactly where the blooms were. Work from the bottom up, and keep the base slightly wider than the top. That shape lets light reach the lower leaves, which otherwise drop and leave bare legs. Cut back to a leaf node or a side shoot, and never leave stubs.
A row of these forms makes a screen, and that is a different project. Plant closer, treat the row as one unit, and match the habit to the job. For guidance on which types hold together as a screen, read about camellia varieties for hedging and privacy screens. Smaller plants can also work in narrow beds, and I cover those in my guide to dwarf and compact camellia varieties for small gardens.
Containers as a size control
If the bed is too small for any of the above, a container is the simplest answer. Pot size limits root growth, and root growth limits top growth. A well-chosen pot can keep a plant at a manageable size for many years, without the constant cutting a trained form demands. Choose a large container with good drainage and an acidic, peat-free potting mix.
Containers have their own problems. In a hard freeze, roots in an exposed pot can suffer, so move the pot against a sheltered house wall or into an unheated garage for the coldest nights. Water more often than you think you need to, because pots dry out faster than the ground. For the full routine, see growing camellias in containers.
Comparing the forms side by side
The table below sets the five forms against each other. Timings are my own estimates from growing these forms, not measured averages, and they will shift with cultivar, climate, and how hard you prune. Treat them as a planning guide rather than a promise.
| Form | Space needed | Years to establish | Pruning demand | Best suited to |
|---|---|---|---|---|
| Free-standing shrub | Open ground, room for its natural spread | 2 to 3 years to settle; flowers may come sooner | Light, mostly after flowering | Mixed borders, woodland edges, larger gardens |
| Espalier | Shallow strip, 45 to 60 cm from a wall | 3 to 5 years to show a clear framework | High, annually after flowering | Narrow strips against north or east walls |
| Fan against a wall | Wall space wider than an espalier | 3 to 5 years to fill the fan | High, with regular tie-in | Walls where branches should radiate outward |
| Standard (lollipop) | Small footprint, a single planting spot | 5 or more years to a rounded head | Moderate to high, rubbing out shoots early | Patios, entrances, paired pots |
| Narrow clipped column or hedge | Narrow strip, often under a metre wide | 2 to 4 years to a clear column | High, clipping every year | Narrow beds, screens, tight side passages |
Why every trained form asks more of you
All of these forms need more pruning attention per year than a free-standing shrub. A bush left alone will survive and often flower well. A trained form will drift, sprout suckers, and lose its shape within a season or two if you ignore it. Plan for an annual session with secateurs, a box of spare ties, and a bit of patience.
Timing the training is the other critical decision. Start while the plant is young, ideally one or two years after planting out. Young stems bend easily, and the framework forms quickly. Older plants with thick, woody bases can be reshaped, but the work is slow, and some will sulk for a season after heavy cutting.
Starting young also gives you a chance to correct mistakes early. A slightly crooked leader can be restaked in its first year. The same crook in a five-year-old plant becomes a permanent feature of the framework, whether you like it or not.
Mistakes I have made, and what I would change
I have made most of the common errors with these forms. Some of them cost me plants. Here is the short list I now work from.
- Planting against the wall rather than out from the footing, which left the root ball in dry shade.
- Leaving ties on through the growing season until they cut into the bark.
- Pruning a japonica in late summer, which removed the flower buds for the next spring.
- Choosing an arching, sprawling cultivar for a narrow column, then fighting it every year.
Each of these is avoidable. The common thread is timing and habit. Know when the plant flowers, know how it grows, and let those two facts guide every cut.
Final thoughts before you start
Choose your form based on the space you actually have, not the one you wish you had. A north wall, a narrow bed, or a patio corner each suits a different approach. Be realistic about the years involved, and accept that a trained camellia is a commitment rather than a quick fix.
If you are unsure about a cultivar’s habit, ask a knowledgeable nursery to show you a mature example. Photographs and descriptions can mislead, especially when the plant has been grown in different conditions. Once you have the right plant in the right place, the training itself becomes one of the most rewarding parts of growing camellias.
About This Article

Written by Helen Pritchard. Helen Pritchard is a lifelong gardener in the Pacific Northwest who has grown more than 200 named camellia cultivars over two decades. She writes practical, experience-based guides to camellia care, from variety selection and pruning to troubleshooting yellowing leaves and bud drop. More about this site.
Verify this against a primary source
Specifics change, and your situation may differ from the one described here. These are the authorities worth checking directly:
- American Camellia Society — cultivar registration and culture guides
- USDA Plant Hardiness Zone Map — zone verification for your location
- Royal Horticultural Society — camellia cultivation and pest guidance