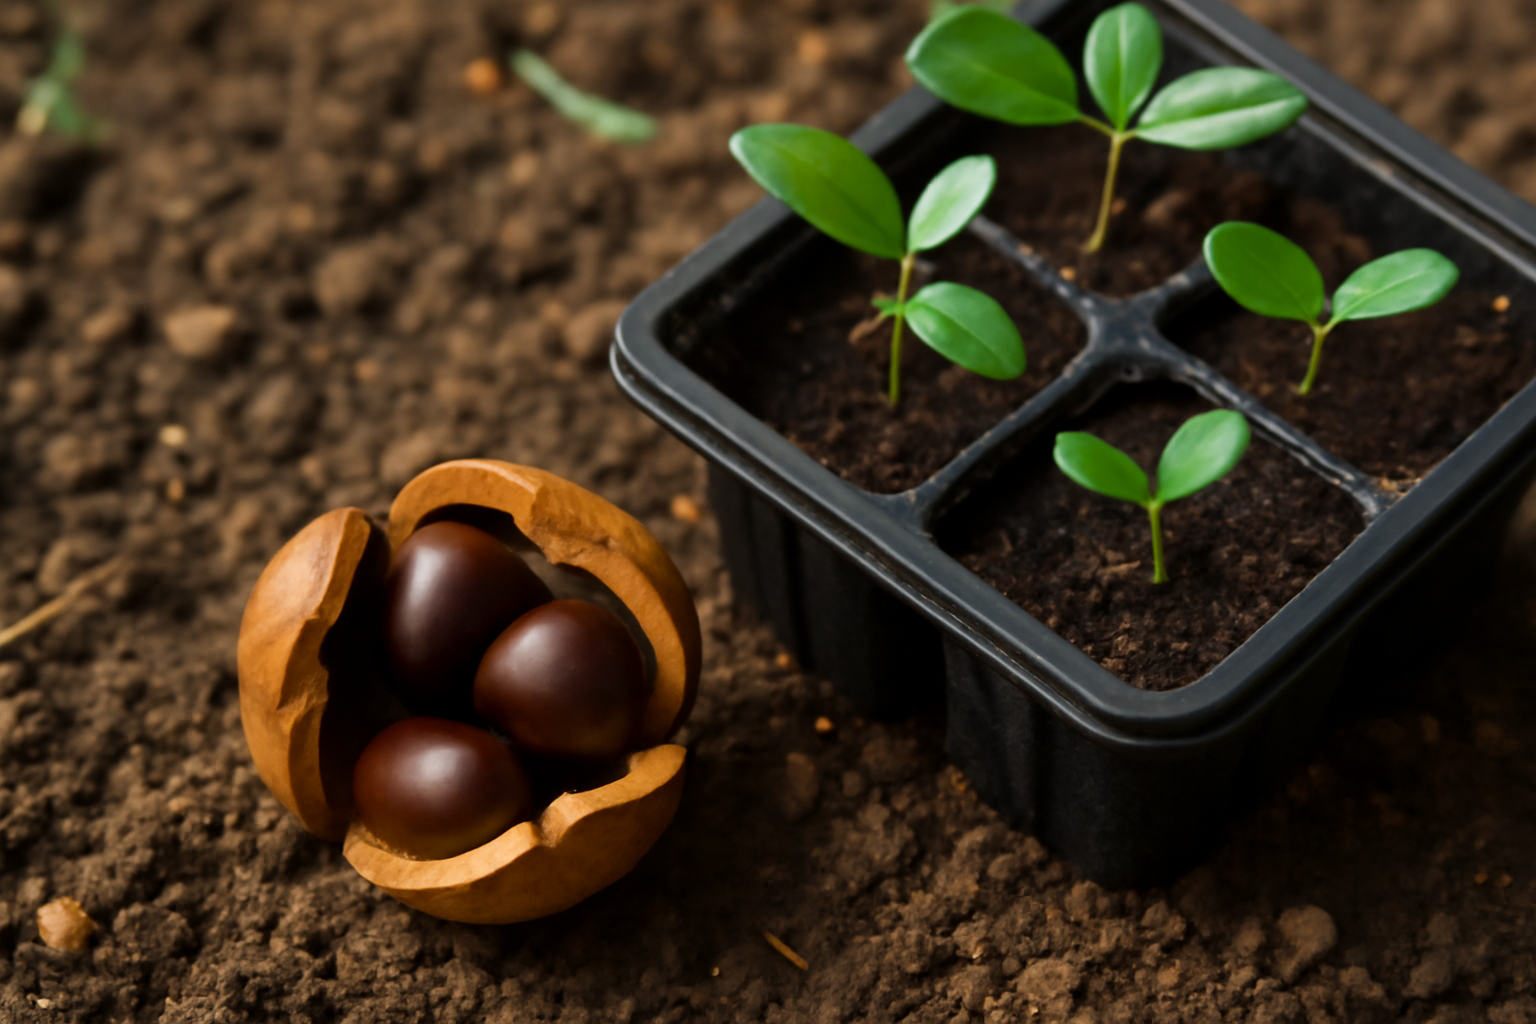
A few winters ago, I cracked open a fat, ripe seedpod from my Camellia japonica ‘Adolphe Audusson’ and held three dark brown seeds in my palm. My husband asked what I was planning to do with them. “Something slow,” I told him. That moment is really the best way I know to introduce the topic of growing camellias from seed — because patience isn’t just helpful here. It’s absolutely essential. If you’re coming to this expecting quick results, I want to be honest with you right now: this is a long game. But it’s also one of the most rewarding things I’ve done in 20-plus years of growing camellias.
Why Grow Camellias from Seed at All?
Fair question. Most gardeners propagate camellias through cuttings or grafting, and those methods have real advantages. You get a plant genetically identical to the parent. You know exactly what flower you’re getting. However, seed-grown camellias offer something cuttings simply can’t — genuine surprise.
Every seed is a genetic lottery ticket. Cross-pollination between cultivars produces seedlings that may carry completely new flower forms, colors, or growth habits. In my experience, this is how many named cultivars originally came to exist. Several breeders I know have introduced beautiful new japonicas by simply letting bees do the work and then growing out the seeds. That said, most seedlings won’t be showstoppers. You need to be prepared for plenty of ordinary-looking plants alongside the occasional gem.
There’s also a cost factor. Seeds are essentially free if you’re harvesting from your own plants. Starting a large number of seedlings costs far less than buying established grafted plants. For me, that low barrier to entry makes seed propagation worth exploring — especially when I’m experimenting with species camellias like Camellia reticulata or the fragrant Camellia lutchuensis hybrids.
When to Collect Camellia Seeds
Timing your harvest correctly is the first critical step. Camellia seedpods ripen in late summer to early autumn — typically August through October in zones 7b through 8b, which covers most of my growing areas. The pods turn from green to brown or tan and begin to split open along their seams. That cracking sound is your cue.
Don’t wait too long after splitting starts. Seeds drop quickly, and squirrels consider them a delicacy. I lost an entire pod’s worth of seeds from my ‘Nuccio’s Gem’ japonica one September because I checked the plant two days too late. Now I tie small mesh bags around pods that look close to ripe. It takes about ten minutes and saves a lot of heartbreak.
Sasanqua varieties like ‘Setsugekka’ and ‘Kanjiro’ tend to ripen slightly earlier than japonicas. Reticulata types, in my garden, often run a week or two later. Keep a dated notebook. Knowing your specific plants’ timing patterns helps enormously in subsequent years.
Checking Seed Viability Before You Plant
Fresh camellia seeds have a hard outer coat, but the interior should feel solid and dense. I do a simple float test in a glass of water. Seeds that sink are generally viable. Seeds that float are often hollow or undeveloped — discard those. This isn’t foolproof, but it eliminates the most obvious duds before you invest time in potting them up.
Viability drops sharply if seeds dry out. Unlike many garden seeds, camellias don’t store well. Plant them within a few days of harvest if at all possible. In my experience, seeds left sitting for more than two weeks at room temperature show noticeably reduced germination rates.
How to Plant Camellia Seeds: Step by Step
Here’s exactly what I do each autumn with fresh seeds. I’m not going to dress this up with fancy equipment — you don’t need it.
- Prepare your mix. Use a well-draining, acidic medium. I combine one part peat (or coir), one part perlite, and one part pine bark fines. Target a soil pH of 5.5 to 6.0. Camellias are acid-lovers, and starting them in the wrong pH causes problems that compound over time.
- Choose your container. Deep four-inch pots or plug trays work well. Camellias develop a taproot early, so depth matters more than width at this stage.
- Sow at the right depth. Plant each seed roughly one inch deep. One seed per cell or pot. Cover lightly and firm the mix gently around it.
- Water carefully. Moisten thoroughly after planting, then keep the mix consistently damp — never waterlogged. Fungal rot is your main enemy at this stage.
- Provide bottom warmth. I use a seedling heat mat set to around 70–75°F. Germination improves significantly with consistent warmth. Without it, especially in zone 7b winters, germination is slow and erratic.
- Be patient. Germination typically takes four to eight weeks. Some seeds take longer. I’ve had stragglers emerge at twelve weeks. Don’t discard pots too early.
A Mistake I Made Early On
I’ll be straight with you: I once used standard potting mix from a big-box store for a batch of seedlings from my ‘Professor Sargeant’ japonica. The pH was around 6.8 — too alkaline for camellias. The seedlings germinated fine, then slowly yellowed and stalled. I spent weeks trying to diagnose a disease before finally testing the soil. The fix was simple: repot into an acidic mix and drench with a dilute acidifying fertilizer. But I wasted nearly a full growing season on those plants. Test your mix before you plant. A cheap pH meter costs less than a bag of seed-starting mix.
Growing Camellias from Seed: The Long Timeline
This is where most people get a shock. Growing camellias from seed to first bloom is not a one-year project. Realistically, you’re looking at three to seven years before you see a single flower. I want to say that plainly, because I’ve seen gardeners give up after year two, convinced something went wrong. Nothing went wrong. Camellias simply take their time.
Here’s a rough timeline based on my experience with japonica and sasanqua seedlings:
- Year 1: Seeds germinate in autumn or winter. Seedlings develop their first true leaves. Growth is slow — expect plants to reach two to four inches by the end of the first growing season. Pot up to larger containers as roots fill the original cell.
- Year 2: Plants begin putting on more consistent growth. Six to twelve inches of new growth is typical for healthy seedlings in good conditions. Continue growing in containers or transplant to a sheltered nursery bed if you’re in zone 8a or warmer.
- Years 3–4: Plants are establishing more substantial root systems. Growth accelerates. Some fast-growing sasanqua seedlings may attempt to set buds at this point, though flowering is still not guaranteed.
- Years 5–7: Most japonica seedlings bloom for the first time in this window. Reticulata hybrids often take even longer — seven to ten years is not unusual. This is the moment of truth: you finally see what the genetic lottery produced.
Sasanqua vs. Japonica vs. Reticulata: Does Species Affect Speed?
Yes, noticeably. In my experience, Camellia sasanqua seedlings tend to be the fastest to bloom. My earliest-flowering seedling was from open-pollinated ‘Yuletide’ — it bloomed in year four, producing a cheerful single red flower that looked almost identical to its parent. Satisfying, even if not particularly novel.
Japonica seedlings are more variable. I’ve had some bloom in year five, others wait until year seven. Reticulata and reticulata hybrids are the slowest. However, the payoff can be extraordinary — reticulata flowers are often enormous and dramatic. The wait feels more justified when you finally see one open.
Caring for Seedlings During the Long Wait
Keeping young camellia seedlings healthy for multiple years requires consistent attention to a few key things. Fortunately, none of them are complicated.
Feeding: I start a dilute balanced fertilizer (something like a 10-10-10 formulation) in spring of the second year. Specifically, I switch to an acid-forming fertilizer — look for formulas designed for azaleas and rhododendrons. These help maintain soil pH while feeding the plant. I fertilize monthly from March through August, then stop entirely to allow the plant to harden off before winter.
Watering: Consistent moisture matters more than quantity. Let the top inch of soil dry between waterings, but never let the roots fully dry out. Container-grown seedlings need more frequent attention than in-ground plants. In hot summers here in zone 8b, I check my seedling benches daily.
Potting on: Repot seedlings each spring into a container one or two sizes larger. Root-bound plants stall. I’ve seen three-year-old seedlings sitting in the same four-inch pot they started in, barely six inches tall. Given proper root room and fresh acidic mix, those same seedlings can double in size within a single season.
Winter Protection in Cooler Zones
Young seedlings are more cold-sensitive than established plants. In zone 7b, I bring all seedlings under two years old into an unheated greenhouse for winter. Temperatures down to about 28°F are fine for brief periods, but prolonged freezes below 25°F can kill small plants outright. Older seedlings in their third year and beyond can usually stay outside with a layer of frost cloth on the coldest nights.
If you’re growing in zones 6b or 7a, I’d honestly suggest keeping seed-grown plants in containers for their first three years and overwintering them in a frost-free space. The extra protection gives them the root mass they need to eventually handle your winters independently. I covered cold-hardiness in more detail in my post on overwintering camellias — worth a read if cold protection is a concern for you.
What to Do When Your Seedling Finally Blooms
This is genuinely one of the best moments in camellia gardening. Document everything. Take photos. Note the bloom date, the form (single, semi-double, formal double, peony), the color, and the size. Compare it to the parent plants if you know them. This record becomes valuable if you ever want to name and register the cultivar — yes, that’s a real option through the American Camellia Society.
Most seedlings won’t warrant naming. That’s fine. They’re still beautiful, personal plants with a story behind them. However, if you do get something genuinely distinctive — an unusual color break, a remarkable flower form, exceptional cold hardiness — it’s worth pursuing. I have two unnamed seedlings in my zone 7b garden right now that I’m watching closely. One came from open-pollinated ‘Dr. Tinsley’ and shows a deeper pink color with a more compact growth habit than its parent. We’ll see.
Growing Camellias from Seed: Final Thoughts
Growing camellias from seed is not for the impatient. It demands years of quiet attention and genuine comfort with uncertainty. For me, that’s exactly the point. Some of my most treasured plants are ones I started from seed over a decade ago — plants with no name, no catalog listing, no pedigree beyond “open-pollinated ‘Nuccio’s Jewel,’ autumn 2012.” They’re mine in a way that no purchased plant ever quite is.
If you’re ready to try it, start this autumn. Collect ripe pods from the healthiest, most beautiful plants in your garden or a neighbor’s. Float-test the seeds. Get your pH right from the start. Use a heat mat. Then put the pots somewhere you’ll see them regularly — a greenhouse bench, a cold frame, a sunny windowsill — and let time do its work.
The first true leaf that unfurls from a camellia seed you planted yourself is genuinely thrilling. I’ve seen it dozens of times, and it still makes me stop and look. That’s the thing about growing camellias from seed — the slowness isn’t a drawback. It’s the whole experience.