And if you’re curious about the root system that makes camellia transplanting possible in the first place, I’ve written a deeper dive into camellia roots and their relationship to soil health that might fascinate you.
Transplanting camellias is entirely achievable for any gardener willing to respect the timing and technique. Whether you’re moving a young plant or an established favourite, you now have the knowledge to do it right.
My advice? Pick your autumn window, prepare methodically, and trust your camellia’s resilience. Yes, shock happens. Yes, there will be a recovery period. But on the other side of that, you have a plant thriving in exactly the location you want it.
And if you’re curious about the root system that makes camellia transplanting possible in the first place, I’ve written a deeper dive into camellia roots and their relationship to soil health that might fascinate you.
Start planning your move. Your camellia is more resilient than you think—I promise.
Your Camellia is Ready to Move
Transplanting camellias is entirely achievable for any gardener willing to respect the timing and technique. Whether you’re moving a young plant or an established favourite, you now have the knowledge to do it right.
My advice? Pick your autumn window, prepare methodically, and trust your camellia’s resilience. Yes, shock happens. Yes, there will be a recovery period. But on the other side of that, you have a plant thriving in exactly the location you want it.
And if you’re curious about the root system that makes camellia transplanting possible in the first place, I’ve written a deeper dive into camellia roots and their relationship to soil health that might fascinate you.
Start planning your move. Your camellia is more resilient than you think—I promise.
The next spring, she lost leaves. She looked sparse and unhappy for a solid six weeks. I watered her consistently, didn’t fertilize, and left her alone otherwise. By June, new growth was emerging. By the following winter, she was flowering again. Now, five years on, she’s thriving and blooming more heavily than ever.
Your Camellia is Ready to Move
Transplanting camellias is entirely achievable for any gardener willing to respect the timing and technique. Whether you’re moving a young plant or an established favourite, you now have the knowledge to do it right.
My advice? Pick your autumn window, prepare methodically, and trust your camellia’s resilience. Yes, shock happens. Yes, there will be a recovery period. But on the other side of that, you have a plant thriving in exactly the location you want it.
And if you’re curious about the root system that makes camellia transplanting possible in the first place, I’ve written a deeper dive into camellia roots and their relationship to soil health that might fascinate you.
Start planning your move. Your camellia is more resilient than you think—I promise.
I lined the burlap underneath and had three people carefully move her. The new hole was prepared with plenty of ericaceous compost. I planted her at the same depth, watered thoroughly, and mulched. Then I waited.
The next spring, she lost leaves. She looked sparse and unhappy for a solid six weeks. I watered her consistently, didn’t fertilize, and left her alone otherwise. By June, new growth was emerging. By the following winter, she was flowering again. Now, five years on, she’s thriving and blooming more heavily than ever.
Your Camellia is Ready to Move
Transplanting camellias is entirely achievable for any gardener willing to respect the timing and technique. Whether you’re moving a young plant or an established favourite, you now have the knowledge to do it right.
My advice? Pick your autumn window, prepare methodically, and trust your camellia’s resilience. Yes, shock happens. Yes, there will be a recovery period. But on the other side of that, you have a plant thriving in exactly the location you want it.
And if you’re curious about the root system that makes camellia transplanting possible in the first place, I’ve written a deeper dive into camellia roots and their relationship to soil health that might fascinate you.
Start planning your move. Your camellia is more resilient than you think—I promise.
I waited for late October, after our first frost. I watered her deeply two days before. I pruned the top by about one-third to reduce leaf area. Then I dug. And dug. The rootball was enormous—easily three feet across and two feet deep. I rented a small mini-digger, which made the job infinitely easier. Without it, I’d have spent a full day with a spade.
I lined the burlap underneath and had three people carefully move her. The new hole was prepared with plenty of ericaceous compost. I planted her at the same depth, watered thoroughly, and mulched. Then I waited.
The next spring, she lost leaves. She looked sparse and unhappy for a solid six weeks. I watered her consistently, didn’t fertilize, and left her alone otherwise. By June, new growth was emerging. By the following winter, she was flowering again. Now, five years on, she’s thriving and blooming more heavily than ever.
Your Camellia is Ready to Move
Transplanting camellias is entirely achievable for any gardener willing to respect the timing and technique. Whether you’re moving a young plant or an established favourite, you now have the knowledge to do it right.
My advice? Pick your autumn window, prepare methodically, and trust your camellia’s resilience. Yes, shock happens. Yes, there will be a recovery period. But on the other side of that, you have a plant thriving in exactly the location you want it.
And if you’re curious about the root system that makes camellia transplanting possible in the first place, I’ve written a deeper dive into camellia roots and their relationship to soil health that might fascinate you.
Start planning your move. Your camellia is more resilient than you think—I promise.
She was 15 years old, five feet tall, and four feet wide when I decided to move her. My new tea garden needed sun, and she was casting shade. I could have removed her entirely, but I couldn’t bear it. Instead, I committed to relocating her.
I waited for late October, after our first frost. I watered her deeply two days before. I pruned the top by about one-third to reduce leaf area. Then I dug. And dug. The rootball was enormous—easily three feet across and two feet deep. I rented a small mini-digger, which made the job infinitely easier. Without it, I’d have spent a full day with a spade.
I lined the burlap underneath and had three people carefully move her. The new hole was prepared with plenty of ericaceous compost. I planted her at the same depth, watered thoroughly, and mulched. Then I waited.
The next spring, she lost leaves. She looked sparse and unhappy for a solid six weeks. I watered her consistently, didn’t fertilize, and left her alone otherwise. By June, new growth was emerging. By the following winter, she was flowering again. Now, five years on, she’s thriving and blooming more heavily than ever.
Your Camellia is Ready to Move
Transplanting camellias is entirely achievable for any gardener willing to respect the timing and technique. Whether you’re moving a young plant or an established favourite, you now have the knowledge to do it right.
My advice? Pick your autumn window, prepare methodically, and trust your camellia’s resilience. Yes, shock happens. Yes, there will be a recovery period. But on the other side of that, you have a plant thriving in exactly the location you want it.
And if you’re curious about the root system that makes camellia transplanting possible in the first place, I’ve written a deeper dive into camellia roots and their relationship to soil health that might fascinate you.
Start planning your move. Your camellia is more resilient than you think—I promise.
I want to bring this all together with the story of my ‘Donation’ because it illustrates what’s possible when you do transplanting camellias correctly.
She was 15 years old, five feet tall, and four feet wide when I decided to move her. My new tea garden needed sun, and she was casting shade. I could have removed her entirely, but I couldn’t bear it. Instead, I committed to relocating her.
I waited for late October, after our first frost. I watered her deeply two days before. I pruned the top by about one-third to reduce leaf area. Then I dug. And dug. The rootball was enormous—easily three feet across and two feet deep. I rented a small mini-digger, which made the job infinitely easier. Without it, I’d have spent a full day with a spade.
I lined the burlap underneath and had three people carefully move her. The new hole was prepared with plenty of ericaceous compost. I planted her at the same depth, watered thoroughly, and mulched. Then I waited.
The next spring, she lost leaves. She looked sparse and unhappy for a solid six weeks. I watered her consistently, didn’t fertilize, and left her alone otherwise. By June, new growth was emerging. By the following winter, she was flowering again. Now, five years on, she’s thriving and blooming more heavily than ever.
Your Camellia is Ready to Move
Transplanting camellias is entirely achievable for any gardener willing to respect the timing and technique. Whether you’re moving a young plant or an established favourite, you now have the knowledge to do it right.
My advice? Pick your autumn window, prepare methodically, and trust your camellia’s resilience. Yes, shock happens. Yes, there will be a recovery period. But on the other side of that, you have a plant thriving in exactly the location you want it.
And if you’re curious about the root system that makes camellia transplanting possible in the first place, I’ve written a deeper dive into camellia roots and their relationship to soil health that might fascinate you.
Start planning your move. Your camellia is more resilient than you think—I promise.
Real-World Example: Moving My Established ‘Donation’
I want to bring this all together with the story of my ‘Donation’ because it illustrates what’s possible when you do transplanting camellias correctly.
She was 15 years old, five feet tall, and four feet wide when I decided to move her. My new tea garden needed sun, and she was casting shade. I could have removed her entirely, but I couldn’t bear it. Instead, I committed to relocating her.
I waited for late October, after our first frost. I watered her deeply two days before. I pruned the top by about one-third to reduce leaf area. Then I dug. And dug. The rootball was enormous—easily three feet across and two feet deep. I rented a small mini-digger, which made the job infinitely easier. Without it, I’d have spent a full day with a spade.
I lined the burlap underneath and had three people carefully move her. The new hole was prepared with plenty of ericaceous compost. I planted her at the same depth, watered thoroughly, and mulched. Then I waited.
The next spring, she lost leaves. She looked sparse and unhappy for a solid six weeks. I watered her consistently, didn’t fertilize, and left her alone otherwise. By June, new growth was emerging. By the following winter, she was flowering again. Now, five years on, she’s thriving and blooming more heavily than ever.
Your Camellia is Ready to Move
Transplanting camellias is entirely achievable for any gardener willing to respect the timing and technique. Whether you’re moving a young plant or an established favourite, you now have the knowledge to do it right.
My advice? Pick your autumn window, prepare methodically, and trust your camellia’s resilience. Yes, shock happens. Yes, there will be a recovery period. But on the other side of that, you have a plant thriving in exactly the location you want it.
And if you’re curious about the root system that makes camellia transplanting possible in the first place, I’ve written a deeper dive into camellia roots and their relationship to soil health that might fascinate you.
Start planning your move. Your camellia is more resilient than you think—I promise.
If your camellia is looking rough after a few months, resist the urge to dig it up and move it again. Give it at least a full year. Root systems are working underground where you can’t see them. Trust the process.
Real-World Example: Moving My Established ‘Donation’
I want to bring this all together with the story of my ‘Donation’ because it illustrates what’s possible when you do transplanting camellias correctly.
She was 15 years old, five feet tall, and four feet wide when I decided to move her. My new tea garden needed sun, and she was casting shade. I could have removed her entirely, but I couldn’t bear it. Instead, I committed to relocating her.
I waited for late October, after our first frost. I watered her deeply two days before. I pruned the top by about one-third to reduce leaf area. Then I dug. And dug. The rootball was enormous—easily three feet across and two feet deep. I rented a small mini-digger, which made the job infinitely easier. Without it, I’d have spent a full day with a spade.
I lined the burlap underneath and had three people carefully move her. The new hole was prepared with plenty of ericaceous compost. I planted her at the same depth, watered thoroughly, and mulched. Then I waited.
The next spring, she lost leaves. She looked sparse and unhappy for a solid six weeks. I watered her consistently, didn’t fertilize, and left her alone otherwise. By June, new growth was emerging. By the following winter, she was flowering again. Now, five years on, she’s thriving and blooming more heavily than ever.
Your Camellia is Ready to Move
Transplanting camellias is entirely achievable for any gardener willing to respect the timing and technique. Whether you’re moving a young plant or an established favourite, you now have the knowledge to do it right.
My advice? Pick your autumn window, prepare methodically, and trust your camellia’s resilience. Yes, shock happens. Yes, there will be a recovery period. But on the other side of that, you have a plant thriving in exactly the location you want it.
And if you’re curious about the root system that makes camellia transplanting possible in the first place, I’ve written a deeper dive into camellia roots and their relationship to soil health that might fascinate you.
Start planning your move. Your camellia is more resilient than you think—I promise.
By year two, you should see a significant improvement. My ‘Donation’ was blooming again by her second winter in the new location. She’s now more floriferous than she was before the move. That’s the reward for patience.
If your camellia is looking rough after a few months, resist the urge to dig it up and move it again. Give it at least a full year. Root systems are working underground where you can’t see them. Trust the process.
Real-World Example: Moving My Established ‘Donation’
I want to bring this all together with the story of my ‘Donation’ because it illustrates what’s possible when you do transplanting camellias correctly.
She was 15 years old, five feet tall, and four feet wide when I decided to move her. My new tea garden needed sun, and she was casting shade. I could have removed her entirely, but I couldn’t bear it. Instead, I committed to relocating her.
I waited for late October, after our first frost. I watered her deeply two days before. I pruned the top by about one-third to reduce leaf area. Then I dug. And dug. The rootball was enormous—easily three feet across and two feet deep. I rented a small mini-digger, which made the job infinitely easier. Without it, I’d have spent a full day with a spade.
I lined the burlap underneath and had three people carefully move her. The new hole was prepared with plenty of ericaceous compost. I planted her at the same depth, watered thoroughly, and mulched. Then I waited.
The next spring, she lost leaves. She looked sparse and unhappy for a solid six weeks. I watered her consistently, didn’t fertilize, and left her alone otherwise. By June, new growth was emerging. By the following winter, she was flowering again. Now, five years on, she’s thriving and blooming more heavily than ever.
Your Camellia is Ready to Move
Transplanting camellias is entirely achievable for any gardener willing to respect the timing and technique. Whether you’re moving a young plant or an established favourite, you now have the knowledge to do it right.
My advice? Pick your autumn window, prepare methodically, and trust your camellia’s resilience. Yes, shock happens. Yes, there will be a recovery period. But on the other side of that, you have a plant thriving in exactly the location you want it.
And if you’re curious about the root system that makes camellia transplanting possible in the first place, I’ve written a deeper dive into camellia roots and their relationship to soil health that might fascinate you.
Start planning your move. Your camellia is more resilient than you think—I promise.
Here’s the hardest part: patience. A transplanted camellia can take a full growing season or more to look truly happy again. Your plant might not flower in the first year after moving. That’s normal. It’s prioritizing root development over blooms—which is exactly what it should be doing.
By year two, you should see a significant improvement. My ‘Donation’ was blooming again by her second winter in the new location. She’s now more floriferous than she was before the move. That’s the reward for patience.
If your camellia is looking rough after a few months, resist the urge to dig it up and move it again. Give it at least a full year. Root systems are working underground where you can’t see them. Trust the process.
Real-World Example: Moving My Established ‘Donation’
I want to bring this all together with the story of my ‘Donation’ because it illustrates what’s possible when you do transplanting camellias correctly.
She was 15 years old, five feet tall, and four feet wide when I decided to move her. My new tea garden needed sun, and she was casting shade. I could have removed her entirely, but I couldn’t bear it. Instead, I committed to relocating her.
I waited for late October, after our first frost. I watered her deeply two days before. I pruned the top by about one-third to reduce leaf area. Then I dug. And dug. The rootball was enormous—easily three feet across and two feet deep. I rented a small mini-digger, which made the job infinitely easier. Without it, I’d have spent a full day with a spade.
I lined the burlap underneath and had three people carefully move her. The new hole was prepared with plenty of ericaceous compost. I planted her at the same depth, watered thoroughly, and mulched. Then I waited.
The next spring, she lost leaves. She looked sparse and unhappy for a solid six weeks. I watered her consistently, didn’t fertilize, and left her alone otherwise. By June, new growth was emerging. By the following winter, she was flowering again. Now, five years on, she’s thriving and blooming more heavily than ever.
Your Camellia is Ready to Move
Transplanting camellias is entirely achievable for any gardener willing to respect the timing and technique. Whether you’re moving a young plant or an established favourite, you now have the knowledge to do it right.
My advice? Pick your autumn window, prepare methodically, and trust your camellia’s resilience. Yes, shock happens. Yes, there will be a recovery period. But on the other side of that, you have a plant thriving in exactly the location you want it.
And if you’re curious about the root system that makes camellia transplanting possible in the first place, I’ve written a deeper dive into camellia roots and their relationship to soil health that might fascinate you.
Start planning your move. Your camellia is more resilient than you think—I promise.
Prompt replanting is critical. Don’t dig a camellia and leave it sitting around for days. From soil to soil should happen the same day, ideally within hours.
After planting, hold off on fertiliser for at least six months. Feeding a recovering plant puts stress on roots trying to establish. What you want is consistent moisture—not waterlogged, but not dry either. This is where that autumn–winter timing shines: natural rainfall usually keeps soil perfectly moist without you working at it.
Recovery and Patience
Here’s the hardest part: patience. A transplanted camellia can take a full growing season or more to look truly happy again. Your plant might not flower in the first year after moving. That’s normal. It’s prioritizing root development over blooms—which is exactly what it should be doing.
By year two, you should see a significant improvement. My ‘Donation’ was blooming again by her second winter in the new location. She’s now more floriferous than she was before the move. That’s the reward for patience.
If your camellia is looking rough after a few months, resist the urge to dig it up and move it again. Give it at least a full year. Root systems are working underground where you can’t see them. Trust the process.
Real-World Example: Moving My Established ‘Donation’
I want to bring this all together with the story of my ‘Donation’ because it illustrates what’s possible when you do transplanting camellias correctly.
She was 15 years old, five feet tall, and four feet wide when I decided to move her. My new tea garden needed sun, and she was casting shade. I could have removed her entirely, but I couldn’t bear it. Instead, I committed to relocating her.
I waited for late October, after our first frost. I watered her deeply two days before. I pruned the top by about one-third to reduce leaf area. Then I dug. And dug. The rootball was enormous—easily three feet across and two feet deep. I rented a small mini-digger, which made the job infinitely easier. Without it, I’d have spent a full day with a spade.
I lined the burlap underneath and had three people carefully move her. The new hole was prepared with plenty of ericaceous compost. I planted her at the same depth, watered thoroughly, and mulched. Then I waited.
The next spring, she lost leaves. She looked sparse and unhappy for a solid six weeks. I watered her consistently, didn’t fertilize, and left her alone otherwise. By June, new growth was emerging. By the following winter, she was flowering again. Now, five years on, she’s thriving and blooming more heavily than ever.
Your Camellia is Ready to Move
Transplanting camellias is entirely achievable for any gardener willing to respect the timing and technique. Whether you’re moving a young plant or an established favourite, you now have the knowledge to do it right.
My advice? Pick your autumn window, prepare methodically, and trust your camellia’s resilience. Yes, shock happens. Yes, there will be a recovery period. But on the other side of that, you have a plant thriving in exactly the location you want it.
And if you’re curious about the root system that makes camellia transplanting possible in the first place, I’ve written a deeper dive into camellia roots and their relationship to soil health that might fascinate you.
Start planning your move. Your camellia is more resilient than you think—I promise.
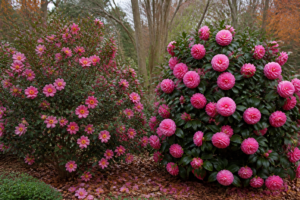
Five years ago, I made a bold decision. My beloved 15-year-old ‘Donation’ camellia—a sprawling, generous beauty with crimson blooms and a spread of four feet—was casting too much shade over my new tea garden. She needed to move. I remember standing in front of her, pruning shears in hand, wondering if I was about to kill my oldest companion. The truth? She thrived. Today, she’s flowering better than ever in her sunny new home. That experience taught me something I wish I’d known when I was starting out: transplanting camellias is not only possible—it’s often surprisingly successful if you know what you’re doing. In this guide, I’ll walk you through everything I’ve learned about moving camellias, from the best timing to the technique that’ll keep your plant healthy and happy.
Can You Move an Established Camellia? The Short Answer
Yes. Absolutely yes.
I tell this to nervous gardeners all the time. Unlike many ornamental shrubs, camellias have a fibrous root system that holds together remarkably well when dug. They don’t have a deep taproot that’ll snap, leaving you with a mutilated plant. This fibrous network means the rootball stays intact during the move, giving your camellia a fighting chance at re-establishment.
I’ve successfully moved camellias ranging from young potted specimens to established giants like my ‘Donation’. Even my friend Sarah, a gardener in zone 8b, relocated a sprawling 20-year-old ‘Yuletide’ using a mini-digger. Yes, it lost leaves. Yes, it sulked for a spring. But it’s now thriving and blooming more prolifically than it did in its old spot.
The key word here is technique. Transplanting camellias requires care, patience, and respecting a few non-negotiable rules. Rush the process or ignore the timing, and you’ll invite trouble. But do it right, and your camellia will surprise you with its resilience.
The Best Time to Transplant Camellias
Timing is everything when you’re moving a camellia. Get this right, and you’ve won half the battle.
Autumn: The Golden Window
In my experience, autumn is the best time to transplant camellias. Specifically, I’m talking about October through November, or right after the first frosts if you’re in a warmer climate.
Here’s why this works so well: the plant is entering semi-dormancy. Active growth has slowed, so the camellia isn’t demanding as much water or energy. At the same time, soil temperatures are still warm enough for roots to establish themselves. Your plant has all winter and early spring to develop new roots before summer heat arrives.
When I moved my ‘Donation’ in late October, she had nearly five months to settle in before the heat of summer. That mattered enormously. The roots grew into the new soil during cool, moist autumn and winter weather. By the time April arrived, she had enough new root development to handle the warming season.
Early Spring: A Solid Second Choice
If autumn has passed you by, early spring works too—but it’s less ideal. I’m talking about the window right after your camellia finishes flowering, before new growth begins to flush.
The advantage? You can see exactly what you’re working with. The plant is starting to wake up, which can stimulate root growth. However, the race is on. You have only a few weeks before new leaves demand water and energy from developing roots. In my zone 8a garden, this window is very narrow—late February to mid-March at best.
What to Avoid
Never transplant in summer. Heat stress combined with active growth is a recipe for failure. The plant’s leaves are transpiring heavily, the roots are struggling to re-establish, and you’re fighting Mother Nature. This is when camellia transplant shock is most severe and most likely to be fatal.
I also advise against moving a camellia while it’s in full bloom. You want the plant to focus energy on root recovery, not flower production. Wait for the flowers to fade, then move.
A UK note: If you’re gardening in the UK, late autumn and early winter are excellent windows—your milder winters actually work in your favour. Some UK gardeners report success transplanting even in mild spells in January or February when the ground isn’t frozen.
How to Prepare a Camellia for Moving
Preparation is where most gardeners stumble. I see people dig up a camellia with dry soil, and the rootball falls apart before they’ve taken ten steps. Don’t be that gardener.
Step 1: Water Deeply Two Days Before
Two days before you plan to move your camellia, give it a thorough, deep watering. I mean really soak the ground around it until the soil is moist a good 12 inches down.
Why wait two days? This allows the soil to firm up slightly while remaining moist. The water distributes evenly through the root zone. When you dig, the soil will cling to the roots and hold together better. It’s the difference between sand that crumbles and sand that packs.
Step 2: Prune the Top Growth
For mature plants, I recommend pruning back the top by about one-third right before or immediately after transplanting. This is one of my favourite moves because it directly reduces transplant shock.
Here’s the logic: while your roots are recovering and re-establishing in the new location, your leaves are still transpiring moisture. By reducing leaf area, you lower the plant’s water demand. That takes pressure off the recovering roots. When I pruned my ‘Donation’ before the move, it lost fewer leaves than it otherwise would have.
Make your cuts above a leaf node or branch junction. Use sharp, clean secateurs. This isn’t the time for a heavy structural reshape—just reduce the overall volume.
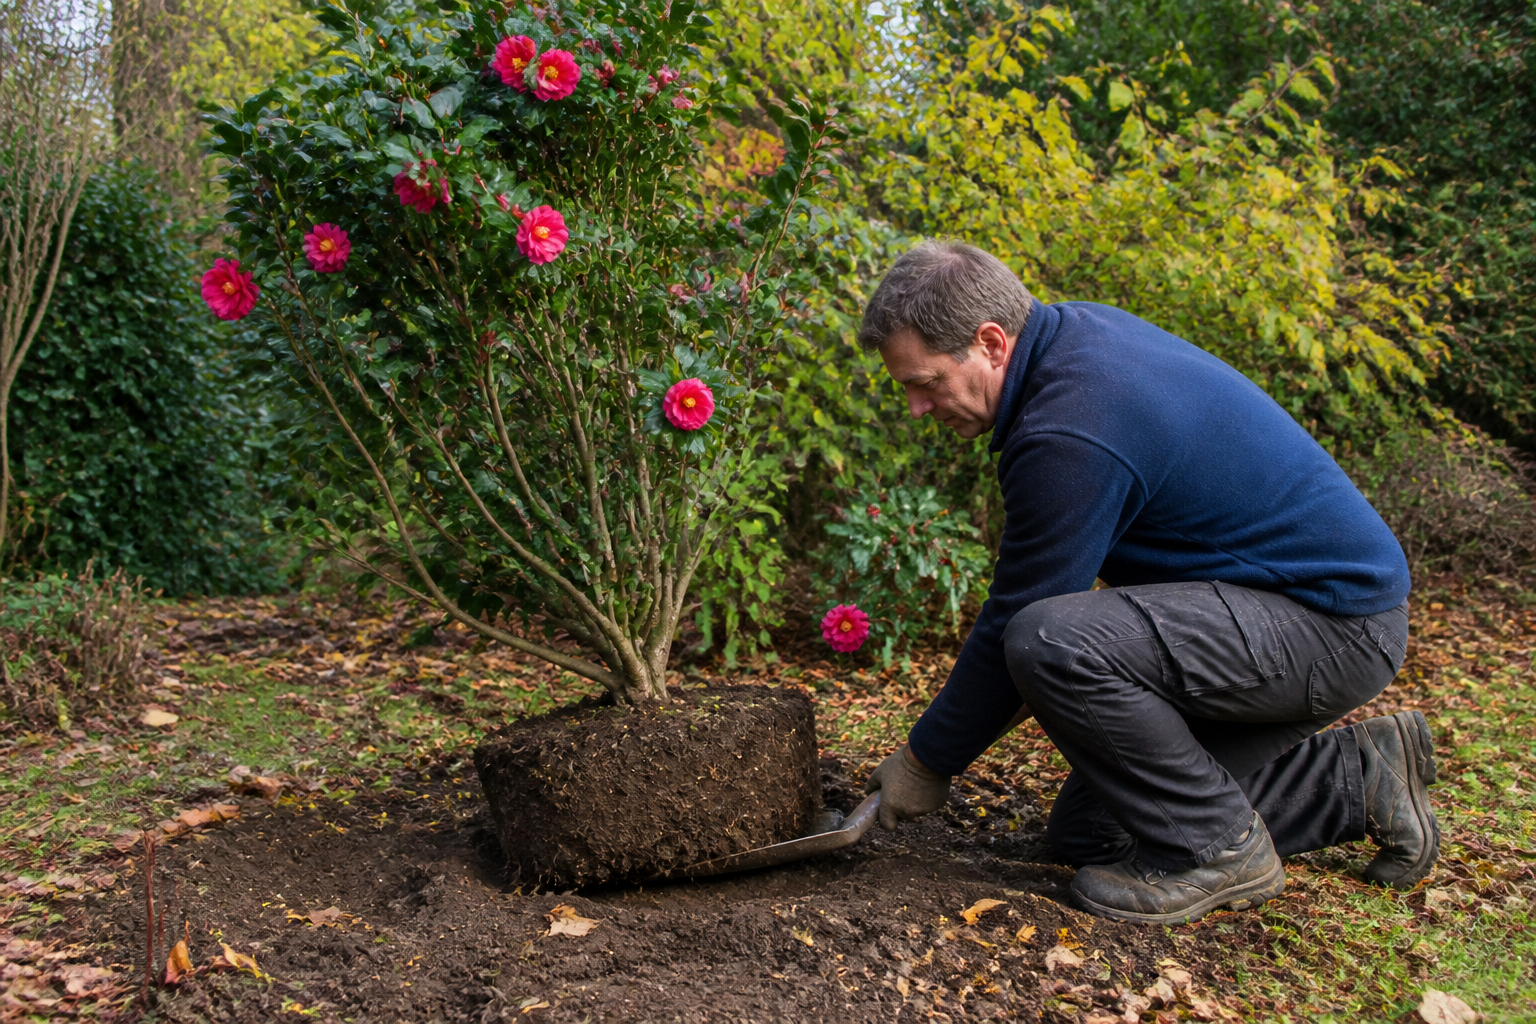
How to Dig and Move a Camellia Without Damaging the Roots
This is where the physical work happens. Take your time here. Rushing is how rootballs crumble and how you lose your plant.
The Digging Technique
Start by working in a circle at the drip line of your camellia—that’s roughly where the outer branches end. This is where most of the fibrous roots are. Don’t dig right up against the trunk. You want to give yourself plenty of buffer.
Use a sharp spade, not a blunt one. A clean cut is better than a mangled tear. Work your way slowly around the plant, driving the spade down and under the rootball. As you work, you’re severing the perimeter roots. This is necessary but handled gently.
Once you’ve cut all the way around, rock the plant gently—side to side, then forward and back. Feel where the roots are still holding. Continue working underneath until the rootball feels loose. The goal is a rootball as large and intact as possible.
For a young, 3-foot camellia, one person can manage this. For anything larger, get help. My ‘Donation’ required two of us, and we were grateful for a third set of hands when it came to moving.
Supporting the Rootball
Before you lift, slide a piece of burlap or tarpaulin under the rootball. This prevents the ball from falling apart and gives you handles to carry. For my ‘Donation’, this step was absolutely critical. The rootball was too large and heavy to lift by the trunk—which, frankly, would snap the plant anyway.
Never lift a camellia by the trunk. Ever. You’ll break branches, damage the bark, and put stress right where you don’t need it. Lift by supporting the rootball and base of the plant.
How to Plant It in Its New Location
You’ve dug it, you’ve moved it. Now comes the planting part—and this matters as much as the move itself.
Preparing the New Hole
Dig a hole that’s wider than it is deep. Camellias don’t want to sit in a deep hole; they prefer a broad planting area. The hole should be slightly wider than your rootball and roughly the same depth as the rootball itself.
Here’s a crucial point: mix plenty of organic matter into the backfill soil. I use a blend of native soil and ericaceous (acid-loving plant) compost. Camellias are acid lovers and thrive in soil with a pH between 5.0 and 6.5. Do not add lime or anything to raise pH. If you’re in an area with naturally alkaline soil, you may face challenges—but adding ericaceous compost helps mitigate this.
I typically aim for a backfill that’s about 40% ericaceous compost and 60% native soil. This gives your camellia the acidic conditions it loves while maintaining soil structure.
The Planting Depth
Plant at the same depth as before. Look for the soil mark on the trunk—that’s your guide. You can plant very slightly higher, particularly if your soil tends to stay wet, but never deeper. Planting too deep is a common mistake I’ve seen gardeners make, and it invites root rot.
Settling and Mulching
Water thoroughly to settle the soil around the roots. Don’t be gentle here—you want to eliminate air pockets. Then mulch generously with pine bark or a similar ericaceous mulch, keeping the mulch 8–10cm deep around the plant. Important: keep mulch away from the trunk itself. A gap of 5–10cm between mulch and bark prevents rot and pest issues.
If your new location is exposed or windy, stake the plant to prevent rocking. A gently moving rootball won’t establish new roots properly. One or two soft ties to a sturdy stake are usually enough.
Camellia Transplant Shock — Signs, Prevention, and Recovery
Let’s talk about the elephant in the room: transplant shock. It’s real. It’s something your camellia may experience. And it’s manageable if you know what you’re looking for.
What Does Transplant Shock Look Like?
The classic signs appear within weeks or months of transplanting. Leaf drop is common—don’t panic when it happens. Wilting, even when the soil is moist, signals that roots are struggling to keep up with the plant’s water demand. You might see yellowing leaves or a complete failure to produce new growth in spring.
My ‘Donation’ lost a significant number of leaves in her first spring after moving. She looked quite sad for about six weeks. But she didn’t wilt completely, and new growth eventually emerged. That’s a plant recovering from shock—not dying from it.
Preventing Transplant Shock
Prevention is your best defence. Good timing is step one—autumn planting dramatically reduces shock risk. Taking a large rootball matters too. The larger the root system you preserve, the better the plant can support itself in its new home.
Prompt replanting is critical. Don’t dig a camellia and leave it sitting around for days. From soil to soil should happen the same day, ideally within hours.
After planting, hold off on fertiliser for at least six months. Feeding a recovering plant puts stress on roots trying to establish. What you want is consistent moisture—not waterlogged, but not dry either. This is where that autumn–winter timing shines: natural rainfall usually keeps soil perfectly moist without you working at it.
Recovery and Patience
Here’s the hardest part: patience. A transplanted camellia can take a full growing season or more to look truly happy again. Your plant might not flower in the first year after moving. That’s normal. It’s prioritizing root development over blooms—which is exactly what it should be doing.
By year two, you should see a significant improvement. My ‘Donation’ was blooming again by her second winter in the new location. She’s now more floriferous than she was before the move. That’s the reward for patience.
If your camellia is looking rough after a few months, resist the urge to dig it up and move it again. Give it at least a full year. Root systems are working underground where you can’t see them. Trust the process.
Real-World Example: Moving My Established ‘Donation’
I want to bring this all together with the story of my ‘Donation’ because it illustrates what’s possible when you do transplanting camellias correctly.
She was 15 years old, five feet tall, and four feet wide when I decided to move her. My new tea garden needed sun, and she was casting shade. I could have removed her entirely, but I couldn’t bear it. Instead, I committed to relocating her.
I waited for late October, after our first frost. I watered her deeply two days before. I pruned the top by about one-third to reduce leaf area. Then I dug. And dug. The rootball was enormous—easily three feet across and two feet deep. I rented a small mini-digger, which made the job infinitely easier. Without it, I’d have spent a full day with a spade.
I lined the burlap underneath and had three people carefully move her. The new hole was prepared with plenty of ericaceous compost. I planted her at the same depth, watered thoroughly, and mulched. Then I waited.
The next spring, she lost leaves. She looked sparse and unhappy for a solid six weeks. I watered her consistently, didn’t fertilize, and left her alone otherwise. By June, new growth was emerging. By the following winter, she was flowering again. Now, five years on, she’s thriving and blooming more heavily than ever.
Your Camellia is Ready to Move
Transplanting camellias is entirely achievable for any gardener willing to respect the timing and technique. Whether you’re moving a young plant or an established favourite, you now have the knowledge to do it right.
My advice? Pick your autumn window, prepare methodically, and trust your camellia’s resilience. Yes, shock happens. Yes, there will be a recovery period. But on the other side of that, you have a plant thriving in exactly the location you want it.
And if you’re curious about the root system that makes camellia transplanting possible in the first place, I’ve written a deeper dive into camellia roots and their relationship to soil health that might fascinate you.
Start planning your move. Your camellia is more resilient than you think—I promise.