A few winters ago, I nearly lost my favourite container-grown camellia. She was a magnificent ‘Nuccio’s Gem’ — a formal double white Japonica I’d been nurturing in a terracotta pot for six years. One hard freeze, a forgotten layer of fleece, and a pot that drained poorly nearly finished her off. She survived, just barely. That near-disaster taught me more about growing camellias in containers than any book ever had. Since then, container camellia growing has become one of my greatest garden obsessions — and honestly, one of my greatest joys.
If you’re short on border space, gardening on a patio, or just want to move your camellias around to catch the best light, container growing is a brilliant solution. Done right, it’s incredibly rewarding. Done wrong, it’s a slow heartbreak. Let me share everything I’ve learned so your patio camellias thrive from the very first year.
Why Grow Camellias in Containers?
My garden spans three USDA hardiness zones — 7b, 8a, and 8b — across different microclimates. That variation taught me the single greatest advantage of container growing: mobility. When a cold snap threatens, I can move vulnerable plants to a sheltered spot. When a Camellia reticulata needs more warmth to set its enormous blooms, I wheel the pot to a sun-drenched corner of the patio.
Container growing also solves the problem of alkaline soil. My zone 7b beds sit over heavy clay with a pH nudging 7.2 in places. Camellias want a soil pH of 5.5 to 6.5. In the ground, correcting that alkalinity is a years-long battle. In a container, I control the soil mix completely from day one.
There’s a visual advantage, too. A well-chosen camellia in a handsome pot is a focal point, a living sculpture. My ‘Anticipation’ — a tall, upright Williamsii hybrid with deep rose peony-form blooms — sits in a slate-grey fibreglass planter by the front door from October through March. Visitors always stop to admire it. That kind of impact is hard to achieve with in-ground planting.
Choosing the Right Camellia Variety for Pot Growing
Not every camellia thrives in a pot. Variety selection is where most beginners go wrong — and where I made my own early mistakes. In my experience, the best container camellias share a few key traits: compact or slow growth, a naturally tidy habit, and reliable flowering without needing excessive root run.
Best Sasanqua Varieties for Containers
Camellia sasanqua varieties are my first recommendation for container beginners. They’re tougher, more sun-tolerant, and bloom in autumn — often from October right through December. That early season display is invaluable when the rest of the garden looks tired.
My top picks for pots include:
- ‘Plantation Pink’ — soft blush-pink single blooms, compact habit, excellent in a medium-sized pot
- ‘Setsugekka’ — large white semi-double flowers with ruffled petals, vigorous but responds beautifully to light pruning
- ‘Yuletide’ — a personal favourite, with bright red single blooms and golden stamens right at Christmas, stays neat and compact naturally
- ‘Sparkling Burgundy’ — deep ruby-pink peony-form flowers, one of the best autumn performers in my entire collection
Japonica Varieties That Shine in Pots
Camellia japonica varieties bloom later — typically February through April depending on your zone and the specific cultivar. For containers, I look for naturally compact growers. Large, spreading Japonicas can outgrow pots quickly and become difficult to manage.
Varieties I grow successfully in containers include:
- ‘Nuccio’s Gem’ — formal double white, slow and upright, stunning in a tall pot
- ‘Lady Vansittart’ — semi-double white with rose-pink stripes, compact and reliable
- ‘Kramer’s Supreme’ — vibrant turkey-red peony-form, fragrant, mid-season bloomer that holds its shape well in a container
- ‘Bob Hope’ — deep red, semi-double to formal double, an upright grower that I’ve kept beautifully contained in a large terracotta urn for four years
If you’d like a deeper dive into Japonica varieties by bloom season and colour, I covered the full range in my guide to choosing camellia varieties for your garden.
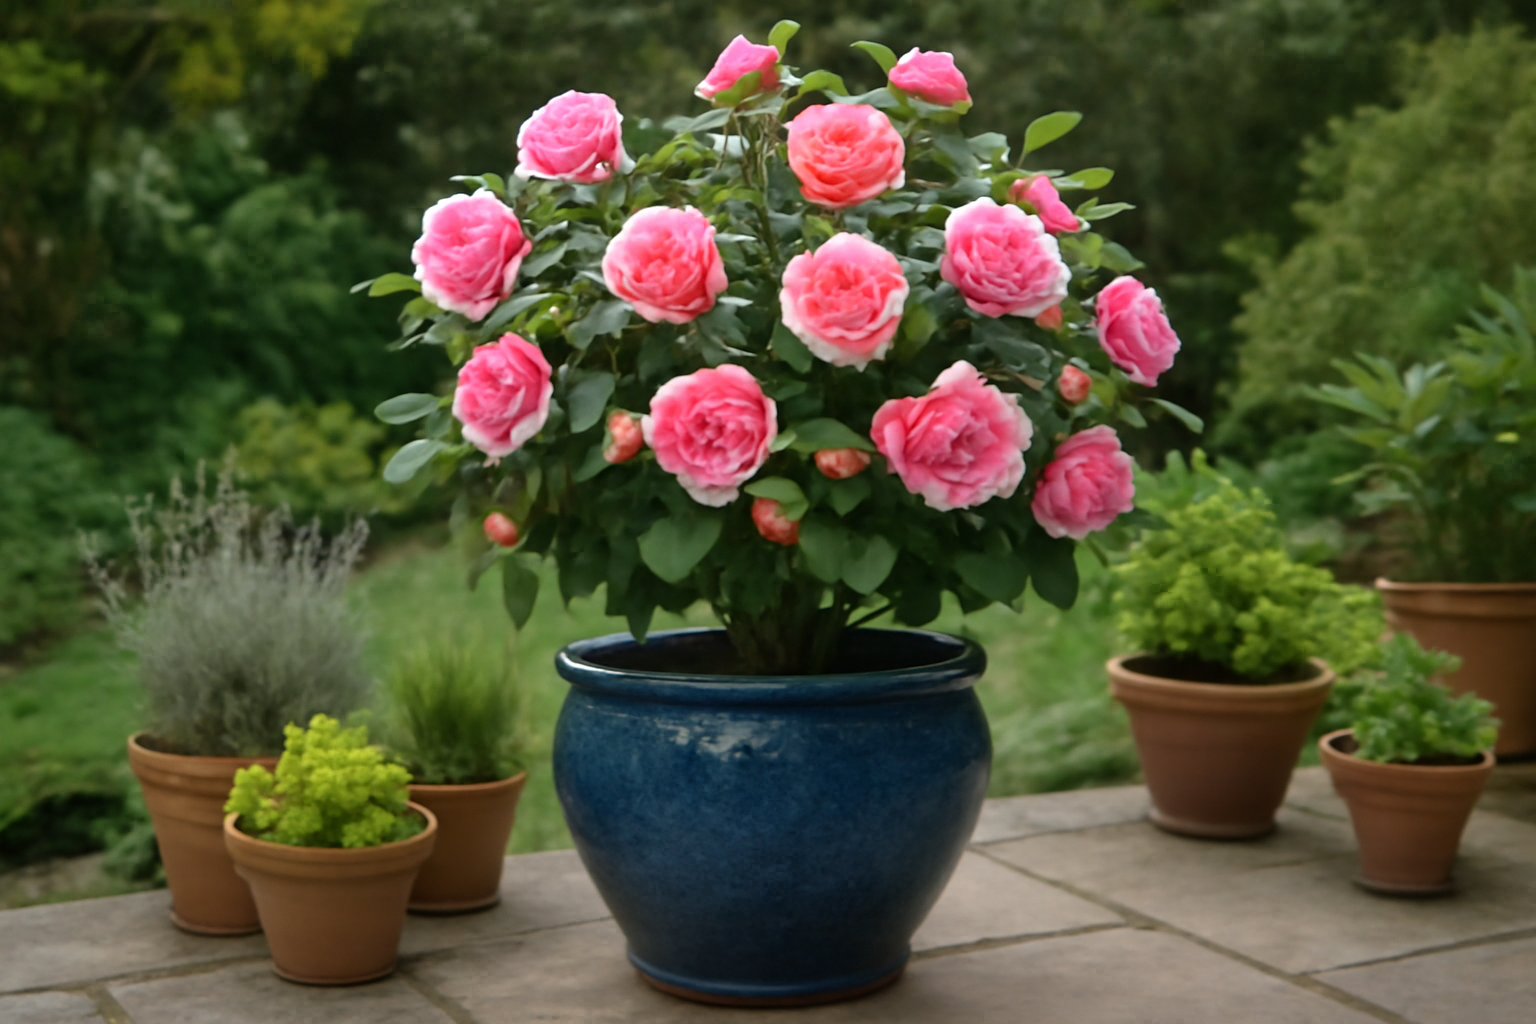
Picking the Perfect Container
Container choice matters far more than people realise. I’ve grown camellias in terracotta, fibreglass, glazed ceramic, and wooden half-barrels. Each has its trade-offs. Here’s my honest take after two decades of trial and error.
Terracotta looks beautiful and breathes well — roots stay healthier in it. However, it’s heavy, chips in hard frosts, and dries out surprisingly fast in summer. I use terracotta for my zone 8b patio where winters are mild and watering is easy to manage.
Fibreglass is my workhorse material for zone 7b. It’s lightweight, frost-proof, and comes in sizes that would be impossibly heavy in terracotta. My ‘Anticipation’ lives in a 60cm fibreglass planter I can actually move without a team of helpers.
Glazed ceramic is gorgeous but risky in colder zones. Moisture penetrates the glaze in repeated freeze-thaw cycles and the pot cracks. I lost two beautiful glazed pots to a particularly brutal January in zone 7b. That was an expensive lesson.
Size: Bigger Than You Think, But Not Too Big
Start with a pot that gives roots room to grow but isn’t excessively large. For a young camellia, I begin with a 30–35cm diameter pot. Every two to three years, I step up by one size — to 40cm, then 50cm, then eventually 60–65cm for a mature specimen.
Oversized pots hold too much moisture around young roots. As a result, root rot becomes a real risk — especially over winter. Drainage holes are non-negotiable. I always add at least two extra holes to any pot before planting.
The Soil Mix That Makes or Breaks Container Camellias
This is where I see the most mistakes — and where getting it right makes the biggest difference. Camellias need a free-draining, acidic growing medium. Standard multipurpose compost is almost always the wrong choice. It’s often too rich, breaks down too quickly, and can be poorly draining.
My go-to container mix is:
- 50% ericaceous compost (pH 4.5–5.5)
- 30% fine bark chips or perlite for drainage
- 20% leaf mould or composted pine bark
This blend holds enough moisture for the roots while draining freely enough to prevent waterlogging. The finished mix sits at a pH of roughly 5.5 to 6.0 — right in the sweet spot for camellias. I check pH annually with a simple soil test kit and top-dress with sulphur chips if it creeps upward.
One mistake I made for years: using rainwater only inconsistently. Tap water in many areas is alkaline — pH 7.5 or higher in my part of zone 8a. Over time, repeated watering with alkaline tap water raises the pot’s soil pH noticeably. Now I collect rainwater religiously, and use it exclusively on my container camellias. The difference in leaf colour and vigour is remarkable.
Watering, Feeding, and Seasonal Care
Container camellias are entirely dependent on you for water and nutrients. The pot has no reservoir to draw from, no surrounding soil to buffer extremes. That means consistent attention — especially through summer.
Watering Through the Seasons
From late spring through early autumn, I water my container camellias every two to three days during dry spells. In peak summer heat, daily watering is sometimes necessary. However, I always check the top 5cm of compost before watering. If it’s still damp, I wait. Overwatering kills more container camellias than drought does.
In winter, watering drops significantly — but never stops entirely. Camellias in pots can suffer from winter drought, especially under overhanging eaves where rain doesn’t reach. I check my pots every ten days through winter and water if the compost is dry more than 3cm down.
Feeding for Healthy Growth and Maximum Blooms
I feed my container camellias three times a year. Specifically, my schedule looks like this:
- Early spring (March–April): a balanced ericaceous slow-release fertiliser to fuel new growth after winter
- Early summer (June): a second application of slow-release feed to support bud development for next season
- Midsummer (July–August): a liquid ericaceous feed, lower in nitrogen, higher in potassium, to harden new growth and strengthen buds
I stop all feeding by the end of August. Feeding too late in the season encourages soft new growth that’s highly vulnerable to autumn and winter frost damage. For Sasanqua varieties, which set buds much earlier, I pull back on feeding by mid-July.
Pruning and Repotting Container Camellias
Container camellias need occasional shaping to stay attractive and manageable. On the other hand, they’re not heavy pruning subjects — less is very much more with camellias. I prune lightly immediately after flowering finishes. For Japonicas, that’s typically April or May. For Sasanquas, it’s December or January.
I remove any crossing branches, trim back overly long shoots by one-third, and tidy the silhouette. That’s usually all a container camellia needs in a given year. I cover pruning techniques in much more detail in my post on how and when to prune camellias — worth a read before you pick up the secateurs.
When and How to Repot
Repot every two to three years, or when you see roots emerging from the drainage holes. Spring — just after flowering — is the ideal time. I always move up just one pot size. Going too large in one step increases the risk of waterlogging.
When I repot, I gently tease away the outer inch of old root ball, refresh the compost mix completely, and firm the plant in at the same depth as before. I never bury the trunk deeper — that invites collar rot. After repotting, I water thoroughly and keep the plant out of direct sun for two weeks while it settles.
Winter Protection for Container Camellias
This is where container growing demands the most attention — especially in zones 7b and 8a. The roots of container plants are surrounded by pot walls, not insulating soil. As a result, they’re far more vulnerable to hard freezes than in-ground camellias of the same variety.
My approach depends on severity. For light frosts (down to about 25°F / -4°C), I wrap pots in bubble wrap or hessian and move them against a sheltered wall. For harder freezes, I move vulnerable plants into an unheated greenhouse or garage. Camellia reticulata varieties — the most frost-sensitive in my collection — always come inside well before the first frost warning.
Sasanqua varieties are generally hardier in their roots, and I’m more relaxed about leaving ‘Yuletide’ or ‘Sparkling