I almost lost my ‘Nuccio’s Gem’ to camellia root rot — and I didn’t even know it was happening until the damage was done. That’s the cruel thing about this disease. By the time you notice something is wrong above ground, the roots have often been struggling for weeks, sometimes months. I’ve been growing camellias for over twenty years across three USDA zones, and root rot remains one of the most heartbreaking problems I encounter. The good news? If you catch it early enough, you can save your plant.
What Is Camellia Root Rot?
Root rot in camellias is most commonly caused by Phytophthora cinnamomi, a water mould (not a true fungus) that thrives in waterlogged, poorly draining soil. It attacks the fine feeder roots first, then works its way inward. Eventually, the plant simply can’t absorb water or nutrients, no matter how much you give it.
A secondary culprit is Pythium species, which behaves similarly and often appears in the same conditions. In my experience, the two are nearly impossible to tell apart without laboratory testing. For practical garden purposes, you treat them the same way.
Both pathogens are soil-borne. They produce spores that move through water — which is exactly why overwatering and poor drainage are your biggest risk factors. Camellias are woodland plants by nature. They want consistent moisture, but their roots absolutely must breathe.
Signs and Symptoms to Watch For
The above-ground symptoms are frustratingly vague. That said, there’s a specific pattern that I’ve learned to recognise after years of watching my collection closely.
Early Warning Signs
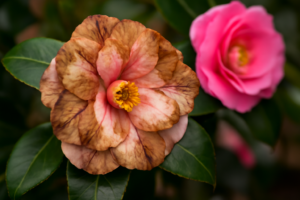
- Pale, yellowing foliage that doesn’t respond to feeding
- Leaves that look slightly wilted even after watering
- Unusually small or sparse new growth in spring
- Flower buds dropping before they open
- Gradual dieback starting at the branch tips
I once had a gorgeous ‘Survivor’ Sasanqua that started dropping buds in October — right at the beginning of her bloom season. My first instinct was to blame cold damage. However, when I checked the soil around the root zone, it was sodden. That was the real culprit.
How to Check the Roots Directly
If you suspect something is wrong, gently dig down a few inches near the drip line of the plant. Healthy camellia roots are firm, white, and slightly tan. Rotted roots are brown to black, soft, and they may smell musty or sour.
On younger or container-grown plants, you can carefully tip the pot and examine the root ball directly. I do this every autumn for any new acquisitions before they go into the ground. It takes two minutes and has saved several plants over the years.
For established in-ground shrubs, scrape a small section of bark from a low stem or surface root. Healthy tissue beneath the bark is green or cream. Discoloured, brown, or water-soaked tissue is a serious sign of Phytophthora activity.
Why Camellias Get Root Rot: The Real Causes
Understanding the cause matters because it changes your entire treatment approach. Root rot doesn’t just “happen.” Specific conditions create it, and those conditions are usually within your control.
Poor Drainage Is the Primary Culprit
Camellias planted in heavy clay soils are at constant risk. Water sits around the roots rather than draining through. The root zone becomes anaerobic, oxygen disappears, and Phytophthora spores — which are already present in most garden soils — suddenly have ideal conditions to proliferate.
In my Zone 8a garden in particular, I have a low-lying section that holds water after heavy rain. For years I planted camellias there anyway and lost several. Specifically, I lost a beautiful ‘Professor Charles S. Sargent’ japonica that I’d grown for seven years. That was a painful lesson I won’t repeat.
Soil pH Out of Range
Camellias thrive at a soil pH of 5.5 to 6.5. Outside that range, nutrient uptake is impaired even in otherwise healthy soil. As a result, stressed plants become more vulnerable to pathogen attack. I test every planting area before putting a camellia in the ground — it’s non-negotiable for me.
Alkaline soil above pH 7.0 is particularly risky. It can cause iron and manganese deficiencies that mimic root rot symptoms on the surface. However, the underlying issue is different, and the solution is different too. Always test before treating.
Planting Too Deep
This is the mistake I see most often in other gardeners’ collections. Camellias should be planted with the top of the root ball slightly above the surrounding soil level. Planting even two inches too deep can trap moisture around the crown and create exactly the warm, wet conditions that root rot pathogens love.
Many nurseries sell camellias in deep containers, and the temptation is to match that depth when transplanting. Resist it. The crown of the plant — that transition zone between trunk and roots — needs air circulation, not burial.
How to Treat and Save an Affected Camellia
I won’t sugarcoat this: severe root rot is often fatal. However, plants caught in the early to middle stages can frequently be saved with the right intervention. Here is exactly what I do when I suspect root rot in my garden.
Step 1: Improve Drainage Immediately
Stop watering until you assess the situation. If the plant is in a container, remove it from any saucers or trays that hold standing water. For in-ground plants, check whether you can improve surface drainage away from the root zone by reshaping the surrounding soil.
In serious cases, I dig the plant up entirely. This gives me access to the root ball and lets me address the soil conditions directly. Yes, it’s stressful for the plant — but leaving it in a waterlogged site is more dangerous than the transplant shock.
Step 2: Prune Away Diseased Roots
Once you have access to the root ball, prune off all visibly rotted roots with clean, sharp secateurs. Cut back to healthy white tissue. Disinfect your cutting tools between cuts using a 10% bleach solution or 70% isopropyl alcohol — this prevents spreading the pathogen further.
Don’t be timid. Leaving even small sections of rotted root gives the pathogen somewhere to continue spreading. Remove everything that looks compromised, then rinse the remaining healthy roots gently with clean water.
Step 3: Apply a Phosphonate Fungicide
Phosphonate-based products (sold under names like Agri-Fos or Aliette) are the most effective treatments for Phytophthora-related root rot. They work systemically, moving through the plant’s tissue and suppressing the pathogen. They’re not a cure in the traditional sense — rather, they help the plant fight back from within.
Apply as a soil drench according to the product label. Timing matters. I treat in early spring before growth flushes, and again in early autumn. For a badly affected plant, I may add a foliar spray as well, since phosphonates are absorbed through leaves too.
Note: standard copper fungicides have limited effect on Phytophthora. I made that mistake early on, treating the wrong disease with the wrong product and wondering why nothing improved.
Step 4: Replant in Amended Soil
If you’re replanting in the same location, amend the soil thoroughly first. I incorporate aged pine bark fines, coarse horticultural grit, and compost to open up clay-heavy beds. This improves drainage and creates the loose, oxygen-rich root environment that camellias genuinely love.
Raise the planting level if possible. In my low-lying Zone 8a bed, I now build raised mounds about 8 to 10 inches high before planting. My ‘Shishi Gashira’ Sasanquas in that section have thrived for six years since I made that change.
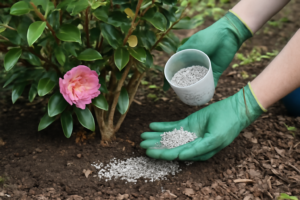
For pH correction, work granular sulphur into alkaline soils several weeks before replanting. For strongly acidic soils below pH 5.5, add agricultural lime carefully and retest before proceeding.
Step 5: Reduce the Top Growth to Match Root Loss
This step is one many gardeners overlook. When you prune diseased roots, you reduce the plant’s ability to take up water and nutrients. The top growth needs to be reduced proportionally so the remaining roots can support it.
I prune back affected plants by roughly a third, focusing on removing weak, crossing, or overcrowded branches. If you’d like more detail on the pruning process itself, I wrote about pruning camellias for health and shape in a separate post on this site.
Preventing Root Rot in Camellias: Long-Term Strategies
Prevention is genuinely easier than treatment. Once I restructured my approach around drainage and planting technique, my losses dropped dramatically across all three of my growing zones.
Site Selection Matters More Than Anything
Choose a site with natural drainage before you plant anything. Do the simple jar test: dig a hole 12 inches deep, fill it with water, and watch how quickly it drains. If water is still sitting there after two hours, drainage is a problem that needs addressing before planting.
Dappled shade is ideal for most camellias — particularly japonicas like ‘Elegans’ or large reticulata hybrids like ‘Howard Asper’. Full sun dries out moisture too quickly in summer; deep shade creates lingering damp that encourages pathogens. On the other hand, a few hours of morning sun with afternoon shade is close to perfect.
Mulch Wisely, Not Deeply
A 2 to 3 inch layer of pine bark or wood chip mulch helps regulate soil moisture beautifully. However, pulling that mulch right up against the trunk creates a moist, poorly ventilated collar zone — exactly where you don’t want it. Keep mulch at least 3 to 4 inches away from the main stem.
I refresh my mulch every spring, pulling old material back before adding new. This also gives me a chance to inspect the crown and surface roots visually — a quick check that has caught problems early on more than one occasion.
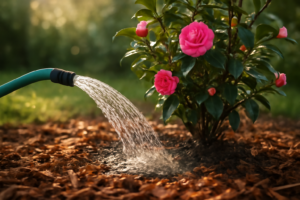
Water Deeply and Infrequently
Deep, infrequent watering encourages roots to grow downward into the soil profile rather than staying shallow and vulnerable at the surface. For established camellias, I water deeply once or twice a week in dry summer periods rather than a little every day.
Drip irrigation is my preferred method. It delivers water directly to the root zone without wetting the crown or foliage. For container camellias, I always check soil moisture before watering — the top inch should be dry to the touch before you add more.
Final Thoughts on Camellia Root Rot
Camellia root rot is serious, but it’s not a death sentence if you act quickly and correctly. The plants that have survived root rot in my garden — including a ‘Debutante’ japonica I genuinely thought I’d lost — came back stronger once the drainage issues were fixed and the soil conditions were right.
The core lesson, after twenty years and over two hundred camellias, is this: most root rot problems are drainage problems wearing a disease costume. Fix the drainage, adjust the soil, plant at the correct depth, and you remove the conditions that let pathogens take hold in the first place.
Check your plants this week. Look at the soil around your most valued specimens — your ‘April Kiss’, your ‘Yuletide’, your prized ret