Last spring, I walked out to check on my ‘Donation’ camellia — a gorgeous Williamsii hybrid I’ve babied for six years in my Zone 8a garden — and stopped dead in my tracks. Half the leaves had turned a sickly, washed-out yellow overnight. My stomach dropped. I’d seen camellia leaves turning yellow before, but never so suddenly, and never on a plant I loved that much. The good news? I figured out the cause within a week. The better news? Every single cause of yellowing camellia leaves is fixable once you know what you’re dealing with.
Over twenty years of growing camellias — including japonicas, sasanquas, reticulatas, and everything in between — I’ve seen yellowing leaves caused by at least seven distinct problems. Some are urgent. Others are completely normal. In this guide, I’ll walk you through each one, share what worked for me, and give you a clear action step so you can get your camellia looking green and healthy again.
Is It Always a Problem When Camellia Leaves Turn Yellow?
Honestly, not always. That surprises people. Camellias are technically evergreen, but they do shed older leaves — typically in spring or early summer. When this happens, the oldest interior leaves yellow and drop quietly. Meanwhile, fresh growth pushes out from the tips.
I see this every year on my ‘Kramer’s Supreme’ japonica and my ‘Setsugekka’ sasanqua. A handful of yellowed leaves on the interior of the plant in May? Perfectly normal. Yellowing on new growth, on outer leaves, or across the whole canopy? That’s when I start investigating.
7 Causes of Camellia Leaves Turning Yellow (And Exactly How to Fix Them)
1. Wrong Soil pH — The Most Common Culprit
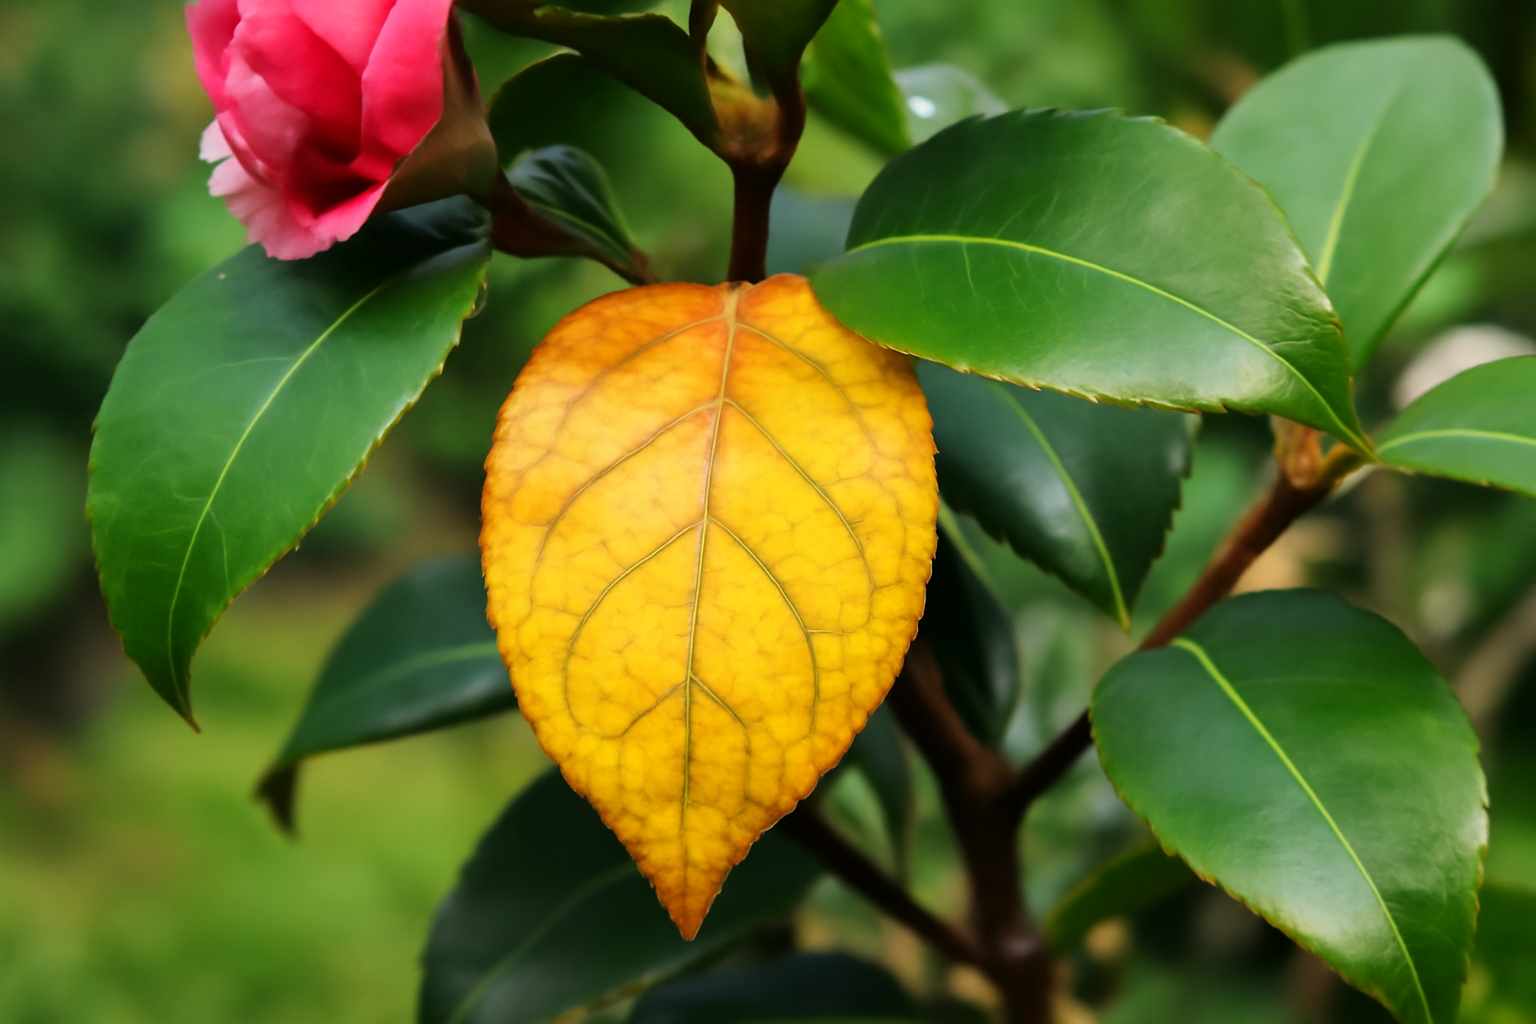
This is the big one. Camellias are acid-loving plants that thrive in soil with a pH between 5.5 and 6.5. When pH creeps above that range, iron and manganese become chemically unavailable to the plant — even if those nutrients are physically present in the soil. The result is interveinal chlorosis: leaves turn yellow while the veins stay green.
I learned this the hard way when I planted a ‘Nuccio’s Gem’ japonica near a concrete foundation in my Zone 7b garden. Lime leaching from the concrete pushed the soil pH above 7.0. That poor plant looked terrible for two full seasons before I figured out why.
How to fix it: Test your soil first — don’t guess. I use a basic mail-in test from my local cooperative extension office. If pH is too high, work elemental sulfur into the soil around the drip line. For a faster fix, apply chelated iron as a foliar spray or soil drench. Going forward, mulch with pine bark or pine needles, which acidify naturally as they break down.
2. Overwatering and Root Rot
Yellowing that’s paired with soft, mushy stems or a general look of wilting-despite-wet-soil often points to root rot. Phytophthora cinnamomi is the main fungal culprit, and it thrives in waterlogged conditions. Camellias need moisture, but they absolutely require well-draining soil.
In my experience, container-grown camellias are most vulnerable. I lost a ‘Doctor Clifford Parks’ reticulata hybrid to root rot several years ago because I had it in a pot with poor drainage holes and watered it on a rigid schedule rather than checking the soil first.
How to fix it: Let the soil dry out slightly between waterings. Stick your finger two inches into the soil — if it’s still damp, wait. For in-ground plants, improve drainage by amending with coarse perlite or pine bark. If root rot has already set in, remove the plant, trim away black or mushy roots, and repot or replant into fresh, well-draining mix. A phosphonate-based drench can help suppress Phytophthora.
3. Underwatering and Drought Stress
On the opposite end, drought stress causes yellowing too — usually starting on the leaf edges and tips before spreading inward. In my Zone 8b beds, summer heat can be brutal. Sasanquas handle it better than japonicas, but even tough cultivars like ‘Yuletide’ will protest in extended dry spells.
How to fix it: Water deeply and infrequently rather than shallowly and often. I aim for about an inch of water per week during dry periods, applied slowly at the root zone. A 3-inch layer of mulch around the base (keeping it away from the trunk) makes a huge difference in moisture retention through summer.
4. Iron Deficiency (Chlorosis)
This one is closely related to pH issues but can also occur independently — for example, in camellias planted in heavy clay that restricts root function. The telltale sign is bright yellow leaves with distinctly green veins, especially on new growth at the branch tips.
I noticed this specifically on a young ‘Midnight Magic’ japonica I’d planted in a clay-heavy section of my Zone 8a garden. The new spring leaves were almost lime green. That vivid interveinal pattern is a classic iron chlorosis calling card.
How to fix it: Apply chelated iron — it remains available to plant roots across a wider pH range than standard iron sulfate. Spray the foliage directly for a quick response, then follow up with a soil drench. Longer term, work on improving soil structure with organic matter and confirm your pH is within the 5.5–6.5 sweet spot.
5. Too Much Direct Sun
Camellias are woodland plants by nature. Most japonicas and reticulatas prefer dappled shade or morning sun with afternoon protection, especially in warmer zones. Too much direct afternoon sun leads to leaf scorch and yellowing — often combined with a bleached, papery look.
That said, sasanquas are more sun-tolerant. My ‘Sparkling Burgundy’ handles full sun in Zone 8b without much complaint. However, even she looks stressed during the peak heat of July if I don’t keep her well watered.
How to fix it: If sun exposure is the problem, shade cloth provides immediate relief during summer. Long-term, consider planting a small deciduous tree to the south or west to filter afternoon sun. Alternatively, relocate the camellia — yes, it’s extra work, but camellias transplant surprisingly well when handled carefully. I’ve moved established plants successfully in late fall.
6. Nitrogen Deficiency
A general, overall yellowing that starts on older leaves and moves toward new growth often signals nitrogen deficiency. Unlike iron chlorosis, the entire leaf tends to yellow uniformly — veins and all. This usually happens after heavy rain leaches nutrients from sandy soil, or when a camellia has been neglected fertilizer-wise for a few seasons.
How to fix it: Feed with an acid-formulated fertilizer designed for camellias, azaleas, and rhododendrons. I use a slow-release granular formula in early spring, right after bloom finishes on my japonicas (typically March in Zone 8a). For a faster response, a liquid fertilizer can perk things up within a couple of weeks. Avoid feeding after July — late fertilizing pushes tender new growth that’s vulnerable to cold damage.
I wrote more about fertilizing timing and product choices in my complete camellia fertilizing guide, if you want to go deeper on this topic.
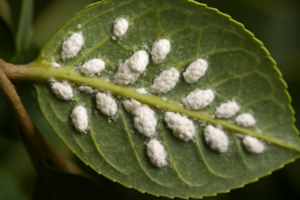
7. Pest Damage — Especially Scale Insects
Scale insects are sneaky. They attach themselves to stems and the undersides of leaves, sucking sap quietly until the plant shows stress — often as general yellowing, sticky residue (honeydew), or sooty mold growing on that honeydew. I find tea scale most frequently on my japonica collection.
Spider mites can cause a similar stippled, faded yellowing, particularly during hot, dry weather. Turn a leaf over and look for tiny webbing or moving dots — that’s your confirmation.
How to fix it: For scale, horticultural oil applied in late winter (before new growth emerges) is my go-to. It smothers overwintering insects effectively. For active infestations, a summer oil spray works too — but avoid spraying in temperatures above 90°F or you’ll cause oil burn. For spider mites, a strong blast of water disrupts colonies fast. Repeat every few days. In severe cases, insecticidal soap or a miticide does the job.
How to Diagnose Yellowing Leaves Quickly: My Simple Process
When I spot a problem, I work through a quick mental checklist before reaching for any product. Here’s exactly what I ask myself:
- Where is the yellowing? Interior old leaves = probably natural shedding. New growth at tips = more serious.
- What does the pattern look like? Green veins with yellow between = iron/pH issue. Uniform yellow = nitrogen deficiency or overwatering.
- What’s the soil doing? Soggy = overwatering or drainage problem. Bone dry = drought stress.
- What’s under the leaves? Check for scale, mites, or sticky residue before assuming a nutrient issue.
- When did I last test my soil pH? If the answer is “never” or “years ago,” that’s my first step.
This process takes five minutes. Honestly, it saves hours of frustration and money spent on the wrong fix.
A Note on Timing: When Yellowing Is an Emergency vs. When It Can Wait
Not all yellowing is urgent. Seasonal leaf drop in spring? Let it happen. A few yellow leaves on an otherwise vigorous ‘April Kiss’ or ‘Winter’s Star’ sasanqua? Monitor it for a week before panicking.
However, rapid widespread yellowing — especially combined with wilting, brown patches, or visible pests — needs immediate attention. Root rot in particular can kill a camellia quickly if left unchecked. Don’t wait on that one.
In Zone 7b, I also watch for cold damage in late winter causing yellowing on exposed tips. That’s different from a nutritional or pest issue, and the fix is simply patience — let the plant push new growth as temperatures warm. I covered cold protection strategies in detail in my post on protecting camellias in winter.
Final Thoughts on Camellia Leaves Turning Yellow
Camellia leaves turning yellow is one of the most common concerns I hear from fellow growers — and one of the most solvable. In almost every case, the plant is telling you something specific. Your job is to read the clues carefully before jumping to a solution.
Start with soil pH. It’s the root cause of more problems than anything else in my garden. A simple soil test costs less than ten dollars and gives you real data to work with. From there, check your watering habits, inspect for pests, and look at your sun exposure. Work through the list methodically.
My ‘Donation’ camellia, by the way? The culprit turned out to be a combination of pH creep and scale insects I hadn’t noticed building up over winter. Two rounds of horticultural oil and a soil acidification treatment later, she’s back to her gorgeous, glossy self. If she can bounce back, yours can too.
Your action step for today: Go outside, pull one yellowed leaf from your camellia, and look at it closely. Note where the yellowing sits, whether the veins are green or yellow, and check the underside for pests. That one observation will point you toward the right answer faster than anything else I can tell you.