
When Roots Run Deep: What My Grandmother’s Camellia Taught Me About Transplanting
My grandmother’s camellia wasn’t just a plant. It was thirty years of November mornings, quiet cups of tea, and a garden she’d built from nothing. So when the landlord’s sale threatened to leave it behind, we refused to abandon it without a fight.
—
Understanding What You’re Moving Before You Dig
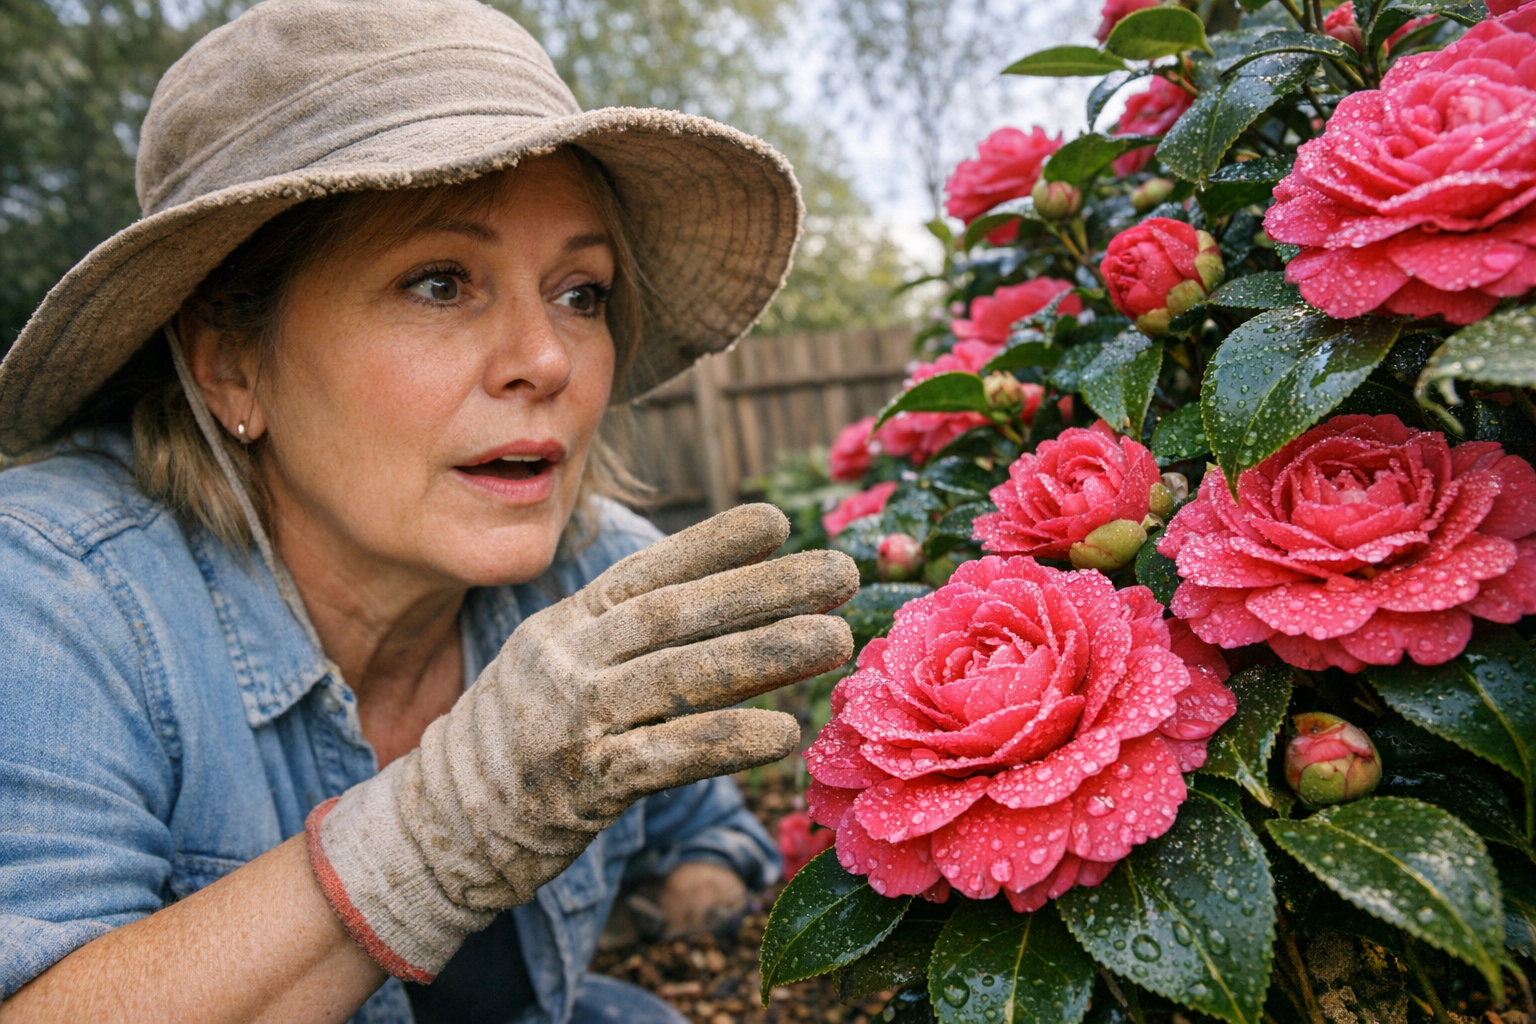
First, therefore, know what you’re dealing with. A mature camellia bush — especially one thirty or more years old — develops an enormous, complex root system. Ours stood nearly eight feet tall with a canopy spread of six feet. That’s not a shrub you casually lift on a Saturday afternoon.
Before digging, assess: – Source Overall height and spread — larger plants need larger root balls – Trunk diameter at the base — a rough guide to root ball size – Soil condition — compacted clay holds differently than loose loam – Current bloom status — camellias in full bloom are under stress
Consequently, understanding the plant’s size helps you plan realistically. We underestimated ours badly, and we paid for it in sore backs and broken tools.
—
Timing: Why November Is Both Terrible and Forgiving
November seems counterintuitive for transplanting. However, late autumn and early winter are actually among the better windows for moving camellias in many climates. The plant is slowing its growth cycle, reducing transplant shock significantly.
Ideal transplanting conditions include:
- Soil temperatures between 40°F and 60°F
- Overcast skies rather than harsh direct sun
- No hard freeze forecast for at least two to three weeks
- Recent rainfall to soften ground naturally
That gray November morning, ironically, worked in our favor. Overcast skies meant the plant wasn’t losing moisture rapidly through its glossy leaves. A neighbor once told me her camellia survived a November move only because a cloudy week followed — never underestimate weather timing.
—
Root Pruning: The Step Most People Skip Entirely
Had we known then what I know now, we would have root-pruned that camellia weeks earlier. Root pruning involves cutting a circle around the plant’s drip line with a sharp spade, several inches deep. This encourages the plant to develop compact feeder roots closer to the trunk.
Root pruning benefits:
- Reduces transplant shock dramatically
- Encourages new root growth within a manageable ball
- Gives the plant time to adjust before full removal
Ideally, therefore, root prune four to six weeks before the planned move. We had no such luxury that November. We simply dug, hoped, and sweated.
—
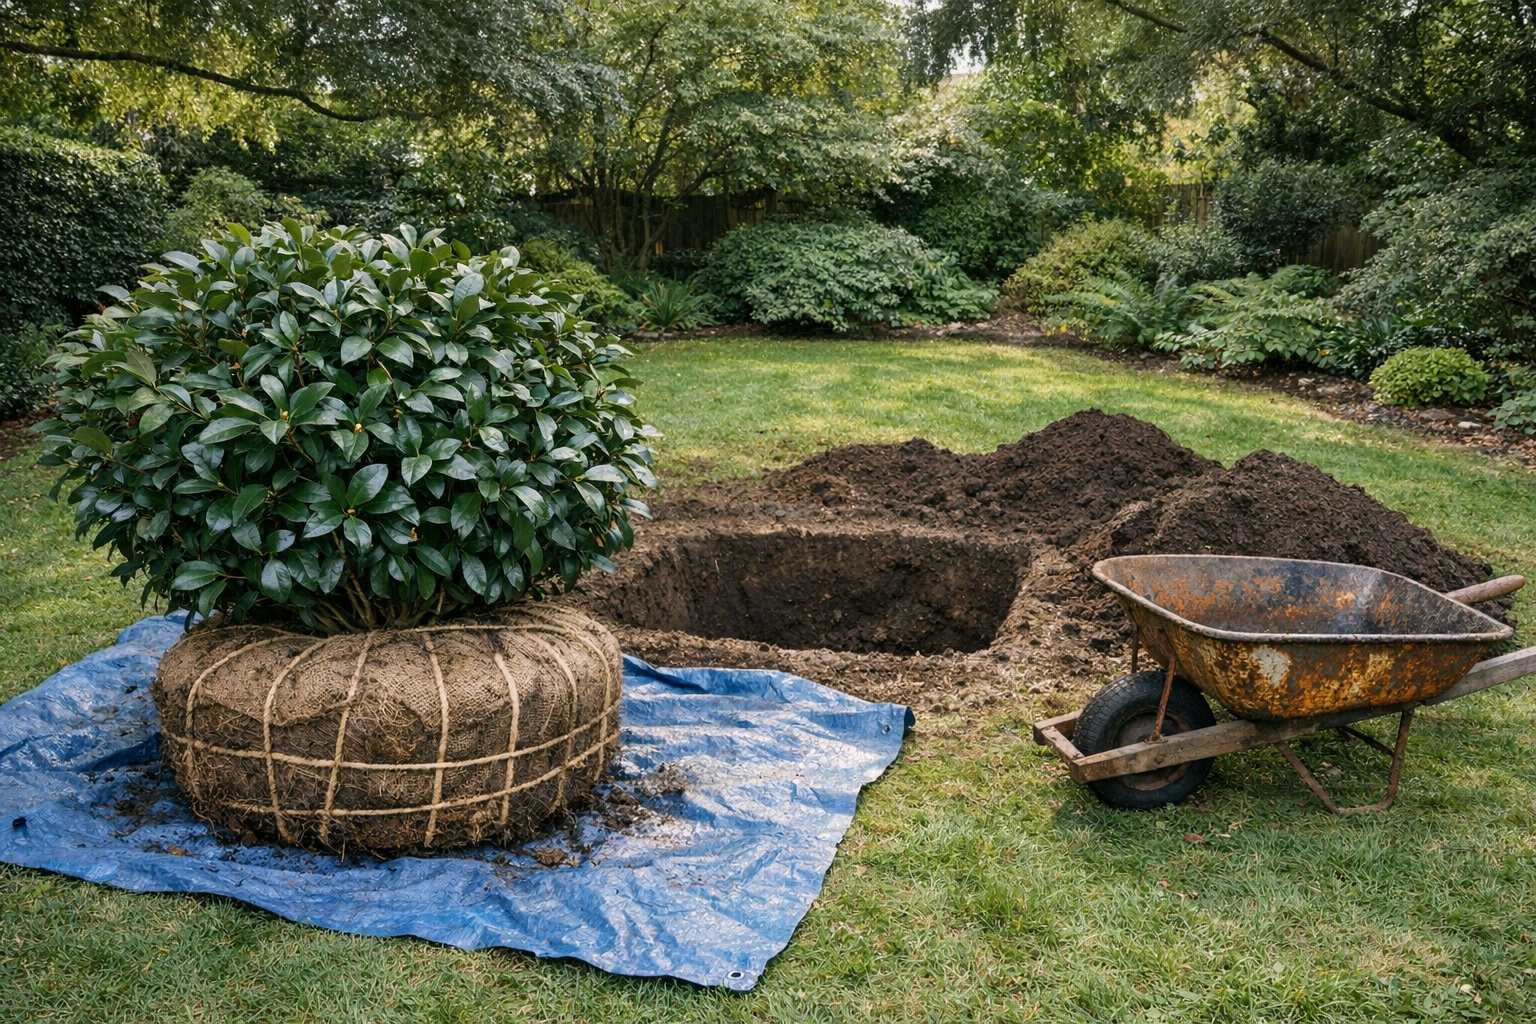
Digging the Root Ball: Patience Over Speed
This is where most transplanting attempts fail. People dig too close, too shallow, and too fast. For a mature camellia, start your trench at least 18 to 24 inches from the trunk, depending on its size. Dig down gradually, working in a circle rather than attacking one side.
Essential tools for large camellias:
- Sharp, long-handled spade
- Pruning saw for thick roots
- Heavy burlap or a tarp for wrapping
- Strong rope or twine to secure the ball
Moreover, expect to encounter thick anchor roots. Cut them cleanly rather than tearing — torn roots invite disease and slow recovery. My grandmother held the branches back while I dug. We worked slowly, pausing often, which was exactly right.
—
Wrapping and Moving Without Destroying Your Work
Once freed, the root ball must be wrapped immediately. Exposed roots dry out within minutes in wind or sun. Slide burlap beneath the ball carefully, then wrap and tie it securely. The burlap can remain on during replanting — it decomposes naturally in soil.
For heavy root balls: The Garden Helper – Camellia Care Guide – Use a hand truck or garden cart – Recruit at least two strong helpers – Never carry by the trunk — always support the root ball – Move the shortest possible distance before replanting
We dragged ours on a tarp across the lawn to my waiting car. It was undignified but effective. The camellia, fortunately, seemed unbothered by the indignity.
—
Preparing the New Planting Hole Correctly
The new hole should be wider than deep — roughly two to three times the root ball’s width but only as deep as the ball itself. Camellias planted too deeply suffocate and decline slowly. The top of the root ball should sit slightly above the surrounding soil grade.
Soil preparation matters enormously:
- Camellias prefer acidic soil, Transplanting Camellias – American Camellia Society pH between 5.5 and 6.5
- Amend heavy clay with compost and coarse grit
- Avoid adding fertilizer at planting — it burns stressed roots
- Mulch generously, keeping mulch away from the trunk
Additionally, water the hole before placing the plant. A muddy hole helps roots make immediate contact with surrounding soil, reducing air pockets significantly.
—
Post-Transplant Care: The Months That Determine Everything
Survival isn’t guaranteed at planting. The following six months determine whether your camellia truly recovers. Water deeply and consistently, especially during dry spells, but avoid waterlogging the roots.
First-year care checklist:
- Water deeply once or twice weekly, depending on rainfall
- Watch for wilting or leaf drop — early stress signals
- Avoid heavy pruning for at least one full growing season
- Do not fertilize until new growth appears confidently
- Stake only if wind is a genuine concern
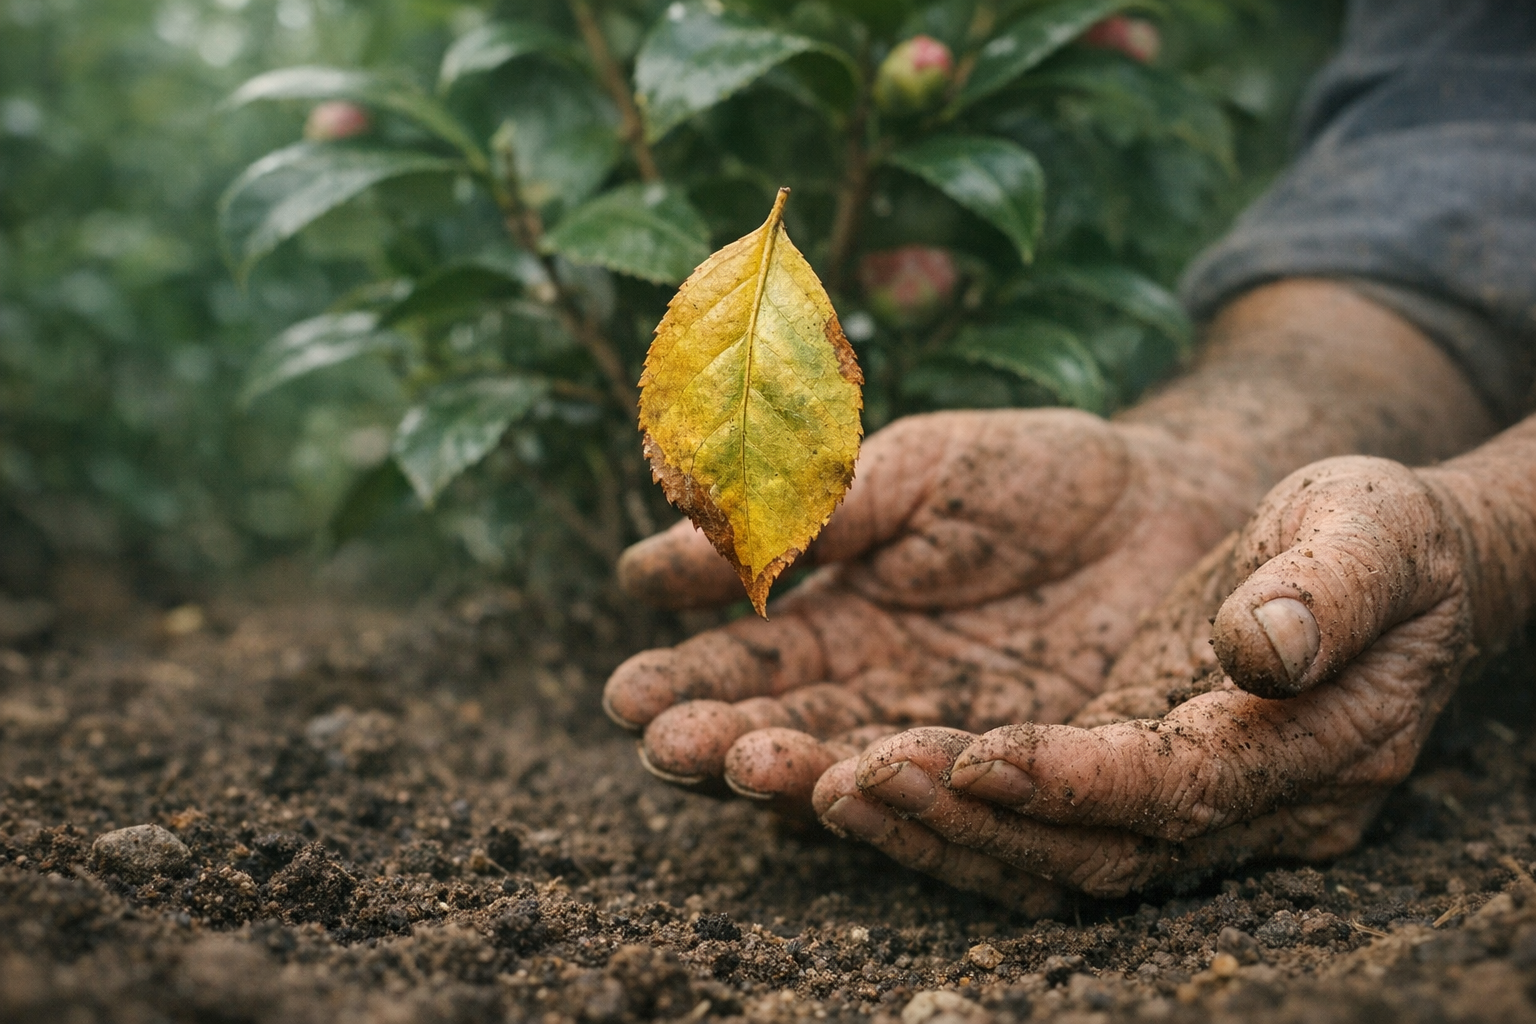
Furthermore, don’t panic if the plant drops some leaves or looks sullen through winter. Camellias are stubborn survivors. They sulk, then they recover.
—
What Happened to My Grandmother’s Camellia
We replanted it in a large pot that day, roots wrapped in burlap, watered thoroughly, and drove it three hours home. It sat on her new apartment balcony looking deeply unimpressed for nearly four months. Then, in early March, it pushed out a single pink bloom. My grandmother cried. So, honestly, did I.
That one bloom confirmed what experienced gardeners already know: Camellia Forest Garden – Garden Visit, like stubborn old roots, don’t give up easily. They simply need time, patience, and someone willing to do the hard work of moving them somewhere they can keep growing.
Moving a mature camellia feels impossible at first glance. These plants develop deep, spreading root systems over decades. However, with the right timing, the right tools, and a little respect for the plant’s biology, transplanting a mature camellia is absolutely achievable. This guide walks you through every step.
Why Timing Is Everything
Camellias are tough, but they’re not invincible. Transplanting at the wrong time stresses the plant severely and can trigger leaf drop, root failure, or even death. Fortunately, camellias give you a clear window of opportunity.
The Dormant Season Advantage
Late fall through early spring is the ideal transplanting window for camellias. American Camellia Society – Transplanting Camellias Source During dormancy, the plant directs minimal energy toward leaf and flower production. Therefore, it can focus its resources on recovering from root disturbance.
Aim for a day when temperatures sit between 40°F and 60°F. Avoid transplanting during a hard freeze or during a summer heat wave. Additionally, try to move your camellia on an overcast day — direct sun stresses freshly dug roots almost immediately.
In warmer climates like the American Southeast or Pacific Coast, late January through February works beautifully. Meanwhile, gardeners in cooler zones should target early spring, just before new growth begins pushing through.
Preparing the New Location First
Never dig up your Camellia Forest Garden – Visit North Carolina before the new site is ready. This is the single most common mistake transplanting gardeners make. Every extra minute the root ball sits exposed increases stress on the plant.
Soil Requirements
Camellias demand well-draining, acidic Source soil with a pH between 5.5 and 6.5. Test your soil before digging anything. If your pH runs high, work in sulfur or acidic compost several weeks in advance.
Successfully transplanting a large Camellia Growing Guide – University of Florida IFAS Extension begins with meticulous site preparation. Initially, prepare a generously wide new planting site. Excavate the hole two to three times the anticipated width of your camellia’s root ball. This ample space allows roots to easily expand into loosened soil, establishing quickly. For example, a four-foot wide camellia probably needs a two-foot root ball. So, target a four to six-foot wide hole. Crucially, maintain a depth equal to the root ball’s height. The root flare, where the trunk naturally widens, must sit precisely at ground level. Planting too deeply restricts vital oxygen flow and invites fungal diseases.
Next, enhance your native soil with specific amendments. Blend it with an equal part of acidic compost or aged pine bark. Camellias thrive in acidic conditions, ideally between pH 5.5 and 6.5. Good choices include peat moss, well-rotted oak leaf mold, or fine pine bark fines. These additions improve drainage and provide essential organic matter. Moreover, this careful mixing prevents a sharp soil interface. Roots often hesitate to cross abrupt changes in soil texture or moisture retention. A gradual transition encourages robust new root development, ensuring your camellia establishes strong connections. My grandmother always said, “Patience is the best fertilizer.” This rings true when transplanting; give your camellia time to settle.
Choose a location with morning sun and afternoon shade. Camellia – Gardening Solutions – University of Florida thrive with bright, indirect light — too much harsh afternoon sun scorches their leaves and stresses transplanted specimens especially hard.
Excavating the Root Ball
Now comes the physical work — and it’s genuinely hard. How to Transplant a Camellia Bush – The Garden Helper A mature camellia with a trunk diameter of two inches or more will have a root ball weighing anywhere from 50 to 200 pounds. Plan accordingly.
Tools You’ll Need
Gather these tools before you start:
- A sharp, long-handled How to Transplant a Camellia Bush spade – A pruning saw for severing thick roots – A garden fork for loosening soil – Heavy burlap or a tarp for wrapping and transporting – A wheelbarrow or garden cart – A helper — this is not a solo job
The Digging Process
Start by drawing an imaginary circle around the plant. Source For a camellia with a two-inch trunk, that means a minimum 24-inch radius circle.
Push your spade straight down along this circle, cutting cleanly through roots. Transplanting Established Trees and Shrubs – University of Minnesota Extension Work your way around the entire perimeter before attempting to lift anything. Cutting roots in sections is far better than ripping them — clean cuts heal faster and resist disease more effectively.
Freeing the Root Ball: Digging Deep and Working Smart
Once you’ve scored the perimeter, the real work begins underneath. Angle your spade at roughly 45 degrees, driving it inward and beneath the root ball. This undercut is crucial — it severs the deepest anchor roots cleanly.
Work systematically from all sides, not just one angle. Push, rock, and repeat. Consequently, the root ball loosens gradually rather than tearing suddenly.
—
Using a Garden Fork Effectively
Switch to a garden fork for the final separation. How to Transplant Camellias – The Garden Helper Its tines slide between compacted soil and roots without slicing them. Gently pry in short, controlled movements.
- Work around the entire base
- Avoid aggressive levering
- Pause frequently to assess resistance
Furthermore, compacted clay soil may require patient, repeated passes before releasing its grip.
—
Pruning Problem Roots on the Spot
Additionally, inspect every exposed root carefully. Look for:
- Circling roots — these strangle growth over time
- Damaged or crushed roots — they invite disease
- Dead, brittle roots — they offer zero value
Trim these cleanly with sharp bypass pruners. A clean cut heals faster than a ragged tear. Moreover, removing compromised roots actually encourages healthy new growth in the transplant location.
My neighbor Margaret always said, “Cut the bad roots without guilt — you’re giving the plant a fresh start, not punishing it.”
—
Why This Step Matters Long-Term
Skipping root pruning is a common mistake. Therefore, transplanted camellias sometimes struggle despite perfect soil and watering. Circling roots continue their damaging pattern underground, unseen.
Healthy root architecture equals a thriving camellia. Taking ten extra minutes during extraction pays dividends for decades. After all, a mature camellia can live well over 100 years — it deserves a clean foundation.
Tip the root ball gently onto its side. Slide your burlap underneath, then roll the ball back onto the burlap. Wrap it firmly, tying the burlap with twine to keep the root ball intact during transport. A crumbling root ball is a Transplanting Camellias – The Spruce disaster — keep it as solid as possible.
Planting in the New Site
Move quickly once the plant is excavated. Every minute counts for exposed roots.
Placement and Depth
Lower the root ball carefully into the prepared hole. Source Check that the top of the root ball sits at or very slightly above the surrounding soil grade. Planting too deep is the number one cause of camellia decline after transplanting.
Remove or cut away the burlap once the plant is positioned. Natural burlap eventually decomposes, but synthetic burlap will strangle roots permanently — always remove it entirely.
Backfill with your amended soil mixture, firming it gently in layers to eliminate air pockets. Avoid stomping heavily — you’ll compact the soil and damage the roots you just worked so hard to preserve.
Watering In
Water deeply and slowly immediately after planting. Use a slow trickle from your hose for twenty to thirty minutes, allowing water to penetrate the entire root zone. Then water again the following day. For the first growing season, your camellia needs consistent moisture — never soggy, never bone dry.
Build a shallow ring of soil around the planting area to create a watering basin. This directs water straight to the root zone rather than running off. Additionally, apply three to four inches of pine bark mulch over the root zone, keeping it away from the trunk itself.
Post-Transplant Care
Your camellia will likely sulk for a while. Expect some leaf drop, yellowing, or a lack of blooms in the first season — this is normal and not a death sentence.
Camellia Culture Guide – American Camellia Society
Feeding and Monitoring
Hold off on fertilizing for the first three months. Pushing new top growth before the roots establish themselves creates dangerous imbalance. After that initial period, apply a slow-release fertilizer formulated specifically for acid-loving plants like Camellia Care Guide – American Camellia Society, azaleas, and rhododendrons.
Watch for signs of stress — wilting despite moist soil, significant leaf drop, or bark discoloration at the base. However, don’t overreact to minor leaf loss in the first few weeks. Camellias are resilient plants. Given proper conditions, most established specimens recover fully within one to two growing seasons.
Prune sparingly in the first year. Remove only dead or damaged branches — let the plant direct its energy toward root development rather than healing pruning wounds simultaneously.
Bringing It Home
My grandmother’s camellia survived that November transplant. It took nearly a full year before it bloomed again, but when it did — fat, pink flowers in February, against the white wall of her new apartment’s garden — she cried a little. So did I.
Moving a mature camellia is more than gardening; it’s an intricate act of preservation. This significant undertaking consequently demands meticulous planning and a deep respect for the plant’s long history. Success hinges on strategic timing and understanding the camellia’s unique requirements.
Strategic Timing and Site Preparation
Ideally, schedule your transplant during the camellia’s dormant period, typically from late fall to early spring. This timing significantly reduces transplant shock. Before any digging begins, prepare the new site. Dig a wide, shallow hole, ensuring excellent drainage. Furthermore, amend the soil with acidic organic matter, creating an inviting environment for new root growth.
Excavating the Root Ball
The root ball’s size is paramount. Aim for a diameter roughly 12 inches for every inch of the trunk’s diameter. Carefully dig around the drip line, preserving as many fine feeder roots as possible. Use a sharp spade to make clean cuts; ragged edges invite disease. Additionally, gently undercut the root ball, preparing it for careful lifting.
Gentle Moving and Planting
Moving the weighty root ball requires careful handling. Utilize a sturdy tarp or plant dolly to prevent damage during transport. Position the camellia at its original depth in the new hole. Subsequently, backfill with amended soil, gently firming to eliminate air pockets. Water thoroughly to settle the soil around the roots.
Post-Transplant Nurturing
Immediate, deep watering is absolutely critical. Thereafter, maintain consistent soil moisture, yet avoid waterlogging. Apply a generous layer of acidic mulch; this retains moisture and regulates soil temperature. For larger specimens, temporary staking might be necessary. Expect a gradual recovery; full re-establishment can take one to two years.
The Enduring Reward
Ultimately, a successfully relocated camellia bush offers unparalleled beauty and a profound sense of continuity. It stands as a living testament to patience and care. My grandmother always said, “A camellia isn’t just a plant; it’s a promise to the future, rooted in the past.” This enduring legacy makes every effort worthwhile.
If you’re planning to move a mature camellia or any large established shrub, having the right supplies on hand before you start digging will save you enormous frustration and help protect the plant through the entire process. Using proper camellia plant transplanting burlap is one of the most important steps you can take, as it keeps the root ball intact and moist during the move, giving your plant the best possible chance of survival. A quality long handled spade makes all the difference when you’re trying to cut cleanly through compacted soil and dense roots without damaging the plant’s delicate feeder roots in the process. For older camellias with thick, woody roots that a regular spade simply won’t cut through cleanly, a sharp pruning heavy duty saw allows you to make precise, clean cuts that heal much faster than jagged tears. Once you’ve wrapped the root ball in burlap, having sturdy garden twine rope on hand lets you secure the wrapping tightly so nothing shifts or loosens during transport, which is especially critical for tall plants that are top-heavy and prone to rocking. After replanting, applying a generous dose of root stimulator transplant solution directly to the root zone encourages the plant to push out new feeder roots quickly and helps it recover from the inevitable shock of being uprooted. Spreading a heavy duty garden tarp beneath the plant before you begin digging gives you a clean surface to pile excavated soil onto, making it far easier to backfill the hole neatly and avoid losing valuable topsoil across the lawn. If you run short of burlap during the wrapping process, having an extra roll of burlap fabric roll available means you won’t have to stop mid-job and risk leaving the exposed roots drying out in cold autumn air while you search for more material. Checking the soil temperature with a reliable soil thermometer garden tool before you begin is genuinely useful, because camellias transplant most successfully when the ground is cool but not frozen, and knowing your exact soil temperature helps you time the move with confidence. Spraying the foliage thoroughly with an anti-transpirant plant spray just before transplanting creates a protective coating on the leaves that dramatically reduces moisture loss while the plant is establishing its new root connections in unfamiliar soil. Finally, mixing mycorrhizal root inoculant into the backfill soil introduces beneficial fungi that form a symbiotic relationship with the camellia’s roots, significantly improving nutrient and water uptake and giving a thirty-year-old plant like my grandmother’s the extra support it needs to thrive in its new home for decades to come.
*As an Amazon Associate, I earn from qualifying purchases.